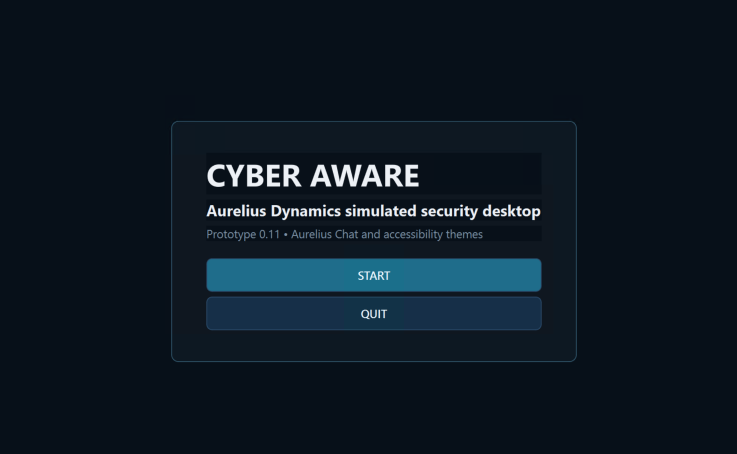
A first look at Cyber Aware, the working title for a Red Team / Blue Team educational game currently in development at Wolf Interactive
For a while now, I’ve been thinking about how cyber security is taught.
We can explain phishing. We can demonstrate logs. We can talk about authentication, compromised accounts, suspicious activity and incident response. We can give learners scenarios and ask them what they think should happen next.
But there is a big difference between being told that a decision has consequences and actually having to make that decision while other things are happening around you.
That thought eventually turned into a game project.
Its current working title is Cyber Aware.
The idea is to create a single-player educational cyber security game where learners don’t simply answer questions about an incident.
They experience one.
Cyber Aware is currently being developed as a Python/PySide6 desktop prototype, with Red Team and Blue Team experiences built around the same underlying cyber incidents.
A game first, not a worksheet wearing a costume
One of the earliest design rules for the project was that it needed to actually feel like a game.
I didn’t want to build something where a fictional company gets “hacked”, a paragraph appears describing what happened, and the learner is presented with:
What should you do?
A) Reset the password B) Investigate the endpoint C) Ignore it D) Panic dramatically
That can test knowledge, but it doesn’t necessarily recreate the reasoning involved in dealing with an incident.
Instead, I wanted the player to be given incomplete information and the tools required to investigate it.
The player needs to decide what matters.
And sometimes they will be wrong.
That’s important.
Making the wrong decision and then seeing the consequences can be considerably more memorable than being told that Option B was worth one mark.
Welcome to Aurelius Dynamics
The first scenario currently being developed is Corporate Espionage.
It takes place inside a fictional Australian technology and engineering company called Aurelius Dynamics.
For the Blue Team experience, the player effectively becomes part of the company’s IT/security operation.
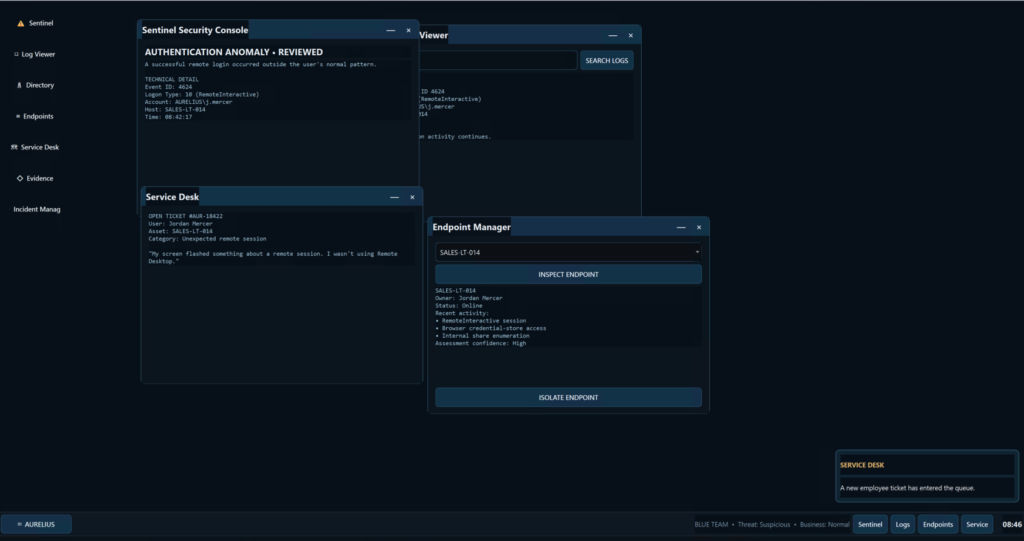
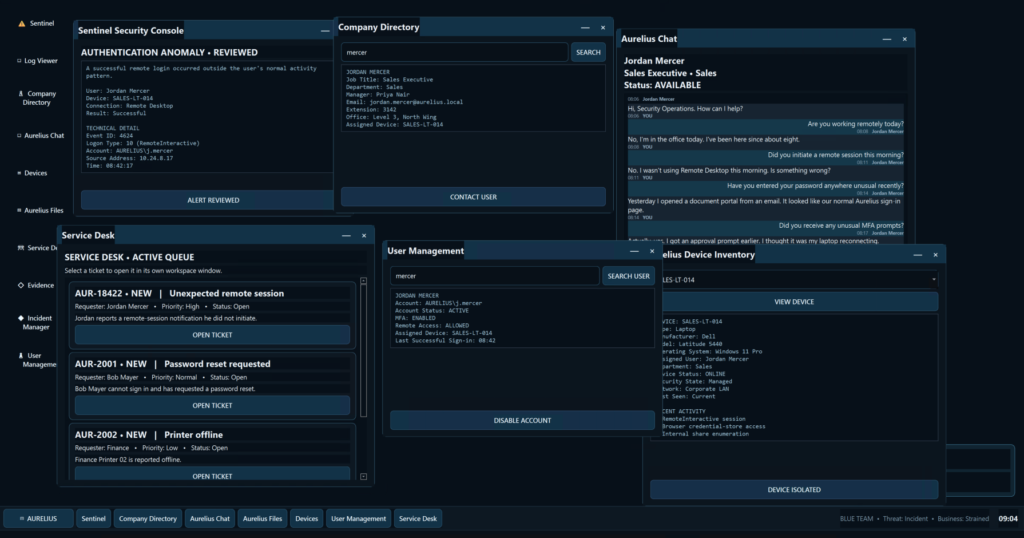
Instead of displaying traditional game choices, the prototype presents the player with a simulated Aurelius corporate workstation.
The Blue Team player’s main gameplay environment is a simulated Aurelius Dynamics corporate workstation.
The workstation currently contains applications including:
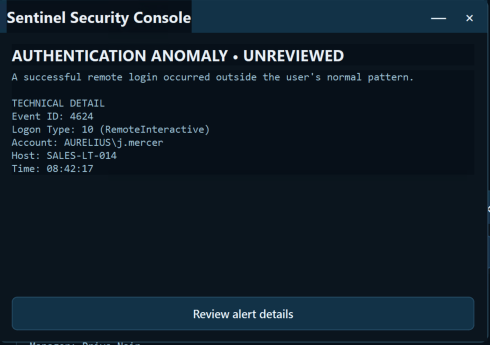
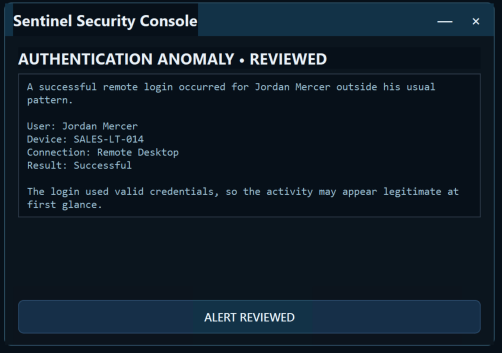
Sentinel Security Console
Log Viewer
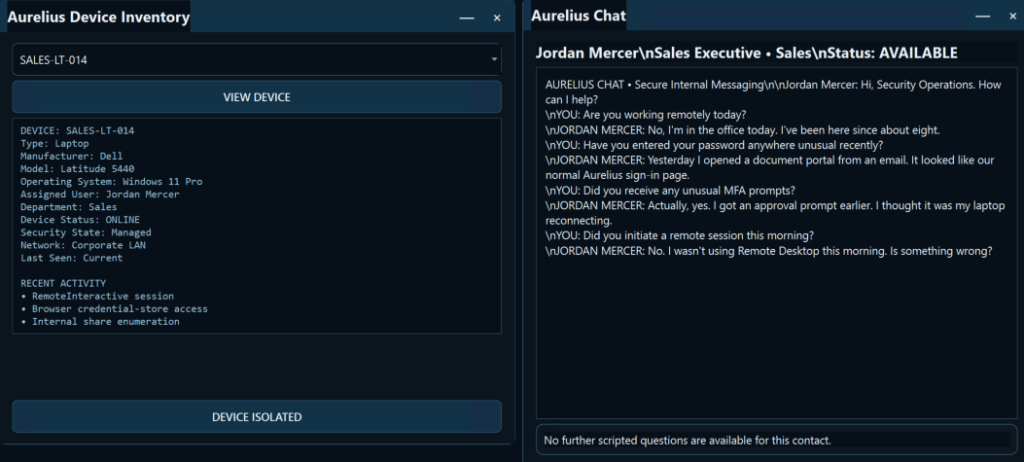
Endpoint Manager
Corporate Directory
User Management
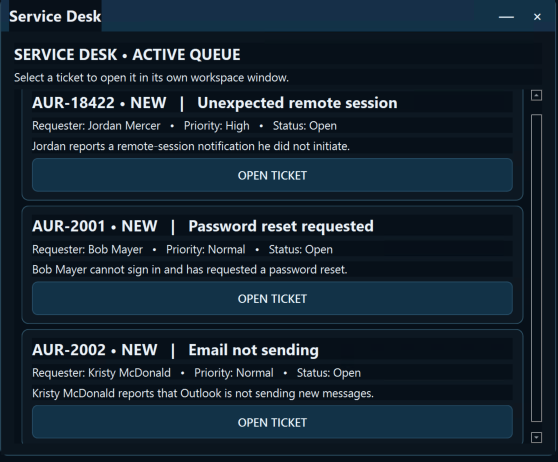
Service Desk
Evidence Locker
Incident Manager
These aren’t intended to perfectly reproduce particular commercial security products.
They are fictional tools designed around recognizable concepts and workflows.
The important part is what the player does with them.
An alert appearing in Sentinel doesn’t necessarily tell you exactly what happened.
You might need to identify the user involved.
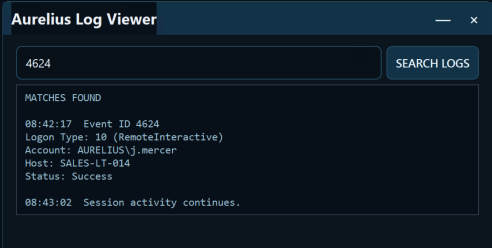
You might search authentication records.
You might inspect their workstation.
Another piece of evidence might appear completely unrelated until you connect it with something you found earlier.
Eventually, you have to decide whether there is actually an incident and what you’re going to do about it.
Sentinel provides information, not the solution. The learner still needs to determine what the alert means and whether further investigation is justified.
The company doesn’t stop because you’re investigating an incident
This became one of my favourite parts of the design.
Aurelius Dynamics isn’t supposed to feel like an empty network waiting for the player to save it.
It’s a company.
People are working.
Someone can’t access their account.
Someone has an email problem.
A workstation isn’t behaving properly.
A Service Desk ticket arrives.
Another employee needs something.
Meanwhile, somewhere underneath that ordinary activity, the actual security incident continues developing.
Not everything happening during a cyber incident is part of the cyber incident. Routine Service Desk activity creates operational noise and forces the player to prioritise.
That creates an interesting educational problem.
Do you investigate everything?
Do you delegate routine work?
Do you ignore a ticket because you’re concentrating on an alert?
What if the ticket that looked routine actually contained useful evidence?
And what did the attacker do while you spent twenty simulated minutes investigating a printer?
The game uses a simulated working clock, so actions can consume time and the incident can continue developing while the player investigates.
The objective isn’t to make learners click as quickly as possible.
It’s to make time itself part of the decision.
Sometimes the safest technical decision isn’t the best response
Cyber security also doesn’t exist separately from the organisation it protects.
Imagine discovering suspicious activity on an important corporate system.
The obvious response might be:
Isolate it.
Great.
Threat contained.
Except that system was supporting an important business process and you’ve just taken it offline.
People begin calling.
Work stops.
Management wants to know what’s happening.
Someone might even try to work around the restriction you’ve put in place.
The player therefore has to consider both security risk and business impact.
Business Impact progresses through qualitative states:
Normal → Strained → Disrupted → Critical
There isn’t a giant percentage bar saying Aurelius is currently 63% annoyed with you.
The player sees the consequences through the environment.
Containment actions change the state of the simulated environment. On harder difficulties, some actions can also be reversed, forcing the learner to consider the consequences of reconnecting or re-enabling something.
A technically successful containment can still be a poor incident response if it unnecessarily cripples the organisation.
Likewise, keeping everybody happy while an attacker wanders through the network isn’t exactly a career highlight.
The interesting learning happens between those extremes.
Difficulty isn’t just “the enemies have more health”
Another area I’ve been working on is the difficulty system.
Because this is an educational game, I didn’t want difficulty to simply mean making everything faster or punishing beginners for not already knowing the material.
There are currently three planned difficulty levels:
Introductory
This is designed for learners who may have limited cyber security experience.
Indicators are clearer, guidance is stronger, fewer competing pressures occur simultaneously and mistakes are generally more forgiving.
The learner still has to investigate and make decisions, but the game provides more scaffolding around that process.
Standard
Standard begins removing some of those training wheels.
Information becomes more ambiguous, competing priorities become more significant and the player needs to correlate more of the evidence themselves.
Containment and recovery decisions can also become more consequential.
Advanced
Advanced is intended for learners who are comfortable working with less guidance.
Signals can be noisier, resources and time matter more, multiple events can compete for attention and poor decisions can create chained consequences later in the incident.
The underlying incident can therefore feel very different even though the player is working inside the same fictional organisation.
But difficulty is only one half of that system.
How much technical information do you want to see?
One of the problems with designing a cyber security game for education is that learners can enter with wildly different levels of technical experience.
One learner might understand:
Windows Security Event 4624, Logon Type 10
Another might reasonably respond:
…what?
I didn’t want the solution to be removing authentic technical information.
I also didn’t want beginners to need a Windows Event ID reference sheet just to understand what the game was trying to teach them.
So the project separates Difficulty from something called Experience Mode.
Difficulty controls how demanding the incident is.
Experience Mode controls how that incident is presented to the player.
There are currently three modes.
Game Mode
Game Mode translates technical information into more immediately understandable language.
Instead of expecting the learner to already recognise every event, protocol or security term, the interface provides the important meaning in accessible language.
The underlying incident hasn’t changed.
Only the presentation has.
This allows somebody with relatively little technical experience to participate in the same investigation and begin developing the reasoning behind incident response.
Game Mode translates technical evidence into accessible information while preserving the underlying event.
Hybrid Mode
Hybrid is currently the intended default.
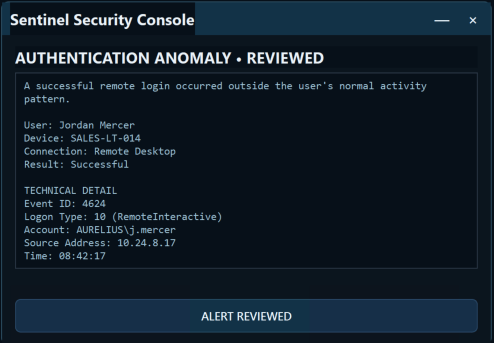
This mode gives the learner an understandable explanation but also allows them to inspect the more authentic technical evidence underneath it.
For example, the player might be told that a particular authentication event represents an interactive remote login.
But they can also inspect the fictional Windows-style event and begin recognizing the terminology, event structure and information that produced that interpretation.
Hybrid Mode acts as a bridge between game-readable information and recognizable real-world technical artifacts.
Educationally, this is probably the mode I’m most interested in.
The game isn’t simply telling the learner:
Remember that Event ID X means Y.
Instead, they repeatedly encounter technical evidence in context.
Eventually the scaffolding can disappear.
Authentic Mode
Authentic Mode removes much of that translation.
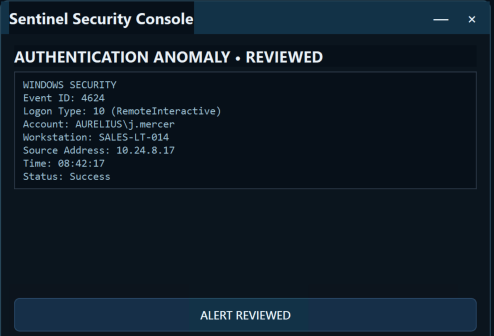
The player receives realistic but completely fictionalized logs, alerts, terminology and system information and is expected to interpret more of it themselves.
Authentic Mode exposes considerably more of the fictional technical artifact and provides less interpretation.
Importantly, Authentic Mode isn’t automatically a harder incident.
You could play an Introductory scenario using Authentic presentation.
Likewise, you could play an Advanced scenario using Game Mode.
They’re two separate decisions.
That gives us combinations such as:
Introductory + Game A learner-friendly incident with translated evidence and stronger guidance.
Introductory + Hybrid A learner-friendly incident where authentic evidence starts becoming visible.
Standard + Hybrid The intended middle ground, requiring more independent investigation while retaining technical scaffolding.
Advanced + Authentic Minimal interpretation, noisy information, competing events and substantially more independent reasoning.
Most importantly, all of those players are still interacting with the same underlying fictional truth.
We aren’t maintaining a “beginner version” of the attack and a completely different “expert version”.
The simulation knows what happened.
The presentation layer determines how much help you receive interpreting it.
Learning to investigate instead of learning to click
This distinction has influenced a lot of the interface design.
If the game highlights every suspicious account in bright red, we’ve already done half the investigation for the learner.
If Sentinel immediately says:
THIS ACCOUNT HAS BEEN COMPROMISED. CLICK HERE TO DISABLE IT.
there isn’t much reasoning left.
Instead, the game should give the player enough information to ask:
Why is this unusual?
Where did this login come from?
Is this normal behavior for this user?
What endpoint was involved?
Is there another event that supports this?
Do I have enough evidence to contain it?
And eventually:
What happens to the organization if I do?
Technical evidence is based on recognizable real-world structures while all organizations, identities, systems, credentials and targets remain fictional.
That last point is particularly important.
This game is about cyber security education.
It isn’t intended to become a procedural guide for attacking real systems.
The Red Team side will teach attacker mindset, reconnaissance, attack-path reasoning, human security and the consequences of weak controls without turning the game into a collection of real-world exploitation instructions.
The other side of the screen
Everything I’ve described so far largely concerns the Blue Team prototype.
But Cyber Aware is being designed around two perspectives on the same incident.
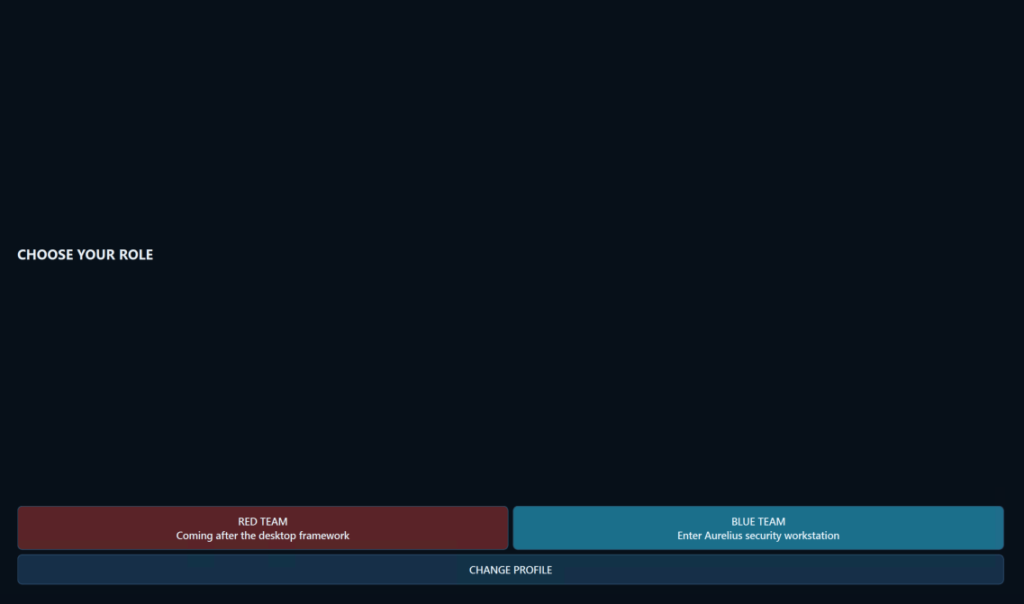
Eventually the player can choose:
🔵 BLUE TEAM / DEFENDER
or
🔴 RED TEAM / ATTACKER
The clever bit, and the part I’m particularly looking forward to developing further, is that these aren’t separate stories.
They’re different views of the same story.
Information Blue struggled to reconstruct might have been something Red deliberately created.
An employee Blue thought was simply careless might have been deliberately selected and manipulated by Red.
An alert that seemed insignificant during one play through might suddenly make complete sense after seeing what caused it from the other side.
The aim is for replaying the opposite role to produce those:
“Wait… THAT’S what that was!”
moments.
Both roles eventually experience the same underlying incident from opposite sides, with different information, objectives and available actions.
That’s where I think the rogue like structure becomes useful educationally too.
People, opportunities, routine events and some incident conditions can vary between runs.
Learning the game shouldn’t simply mean memorizing that you click buttons 4, 7 and 2 in that order.
The learner should be developing a way of thinking about the problem.
Getting things wrong is part of the design
The game currently uses a 1,000-point scoring system.
Points can reward useful investigation, evidence correlation, sensible containment, operational triage and maintaining business continuity.
Poor investigation, unnecessary disruption, premature incident closure and other decisions can cost points.
There are also tiered hints.
A learner who becomes stuck can ask for help.
The first hint might gently point them toward an area worth investigating.
Further hints become progressively more explicit.
Using them costs score, but it doesn’t stop the learner from completing the scenario.
I prefer that to leaving somebody staring at a screen for twenty minutes because they missed one clue.
The objective is still learning.
And after the incident finishes, the score isn’t supposed to be the final lesson.
The after-action report is.
It can reconstruct the incident, identify important turning points, show evidence the learner used or missed, explain why particular decisions mattered and suggest things worth exploring on another run.
The important question isn’t:
“Did you get 842 points?”
It’s:
“Do you understand why you got 842 points?”
Where the project is now
Cyber Aware is still very much in development.
The current Windows prototype is being built in Python using PySide6, which has allowed me to experiment quickly with the desktop environment, scenario systems and gameplay ideas.
At this stage I’m deliberately concentrating on one complete vertical slice rather than trying to build ten half-finished scenarios.
Corporate Espionage needs to work.
The investigation needs to be enjoyable.
The consequences need to make sense.
The educational feedback needs to actually teach something.
And somebody who has never seen the project before needs to be able to launch it, play it and understand what happened without me standing beside them explaining what all the unfinished buttons are supposed to do.
Only then does expanding it make sense.
The current prototype is being used to prove the core investigation, consequence and learning loop before the project expands into additional scenarios.
Longer term, I want to explore other organizations and incident types, each creating different pressures.
A small business won’t have the same resources as a technology company.
A school has different users and priorities.
A health service introduces very different consequences when systems become unavailable.
Financial services brings another set of risks again.
The cyber concepts change, but so does the organisation around them.
Why I’m building it
I’m a game developer and educator, and this project sits in an interesting space between those two worlds.
I’ve spent a lot of time thinking about how we move learners from:
“I remember being told this.”
to:
“I understand why this matters.”
Games give us an interesting tool for doing that.
We can create safe environments where decisions have consequences.
We can let learners fail without breaking a production network.
We can let them investigate something that initially doesn’t make sense.
We can give them competing priorities.
We can let curiosity take them somewhere we didn’t explicitly point toward.
And then we can reset the world and let them try again.
That’s what I’m hoping to explore with this project.
Cyber Aware is only a working title, and there is still a lot to build.
But Aurelius Dynamics is beginning to feel less like a collection of buttons and more like a workplace where something has gone wrong.
And that’s when this experiment started becoming a game.
Cyber Aware is the current working title of an educational cyber security game in development by Wolf Interactive. All organisations, characters, systems and security incidents depicted in the game are fictional.
“Every journey starts with the first piece of track.”
After collecting locomotives, routes, diagrams and reference material, it was finally time to shift gears from researching and start building route.
Creating the route itself was almost anticlimactic.
One click in TSRE5.
A route name.
A blank world.
An empty canvas waiting to become one of Australia’s most iconic railway lines.
The plan was simple.
Recreate the North Coast Line as it existed during the 1970s, beginning with South Grafton before eventually extending north to Casino and south to Coffs Harbour.
At least…
That was the plan.
The First Piece of Track
Like every new route builder, I spent far longer placing the first few sections of rail than I care to admit.
Every curve was checked against satellite imagery.
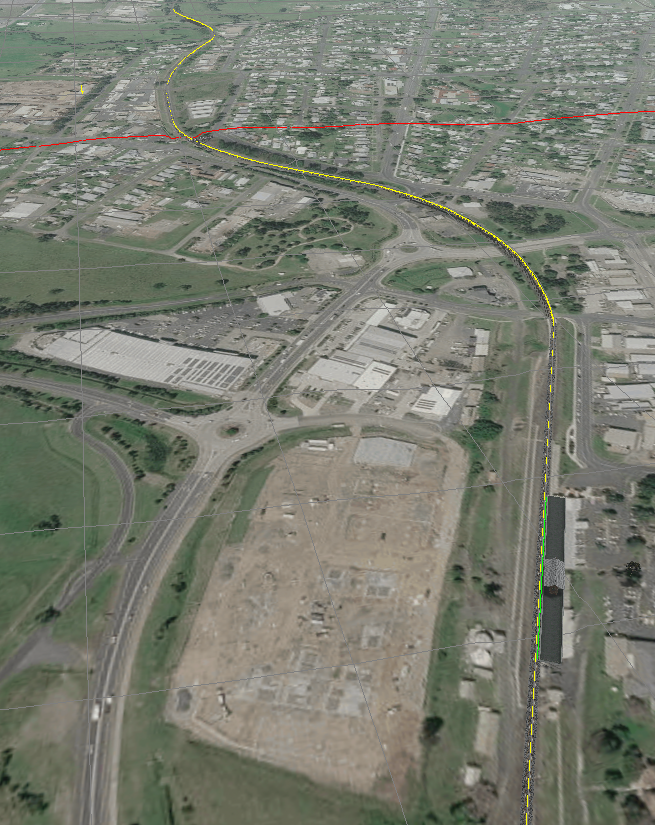
Every alignment compared with historical aerial photographs.
Every slight adjustment made with the hope that it looked just a little closer to the prototype.
Eventually something interesting happened.
It stopped looking like individual pieces of track.
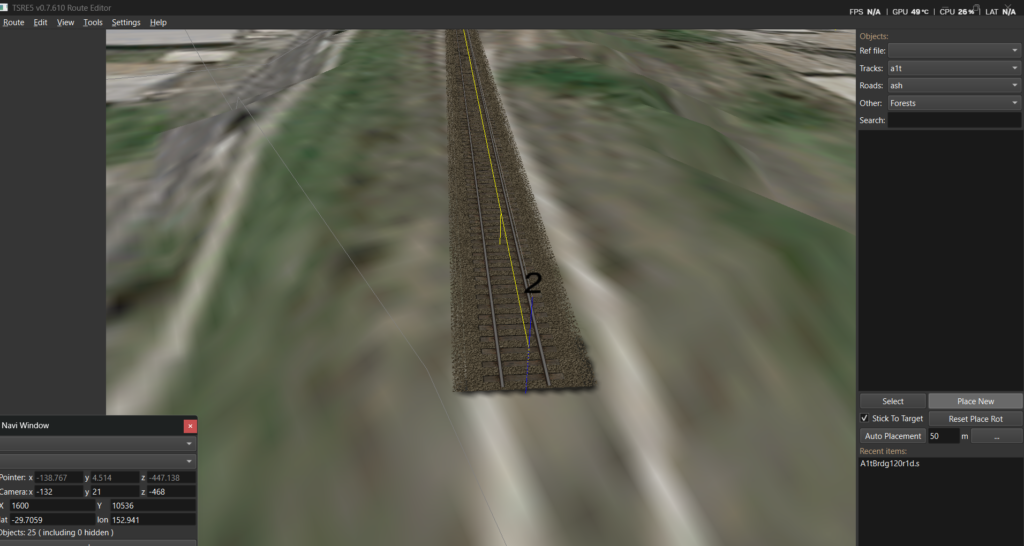
It started looking like a railway.
The first section of main line.
Learning How TSRE Thinks
Coming from modern editors like Unreal Engine, TSRE requires a completely different mindset.
The software isn’t trying to be clever.
It expects you to understand how railway infrastructure is constructed.
Many of the things I initially assumed were bugs were simply the editor working exactly as intended.
That first week became less about laying track and more about learning how TSRE itself worked.
Some discoveries were obvious.
Others took several hours to uncover.
REF Files… and Why Nothing Appeared
One of my first problems involved scenery.
I’d successfully imported bridges, stations and structures into the route.
Except…
Nothing appeared in the object list.
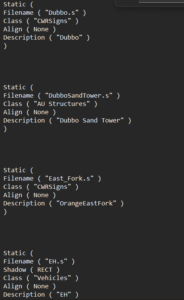
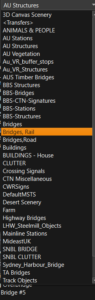
After chasing missing models and checking file paths, the real culprit turned out to be the REF file itself.
Extra blank lines and inconsistent formatting were preventing TSRE from reading entire sections of the object database. (more then one line between objects as well as indenting the entries)
Correcting the formatting immediately restored hundreds of scenery objects.
A surprisingly small mistake with surprisingly large consequences.
incorrect ref file formatting and Bridge objects finally appearing in the scenery list.
Pink Bridges and Missing Textures
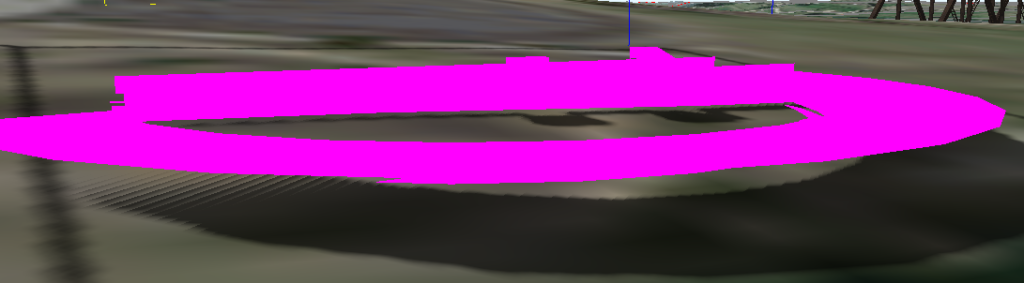
The next surprise arrived in fluorescent magenta.
The bridge itself loaded correctly.
The textures didn’t.
Fortunately the solution turned out to be much simpler than expected.
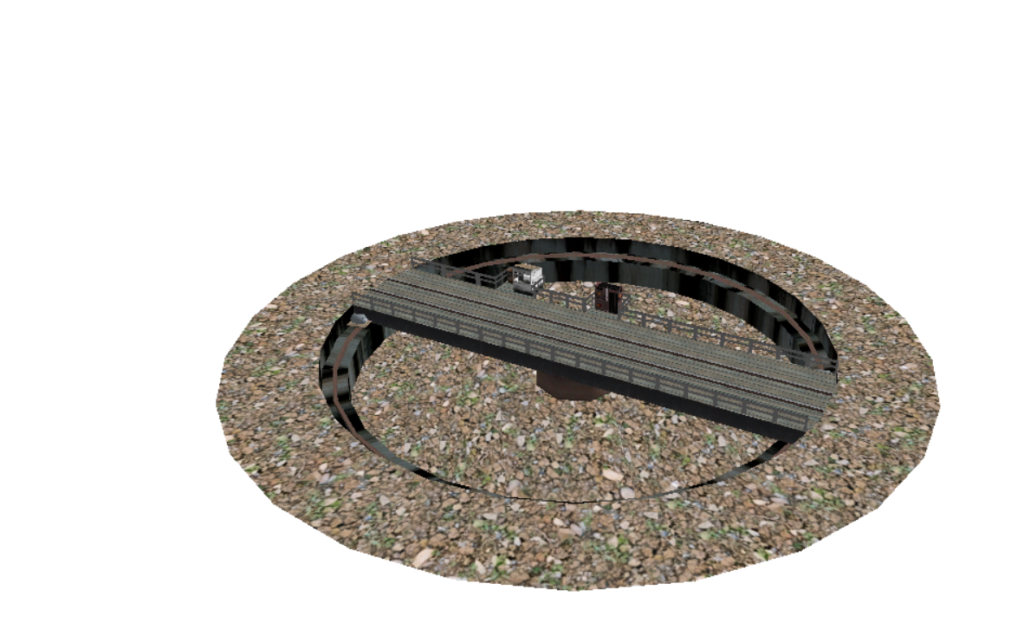
The required ACE textures were sitting inside the XTracks archive but had never been copied into the correct Global texture folder.
One missing file transformed an almost unusable model into a perfectly acceptable placeholder bridge.
It won’t remain there forever.
One day I’d love to model the original South Grafton timber bridge myself.
For now, though, it serves as the perfect reminder that progress is more important than perfection.
Before and after fixing the missing bridge textures.
My First Drive
There is something strangely satisfying about driving over track you’ve just laid yourself.
After solving a few startup issues and persuading Open Rails to cooperate, I finally loaded the route.
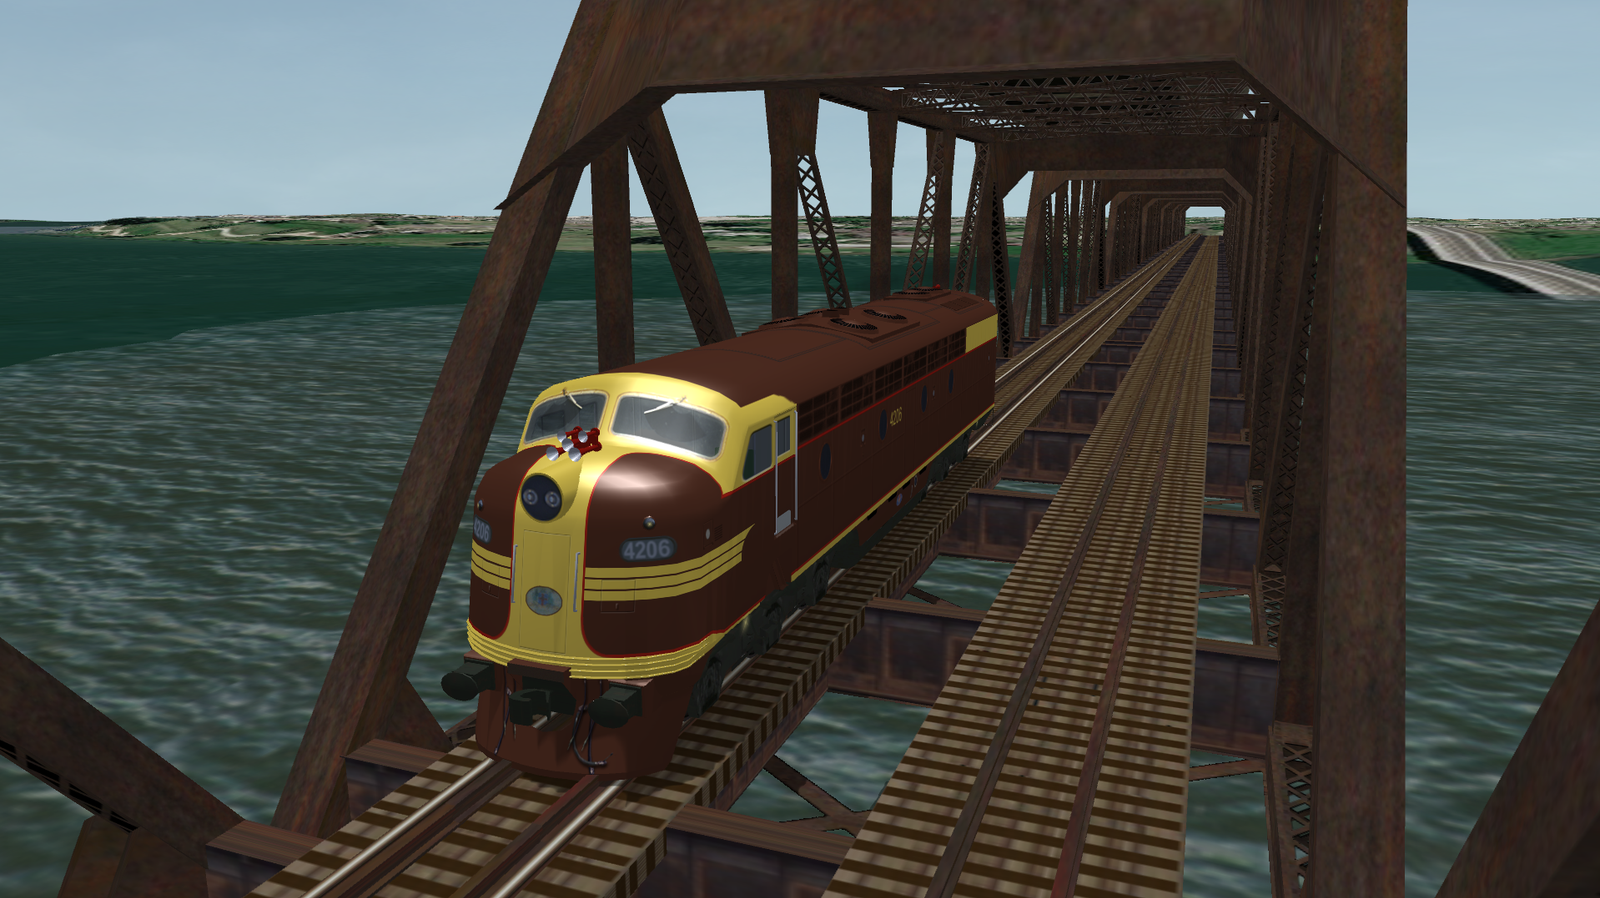
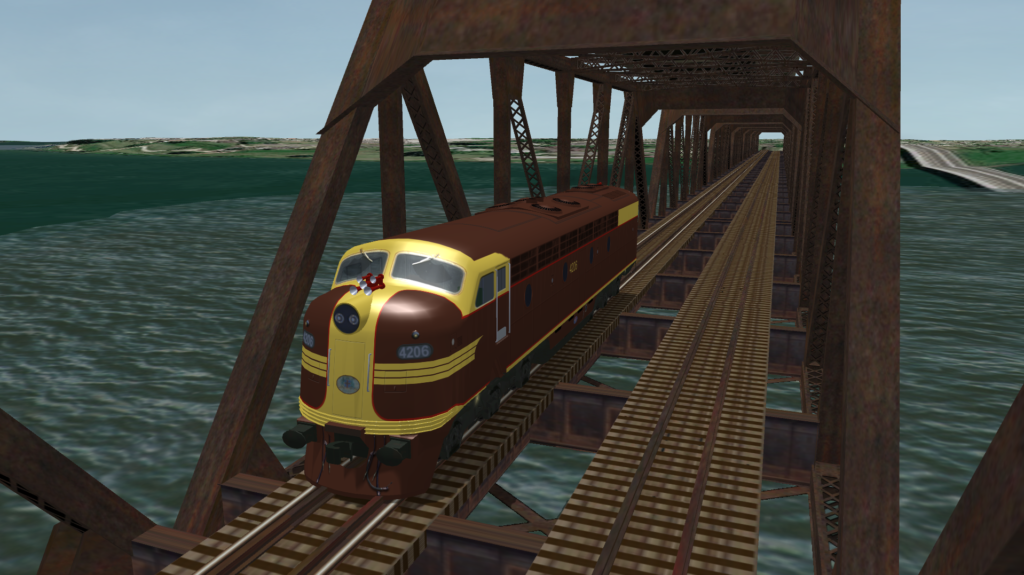
4206 rolled slowly across the Clarence River bridge.
For the first time, I wasn’t driving somebody else’s railway.
I was driving mine.
4206 crossing the Clarence River.
Then Everything Broke…
Of course it did.
Experimenting with TSRE’s distant terrain tools seemed harmless enough.
The next time I opened the editor, it loaded to a completely white screen before crashing.
After a considerable amount of head scratching, the solution turned out to be a tiny file called:
cerecent.txt
Deleting it immediately restored the route.
The project wasn’t damaged at all.
TSRE had simply remembered an invalid editor state.
One tiny text file nearly convinced me that a week of work had disappeared.
Open Rails Had One More Lesson
Not long afterwards Open Rails refused to load the route altogether.
Instead it greeted me with:
Player train original position not clear
Naturally I blamed the platform.
Then the activities.
Then the paths.
The real problem was something far less obvious.
A tiny piece of abandoned track hidden beneath the river.
Deleting that single rogue section immediately solved the issue.
It’s a reminder that Open Rails is remarkably good at finding mistakes, even when they’re buried out of sight.
Discoveries Worth Writing Down
One of the reasons I decided to keep this journal is because the small discoveries often end up being the most valuable.
Some of the shortcuts and quirks I’ve discovered during the first week include:
X flips the direction of curved track pieces while placing them.
R combined with the numeric keypad adjusts rotation and elevation while placing track.
Z removes selected track from the Track Database (TDB), allowing adjustments before committing it back into the route.
Existing track can sometimes be regraded by temporarily removing it from the TDB, making the adjustment, then reconnecting it.
F applies the embankment editing setting for selected track.
The embankment settings are not an “Apply” button. They define how the terrain tool behaves while shaping around selected track.
REF files are extremely sensitive to formatting. Something as simple as extra blank lines can prevent scenery categories from loading.
Missing ACE textures generally mean the model exists, but one or more texture files are missing.
A single hidden section of track can prevent Open Rails from spawning a player train.
If TSRE suddenly opens to a white screen before crashing, check cerecent.txt before assuming the route has been corrupted.
These aren’t things I’d found in the manuals.
They’re simply lessons learned through trial, error and a healthy amount of persistence.
Building the Railway… Not the Terrain
Another lesson surprised me.
Initially I assumed I should make the railway follow Google’s terrain.
In reality, that’s the opposite of how railways are built.
The engineers build the railway first.
Then they shape the landscape around it.
That has become my philosophy for this project.
Lay the railway accurately.
Then build the embankments, cuttings and surrounding landscape afterwards.
The embankment tool has already proven surprisingly useful.
My current settings are:
Size:         2
Embankment:   5–8
Cutting:      2–5
Max Radius:   10–20
They’re still very much a work in progress, but they’re producing a natural looking profile that suits the North Coast surprisingly well.
The Line Bug
Originally I intended to build South Grafton station.
Instead…
I kept laying track.
The next curve looked interesting.
Then the next.
Before long I found myself extending the main line south exactly as it followed the real railway.
I think every route builder eventually catches what I’d call the line bug.
The temptation to see just one more kilometre complete is incredibly difficult to resist.
The sensible part of my brain knows I should probably stop soon and build North Grafton yard.
The other part keeps saying…
“Just one more section…”
Current route progress showing the line extending south from South Grafton.
Looking Ahead
The next milestone is clear.
Connect South Grafton to Grafton.
Build the North Grafton yard.
Recreate Grafton station.
Only then will I return to fill in the countless details that bring a railway to life.
This project isn’t going to be finished in weeks.
Probably not even months.
But every piece of rail, every historical photograph, every recovered diagram and every solved problem moves it one step closer.
For the first time, I can finally see it taking shape.
Current Progress
✅ Route created in TSRE5 ✅ Open Rails route operational ✅ South Grafton station under construction ✅ Clarence River bridge placed ✅ Main line following the prototype alignment ✅ Original NSWGR diagrams collected and digitised ✅ First successful drive with 4206 ✅ First embankments beginning to shape the landscape
Next Journal
Developer Journal #2 | North Grafton: Building the Yard That Disappeared
For years I’d been fascinated by the railways around Grafton. Growing up in Northern New South Wales, the North Coast Line was simply part of life. Trains crossing the Clarence River bridge, locomotives working South Grafton yard and stories from people who remembered when steam still ruled the rails.
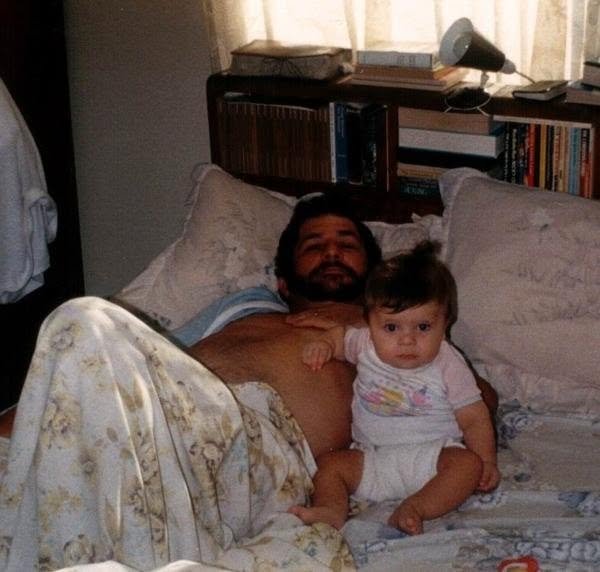
One of those people was my father.
Although I lost him when I was only eighteen months old, somehow the fascination with railways found its way to me. Whether it came through family stories, old photographs or simply growing up surrounded by railway history, I’ve always found myself returning to it.
Like many hobbies…
It started small.
I simply wanted to drive some NSW locomotives again.
Rediscovering Open Rails
Initially my goal wasn’t to build anything.
I wanted to relive the experience of driving the locomotives I’d admired growing up.
Before long I was editing ENG files, rebuilding sound systems, fixing locomotives that hadn’t worked correctly for years and assembling what quickly became one of the largest collections of NSWGR content I’d ever owned.
But while driving existing routes was enjoyable…
Something always felt missing.
The places I knew weren’t there.
South Grafton.
North Grafton.
Glenreagh.
The Dorrigo Branch.
The Clarence River bridge.
The Peter’s Ice Cream factory.
These weren’t simply locations on a railway.
They were places connected to memories.
Standing on the Shoulders of Giants
One thing became obvious almost immediately.
I wasn’t starting from nothing.
For more than two decades an incredibly passionate Australian train simulation community has quietly preserved our railway history through Microsoft Train Simulator and, more recently, Open Rails.
Without their work, this project probably wouldn’t exist.
One of the first routes that genuinely inspired me was Coals to Newcastle.
It wasn’t simply enjoyable to drive. It demonstrated just how much could still be achieved using technology that many people considered long obsolete.
More importantly, it became an invaluable learning resource.
By exploring how that route had been constructed, I slowly began understanding how track databases, scenery, signalling, terrain, activities and route structure all worked together behind the scenes.
That naturally led me to another legendary Australian resource.
Although the original website has long since disappeared, thanks to the Internet Archive’s Wayback Machine and the dedication of countless community members, much of its content still survives.
That archive became an incredible source of Australian locomotives, rolling stock, routes, utilities, tutorials and reference material.
It also introduced me to routes I had never previously experienced, including sections of the NSW network that helped me better understand how Australian MSTS route builders approached scenery, terrain and signalling.
Many of the assets, utilities and techniques used throughout this project can trace their origins back to those preserved archives.
This project isn’t simply built on my own work.
It’s built upon twenty years of knowledge generously shared by countless Australian route builders before me.
One Diagram Changed Everything
Around this time I was fortunate enough to inherit something incredibly special.
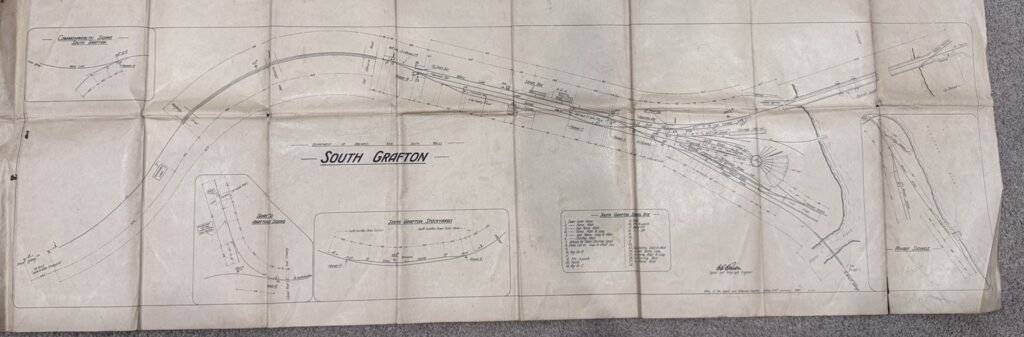
An original NSWGR track diagram of South Grafton yard that had belonged to my father.
The paper had yellowed with age.
Fold marks covered the page.
It had clearly lived a long working life.
I photographed it section by section before digitally stitching the entire diagram back together into a high-resolution copy.
For the first time I wasn’t relying on memory.
I had the railway exactly as NSWGR engineers had drawn it.
That single document transformed the project from wishful thinking into something genuinely achievable.
Original South Grafton yard diagram.
Then the Rabbit Hole Opened
Once I started looking…
I couldn’t stop.
Historical aerial photography.
Light Railways magazines.
Archive websites.
Forgotten downloads.
Facebook groups.
Google Earth.
Every answer seemed to create three new questions.
One evening I sat down intending to lay a kilometre of track.
Three hours later I had done nothing except research timber bridge construction and compare aerial photographs from different decades.
That has happened more than once.
Learning Before Building
Before a single kilometre of railway could be built…
There was another skill to learn.
TSRE5.
Like many enthusiasts, I’d heard about it for years.
Actually building a route with it, however, proved to be an entirely different experience.
The first week consisted almost entirely of learning how the editor thought.
Finding missing assets.
Understanding REF files.
Importing scenery libraries.
Tracking down missing textures.
Discovering keyboard shortcuts that weren’t obvious.
Working out why bridges appeared fluorescent pink.
Recovering from editor crashes.
Learning how the Track Database behaved.
Every mistake taught another lesson.
Some of those discoveries have already become indispensable:
X flips curved track placement direction.
R together with the numeric keypad adjusts track orientation and elevation while laying track.
Z temporarily removes selected track from the Track Database, allowing adjustments before reconnecting it.
F applies the TSRE’s embankment tool setting for shaping terrain around selected track.
REF file formatting is surprisingly sensitive and can determine whether scenery appears at all.
Missing ACE textures usually mean the model exists, but one texture file doesn’t.
A single hidden piece of rogue track can stop Open Rails from spawning a train.
A tiny file called cerecent.txt can prevent TSRE from opening an otherwise healthy route.
Most of these lessons weren’t found in documentation.
They were discovered one problem at a time.
This Isn’t Just About Building a Route
The more time I spend on this project, the more I realise it isn’t simply about creating another Open Rails route.
It’s about preserving a small piece of railway history.
Many of the locations I’m recreating have already disappeared.
Station buildings have burned down.
Yards have been simplified.
Sidings have been removed.
Industries have closed.
Yet through old photographs, original diagrams and the incredible work of the Australian train simulation community, those places can still be recreated.
If this project succeeds, perhaps someone else will one day drive across the Clarence River bridge, stop at South Grafton, work North Grafton yard and continue towards Casino exactly as trains once did.
Updated: This Tutorial has been updated to work with UE5.6+ Originally published: 15/12/2023
Why?
Having a swimming mechanic will add a lot of volume to any game. In the vast expanse of game design, the inclusion of a swimming mechanic not only expands the horizons of gameplay but also delves into uncharted depths of immersion. By integrating swimming mechanics, game worlds become boundless oceans teeming with exploration opportunities. Imagine traversing expansive bodies of water, uncovering hidden treasures beneath the waves, or embarking on epic underwater quests. The addition of swimming mechanics introduces a dynamic dimension to gameplay, enabling players to access locations that would otherwise be unreachable.
To swim we of course need a body of water to use. So we need to enable the water plugin. Goto Edit > plugins and search water. Enable water (experimental) and then restart the editor.
When the engine restarts if you see this error make sure you scroll the the left and click on the add entry to Defaultengine.ini – this is important! (however its stated as of UE5.6 you should no longer have to add entries to the defualtengine.ini file, however if you check collision presets on the waterbody and the preset for water is not there you will need to add this entry.)
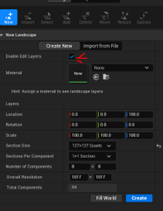
Create a basic level > remove the floor > add a basic landscape and enable edit layers.
Now we have our land scape lets add water, go to the quick add > all classes > type water > water body ocean. (or water of your choice)
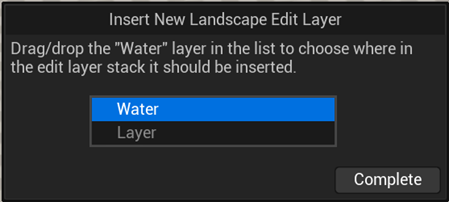
UE5.6+: when adding the waterbody to the landscape you will now get an insert new landscape edit layer. make sure that water layer is above the landscape layers. This will prevent changes to the landscapes height map from being directly affected by the water.
If you have a problem where you cant see the water or a beach etc, it maybe the position of your waterbody and the landscape. You may need to make sure they overlap by selecting them in the outliner and moving them around and adjusting the height.
Once you can see it lets adjust the area by making a small island, to do this we can adjust the area by clicking and then moving the splines > lets just make a small island.
When we enter the water we can not swim. That’s because we don’t have anything setup to tell it how to work. If you end up walking on top of the water click on the water body in the outliner, select the physics tab and scroll down till you see Collison presents. change this option to WaterBodyCollisions
UE5.6+: This may appear as WaterMeshCollision instead, If you are not seeing either you may need to check your error log>load errors and if it does have one about collision profile settings click add entry to defaultengine.ini. reload the level you are editing and check again for the collision setting.
Setting up the character blueprint
Open the Character blueprint you are using.
Create two custom events called Start swimming and Stop swimming.
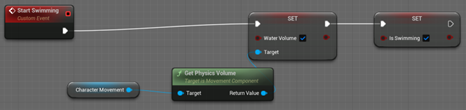
Lets create start swimming first, get character movement from the components menu and drag it just below the event.
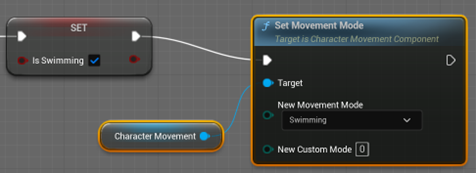
from the movement node > Get player volume > set water volume > Tick water volume >
Create a new var isSwimming (boolean) > Connect it to the water volume > Tick isSwimming?
From the set swimming > Change movement mode > add character movement > change movement mode to swimming
Copy and paste everything except the event and connect it to the stop swimming. {Untick the water volume and isSwimming? And change movement mode to walking)
Swimming movement.
Next we need to modify the movement input (this is already in the blueprint.)
Find the movement input section of the blueprint and drag the IA_Move node to the left to make some space
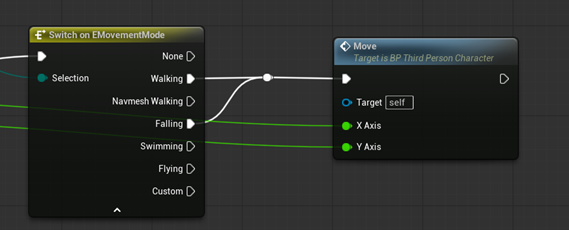
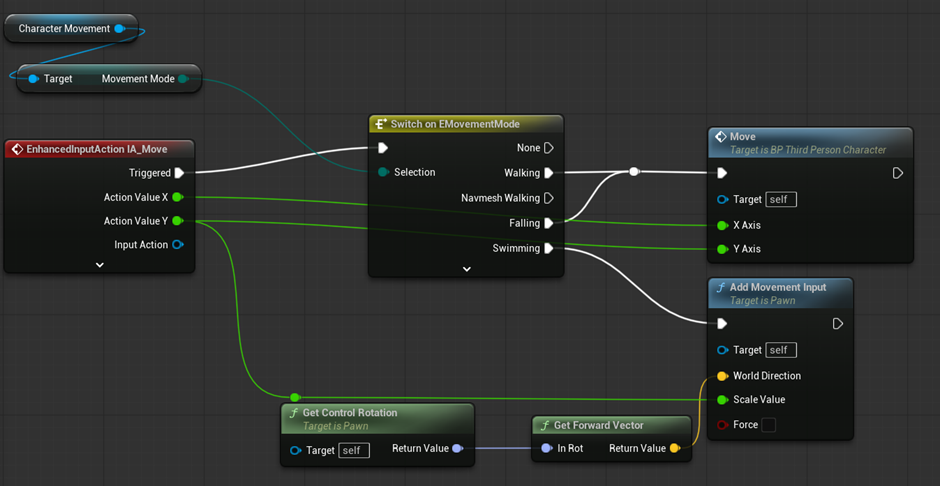
We are going to drag in the character movement from the components section > Get movement mode > switch on EMovementMode
Connect IA_move to the Emovementmode. Click on the reveal arrow and Connect walking pin and falling pin to the existing movement blueprint. (you can make a junction/move joint and connect falling there)
Copy and paste the add movement input below the existing one.
UE5.6+: You will not have an existing movement input node; Right Click andadd movement input below the existing move function.
Get control rotation > Get forward vector > World orientation (new movement input)
Connect the swimming option from our movementmode to the movement input
Connect the Y axis from the IA_Move to the movement input.
Compile and save. UE5.6+: When completed the function should look like this.
Setting up the water body.
If we were to test the function of swimming now nothing would really happen as we have yet to tell the game when to start and when to stop the swimming events. To do this we need to go back to the main screen and in the outliner select WaterBodyOcean.
Under details and next to the add button click on the blueprint button and a create blueprint dialog box will open up.
UE5.6+: The button is now labelled “Create Blueprint from This”. It may appear at the top of the Details panel instead of next to Add.
Leave the name if you would like and click on the select button and the blueprint will be created. The blueprint should open. Select event graph and delete event tick.
We now need to add a new event called ActorEndOverlap to get this event you may have to click on the ActorBeginOverlap event already on the blueprint.
ActorBeginOverlap > Cast to BP_ThirdPersonCharacter (or what ever is your character blueprint) > As BP thirdperson > Start swimming.
Repeat this process for the ActorEndOverlap however instead of Start swimming do Stop swimming. (Don’t forget to connect the other actor pin from the overlap event to the object pin on the cast.)
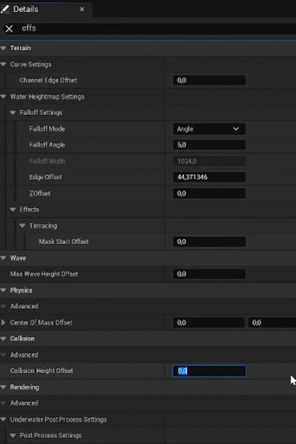
while we are here we also should change the collision value; If we leave out this step when our feet touch the water you will change to swimming animation in mid air which can ruin immersion of the game. Make sure you have the parent waterbody selected in components then In the details pane search for offset. Navigate down to collision and change the collision height offset. Lets start with -70 but you may need to adjust this to your liking.
Compile, save and return to the level tab.
If you find the water has disappeared, select one of the spline nodes and move it slightly.
We are now going test this (ignore the animation for now) you will also notice your character is sliding around a lot.
Lets fix it.
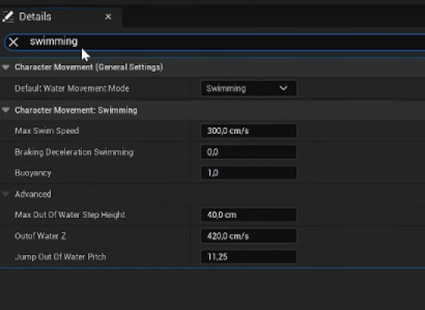
Open the Character BP, select character movement from the components tab and then under the details tab search for swimming.
I feel our swim speed is ok; however, let’s change our braking deceleration swimming to make it feel a little more natural; we will change it to 150 however depending on your game this is your call as to what you set it to.
Setting up the Animation Blendspace
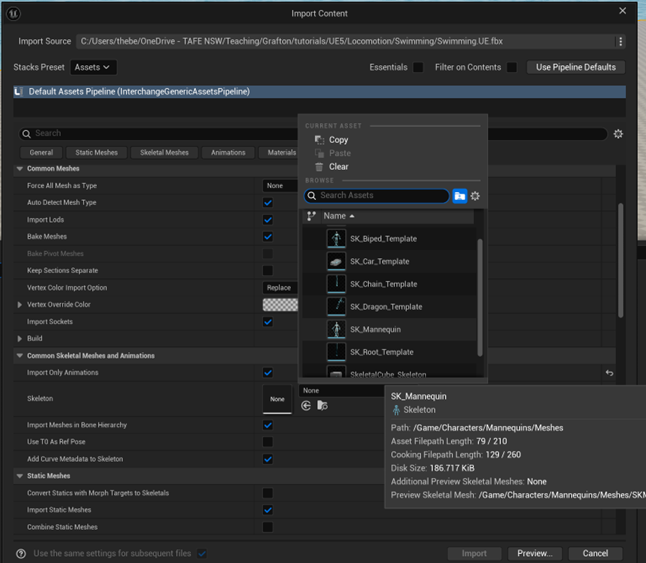
In our Main Animations folder Create a new one call swimming and import our swimming animations Swimming and TreadingWater.
An import content window will appear and all we need to do is scroll down and under the skeleton drop down select the correct skeleton to target, since we are using the 3rd person template we will use SK_Mannequin. The animation files are also retargeted animations from mixamo.
UE5.6+: The below section has refers to the removed the import translation settings in animation files, The nearest fix is when importing animations search for a function called snap to closest frame boundary and skip to creating the Animation Blendspace.
Once we have imported the animations we need to make a change to the TreadingWater animation otherwise when we are treading water at the surface the water level will be at the hip height of the character.
Open TreadingWater and on the left hand side menu find transform you may need to expand it.
We want to change the last value which is the Z value of import translation to -50 then at the top click reimport animation you will notice the mannequin shift position. You can change this value depending on your preferences.
Go back a step and create a new animation blendspace and call it ABS_Swimming
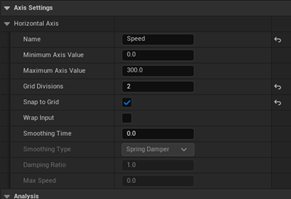
Open up ABS_Swimming and Under the Asset details tab find the horizontal axis and change the name to Speed and set the Maximum Axis Value to the speed you set in the blueprint. Default is 300. Also change your grid divisions to 2 and select snap to grid.
Now on the right under asset browser find your Swim idle and drag it to the left side of the time line and then find your Swimming and drag it to the right side of the timeline.
If you hold Left CTRL and move your mouse over the time line the animation should play.
Save and Exit.
Setting up the Animation.
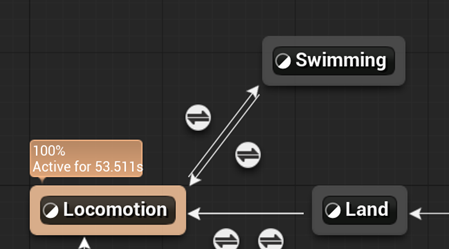
Open animation BP > Main state machine add new state Swimming.
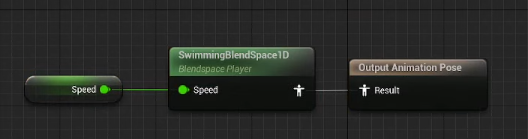
open it > add ABS_Swimming > result > speed > right click and promote to variable (to save a little time rename this variable SwimSpeed)
Use the back button to go back to the main states section of the animGraph and Create a new variable(bool) called Swimming (if its already being used call it swim.)
Create transition lines from and to the main locomotion state by dragging from one to the other
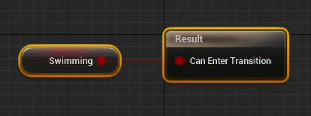
The transition will be controlled by the swimming Var. So click on the transition rule button; for locomotion to swimming the swimming bool is all you need to enter the transition.
for the transition from swimming back to locomotion place the swimming bool from that drag out and get the NOT Bool Var then connect that to enter transition.
Save.
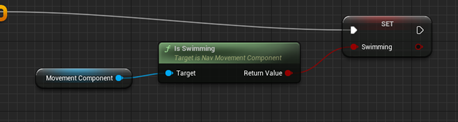
Goto the event graph and on the Sequence add a new pin. Add a new movement component > get is swimming and set swimming.
We now need to setup how our the engine determines the speed of the character.
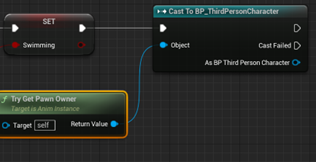
From set swimming > Cast to BP_ThirdPersonCharacter.
From thirdperson object > Try Get Pawn Owner
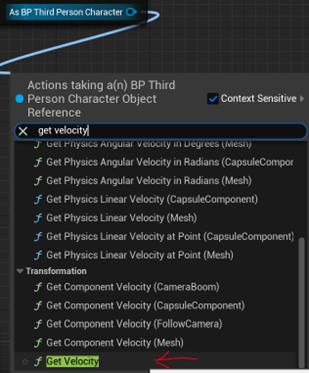
From thirdperson as BP third person character> Get velocity (scroll down find it under transformation) > Vector length > Set speed and connect the cast BP third person to set speed(SwimSpeed).
Now we need to go into our AnimGraph and add a swimming > not >AND (may need to create this Drag from the NOT and search AND Boolean) > Should Do IKTrace (control rig)
UE5.6+:
“Should Do IKTrace” might now appear under a different category because Control Rig nodes were reorganised.
The graph may default to Structured View, hiding some nodes.
You might need to disable “Show Only Compatible Nodes” to find the Boolean NOT/AND nodes.
Another note is if you are using control rig 2.0 the IK Foot-trace pipeline has been upgrading meaning you may need to use a different node name or you may need to disable it entirely for swimming states.
However; Now when we enter the water the swimming animation should happen, note you may need to go back and adjust the collision to your liking.
You could also setup a few more animations to smooth out the transitions this is up to you.
Conclusion
With the implementation of a swimming mechanic, you’ve unlocked a new realm of possibilities within your game world. Just as the vast oceans hold unexplored territories and hidden treasures, your game now offers players the chance to dive into untold adventures. While your swimming mechanic may require further refinement to align perfectly with your vision, it serves as a solid foundation for bringing your aquatic landscapes to life. Whether it’s navigating through sunken ruins or discovering secret underwater realms, your players will embark on journeys beyond their wildest imagination. Embrace the endless potential of your newfound aquatic frontier, and watch as your game evolves into an immersive experience like no other.
Additional
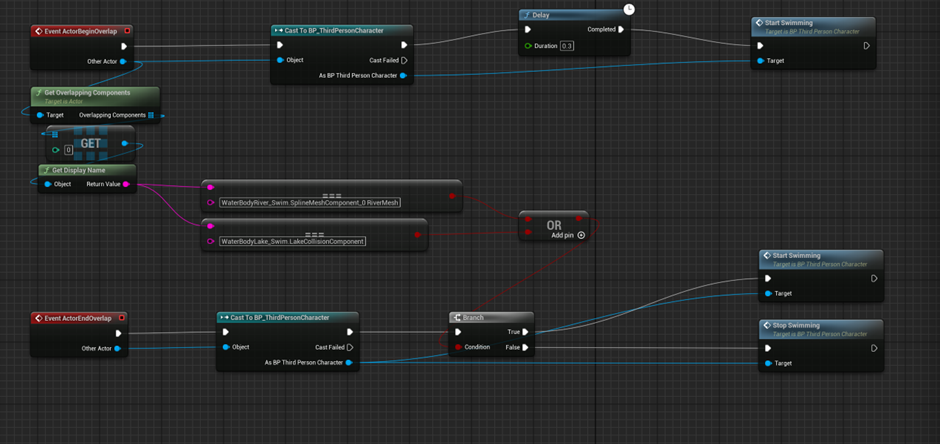
If you are trying to swim between two different bodies of water say a lake and a river the overlap will end you will need to include a function in your waterbody blueprint like this
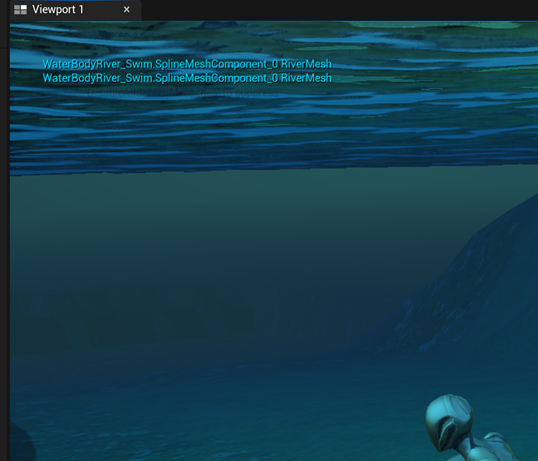
The names for the overlap that is connected from the display name can be found by doing a print string from get display name, when you are testing it will print the names out. Screen shot them and then add them to your absolute equal nodes. You will need to do this for all overlapping waterbodies. For rivers that operate on splines you will need to specify the spline number that overlaps the lake or ocean.
I’ve been making solid progress on the game, and I thought it was a good time to update you all on what’s been happening behind the scenes. The focus lately has been on refining the zombie mechanics, adding more depth to the combat system, and polishing up the player animations. Here’s a breakdown of the latest changes:
Completed Tasks:
Zombie Mesh and Skeleton Overhaul: I’ve swapped out the old zombie model and skeleton for something far more detailed and immersive. The new mesh looks a lot more polished, and the new skeleton will let me create more dynamic animations as we go. You’ll really notice the difference in how the zombies move and react.
Random Zombie Spawn System: I expanded the spawn system so that zombies appear randomly throughout the game world. This makes the encounters feel more unpredictable and keeps the tension high. You never quite know when a zombie is going to come lurching out from behind a corner!
Blood Splatter Effects: One of the fun parts of combat has been adding blood splatter effects when zombies are shot. It’s not just for visuals – it adds a really satisfying impact when you hit your target, making the combat feel more rewarding and visceral.
Zombie Melee Attacks: Zombies now have a basic melee attack system in place, so they can finally strike back when you get too close. This has made those tight, up-close moments much more intense, and forces you to be a little more strategic when dealing with a crowd of the undead.
Player Animation Speed Tweaks: I spent some time fine-tuning the player animations, especially around movement speed. Now, running, walking, and aiming feel much more fluid. Before, the animations felt a bit off, but this adjustment really brings everything in line with the pacing of the game.
Weapon Zoom-Out Function: I’ve also added a cool new feature where right-clicking will zoom out the camera, but here’s the twist – the zoom level depends on the weapon you’re using. So, if you’re holding a long-range rifle, you’ll zoom out more than if you’re using a close-range weapon like a pistol. I was able to leverage the existing enum setup to manage this.
Fixing Weapon Equip Animations: There was a bit of an issue with the weapon equip animations not syncing up properly, but that’s all fixed now. The transitions between drawing and equipping your weapons are smooth and responsive, which is important for keeping the combat feeling tight.
Defining Equipment Slots: After some consideration, I’ve locked in how the equipment slots will work. You’ll have four main slots: Unarmed, Melee Weapon, Sidearm, and Primary Weapon. This setup will make it easier to manage the player’s loadout and should feel pretty intuitive when switching between different weapons.
Ammo Counter and Reload System: The ammo counter is fully functional now, and I’ve added reload mechanics too. When you’re in the heat of battle, you’ll need to keep an eye on your ammo, and the reload system adds another layer of strategy. Running out of bullets at the wrong time could be deadly!
Grenade Throw Animation: The grenade throw animation is in place and feels pretty smooth. I wanted the animation to look natural, so I spent a bit of extra time polishing the throw mechanics. Now when you toss a grenade, it looks and feels like a real action rather than just a stiff animation.
In Progress:
Reload Animations: I’ve added a temporary reload animation for now, but this is just a placeholder. Eventually, I plan to add different animations depending on the type of weapon you’re using. A shotgun reload should look and feel different than reloading a pistol or rifle, so that’s next on my list to polish.
Upcoming Tasks:
Player Vision Cone: I’m looking into adding a vision cone mechanic for the player. This would limit the player’s ability to see enemies outside of a certain field of view, adding a bit of realism and some extra challenge. It’s something that could create tense moments where zombies sneak up on you if you’re not paying attention.
Player Melee Combat: While the zombies can attack in close quarters, the player doesn’t have a melee attack yet. This is something I’m eager to add because I think it’ll complement the ranged combat really well. Plus, sometimes you just need to punch your way out when you’re out of ammo!
Spent Shell Casings: I’m planning to add spent shell casings ejecting from the player’s weapon after each shot. It’s a small detail, but I think it’ll add to the realism and immersion of the combat scenes, especially in chaotic firefights.
Inventory System with Equipment Slots: An inventory system is on the horizon, and I’m excited about it! It’ll allow players to manage their equipment slots and organize weapons, ammo, and items. This will tie into the combat mechanics, especially with how you’ll switch between different weapons and manage your resources.
Grenade Counter: Finally, I’ll be adding a grenade counter to the HUD so players can keep track of how many grenades they have left. No more guessing whether you have one more explosive in your pocket or not!
That’s where things stand right now. I’m pretty excited about how the game is shaping up and can’t wait to share more updates as I continue refining the gameplay. As always, I appreciate your support and feedback. Let me know what you think of the new features, or if there’s anything you’d like to see next!
For nearly two years, I’ve been immersed in small projects and commissions within UE5, yet I’ve never fully committed to creating something truly my own—something worth sharing. From the moment I first dabbled with Project RPG Alpha (dont worry I still have that toiling away somewhere), my humble RPG Maker game, the thought of evolving it into a fully-fledged Unreal Engine experience has lingered in my mind. But as I poured myself into that project, a new, insistent idea began to take root, demanding my attention, refusing to be ignored.
That was a 3rd person / top down action/RPG game, Lets have a bit of a back story.
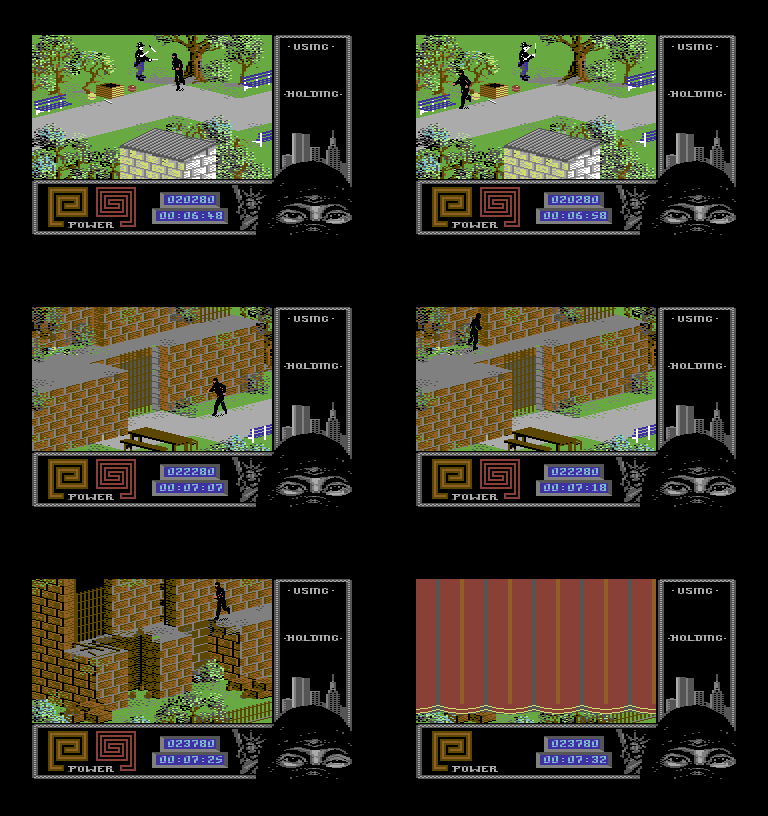
My love for old-school games runs deep, rooted in countless hours spent on the Commodore 64, and evolving with each new generation of console and PC alike. Among those early treasures, The Last Ninja II by System 3 held a special place in my heart—a masterpiece that captivated my imagination. I’ve long believed this iconic game deserved a rebirth in a modern engine, and many have tried to bring it back to life. Yet, each attempt has been silenced by cease-and-desist orders, as System 3 fiercely guards their stake in this legendary title.
Last Ninja II – Commodore 64
As a game developer, especially in the indie scene, I fully understand the importance of protecting IP and copyright—they’re the lifeblood of our industry. So, I decided to put the idea on hold, at least for now. But then, another light-bulb moment struck: why not create a shooter from a similar perspective? My mind instantly flashed back to the thrill of playing Cannon Fodder as a kid—the addictive music, the nonstop action—it had everything I loved in a game. Yet, what really stuck with me was the iconic main menu: the green hill dotted with the graves of your fallen soldiers, while new recruits marched down to the recruitment barracks. This haunting image left a mark on me, and now, I’m driven to recreate that atmosphere—but with my own twist, breathing new life into that nostalgic memory.
Cannon Fodder
Without revealing too much—after all, IP is sacred—I’m aiming to reinvent this concept with a fresh twist. Imagine a game where your player-created character isn’t the only hero—other playable characters come with their own status, ranks, experience points, and the looming threat of perma-death. I’m also toying with a POW mechanic that adds an intense layer of strategy: rescuing captured comrades and returning them to your ranks, knowing full well that each mission could be their last. It’s a dynamic, high-stakes world where every decision could mean the difference between victory and permanent loss.
Enter: Project ProtoFodder
Once again, protecting IP is key, so ProtoFodder is just a working title—a nod to the inspiration driving this project. I wanted this game to be a true reflection of my vision, so I started from scratch with a blank UE5 project, building everything from the ground up. For now, I’m using models from the marketplace and Sketchfab, allowing me to focus on prototyping the core game mechanics. But before I could dive into that, I needed to establish the basics—a functional level and a solid movement system—to lay the foundation for what’s to come.
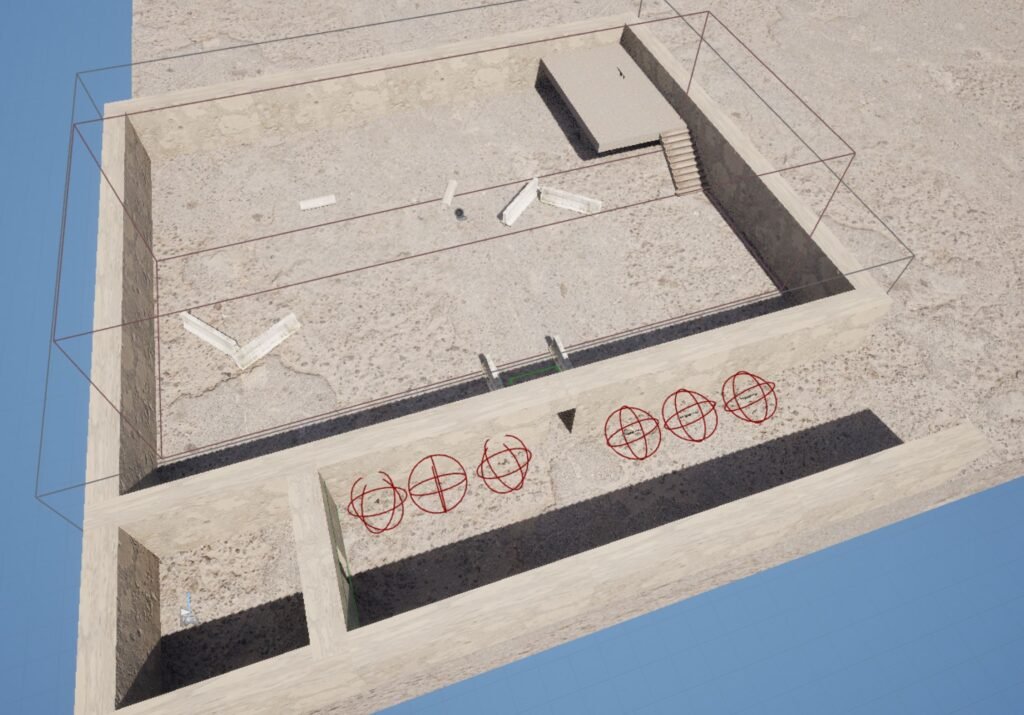
I began by crafting a basic floor plan and pinpointing the ideal location for the starting area. From there, I partitioned off various sections, realizing I needed a dedicated space for spawning enemies. It was crucial to avoid the pitfall of designing an expansive test level only to later struggle with integrating the movement and aiming systems. My focus was on creating a functional environment that would allow me to fine-tune these mechanics effectively before expanding further.
I shifted my focus, diving into the technical setup by organizing a dedicated folder for my AI components. I integrated an IMC and mapped out the movement keys, then moved on to the Character Blueprint to refine the aiming-at-cursor system. The results were promising—my character could now navigate the environment while tracking the cursor with precision. It was a significant milestone, marking the successful implementation of a core feature.
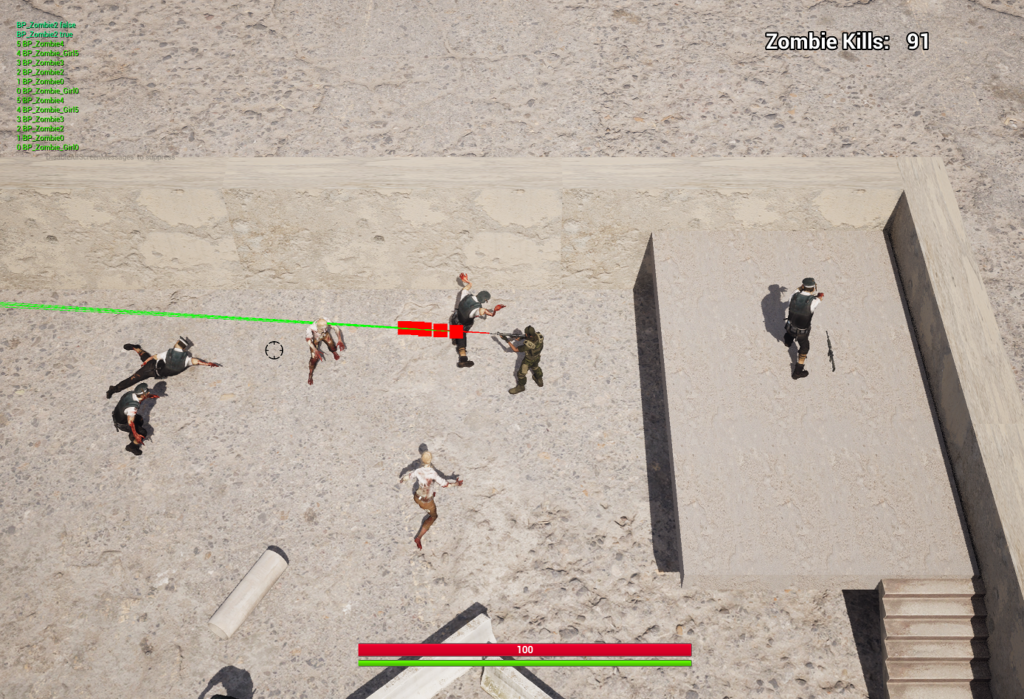
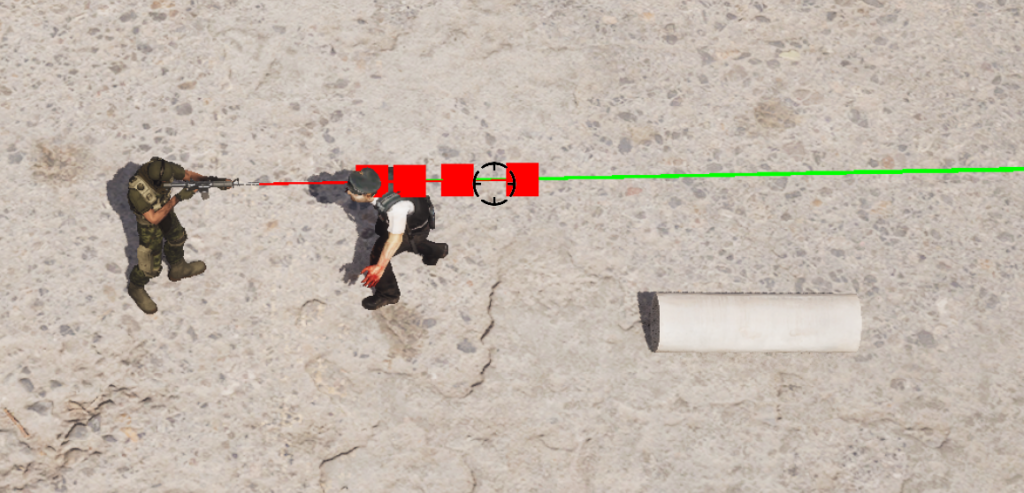
To cut to the chase, after nailing down the look-at-cursor system, I turned my attention to testing the weapon aiming mechanics. I created a crosshair cursor and equipped my character with a pistol to see how it would handle. That’s when I hit my first major roadblock: the line trace. I set up two trace points—one from the pelvis and another from the barrel of the pistol—but quickly realized the trace from the barrel wasn’t intersecting with the crosshair. This misalignment meant that shots fired at enemies wouldn’t hit where the player aimed, presenting a critical challenge I needed to overcome.
No matter what I tried—tweaking aim offsets, adjusting parameters—I just couldn’t get my character to aim precisely at the cursor. I suspected the issue lay with the camera angle, but I couldn’t figure out how to resolve it. Up until now, my experience had been with third-person, first-person, or top-down games—never one where the camera was set at a distance with such an unconventional angle. It was a frustrating challenge, one that pushed me to confront the limits of my knowledge and forced me to think beyond my usual approaches.
My progress ground to a halt. Countless hours bled into frustration as I tried every possible approach to perfect the look-at-cursor function. I scoured forums, dug through endless YouTube tutorials, hoping for a breakthrough. But no matter what I did, nothing worked.
In the end, I gave up.
Breakthrough
It had been nearly two months since I last opened my project, and the frustration had drained even my desire to work on my RPG game. I haven’t mentioned this on my blog before, but I’m a tertiary education teacher, specializing in general IT and game development. Recently, during a lecture on game development using UE5, a student asked a question. Though it wasn’t directly related to my issue, the way they phrased it sparked an epiphany—ray tracing!
I had been stuck on line tracing all this time, but then it hit me—why not use ray tracing from the camera to the plane and create an intersection to fix the cursor problem? Math has never been my strong suit, so I did some Googling and pieced together a solution from various sources. With a bit of trial and error, I managed to set up a ray trace to line intersection.
Ray tracing to line intersection is all about precision. Instead of relying on basic line tracing from the character to the cursor, I realized I could leverage a more sophisticated approach. By casting a ray from the camera—essentially a straight line—to the game’s plane, I could calculate the exact point where that ray intersects. This intersection gives a true point of reference for where the cursor actually is in 3D space, perfectly aligning the aim. It’s a more complex solution, but one that ensures the character’s aim hits exactly where the player intends. It took some research and a bit of cobbling together, but it finally brought everything into focus.
Vola! With the new system in place, my shots finally hit their mark, bringing those pesky enemies down with precision. Since then, I’ve made significant progress, even overhauling the older weapon system—but that’s a story for another time.
Sometimes, all it takes is stepping away, letting your mind clear, and trusting that the solution will eventually reveal itself.
Unreal Engine’s Marketplace boasts an extensive array of assets, providing creators with a rich palette to enhance their projects. However, the process of downloading and incorporating these assets into your projects comes with a caveat: the accumulation of data in your Vault cache. As these assets are added to your Vault cache before being imported into specified projects, the cache can grow substantially over time. By default, Unreal Engine deposits these files in your user directory, leading to a potential strain on your primary OS drive’s disk space
How do i do it?
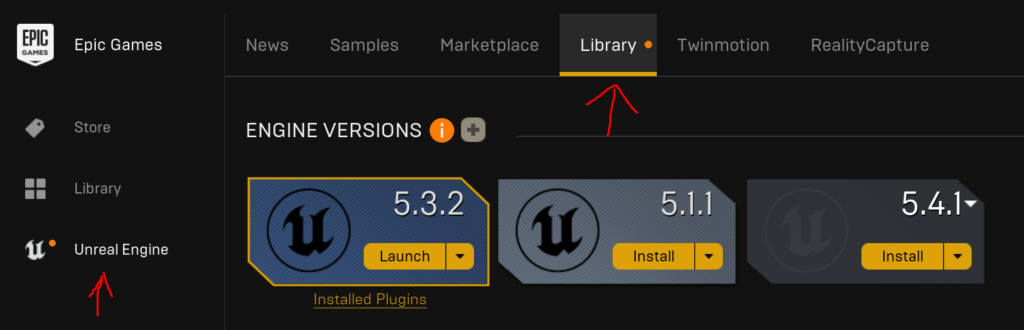
Well its a lot simpler then you may think, Fire up Epic games and click on Unreal engine, the option on the left. It will most likely load to the News tab or the Marketplace tab so at the top change it to Library.
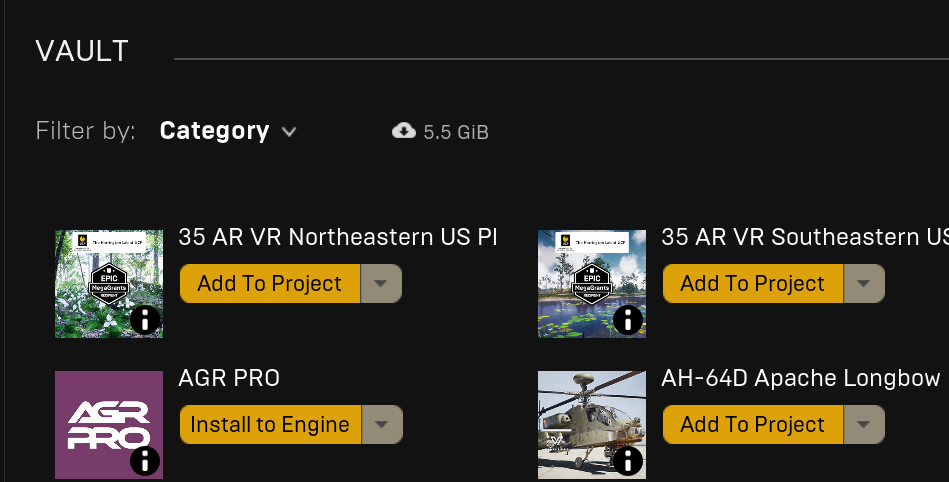
If you have a lot of projects installed you will need to scroll down but you should see a divider and the title says VAULT. Here you will see a filter by option and the right of that will be the amount of space the vault is taking up.
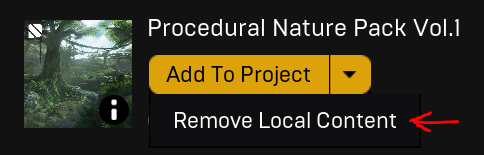
The simplest of solutions would be to remove the vault files you are no longer using unless they are files you share between projects or regularly use for new projects as these files already exist in your project folders. so you can click the yellow drop down arrow and select remove local content.
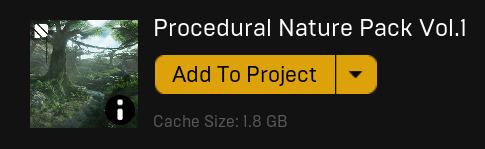
Below each plugin/ package it will show you the space that it takes up on your drive.
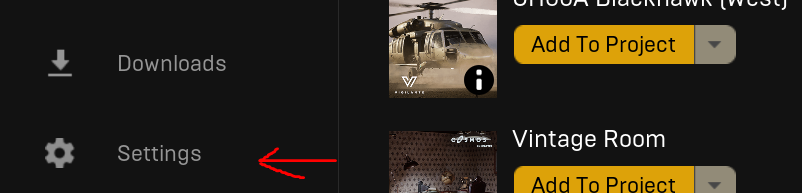
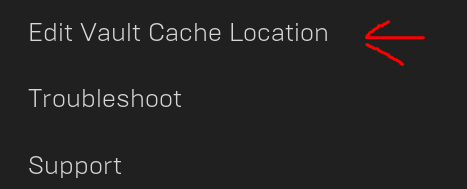
Now, what you have been waiting for. To change the vault cache location select settings on the left and towards the bottom of the new window you will see Edit Vault Cache Location.
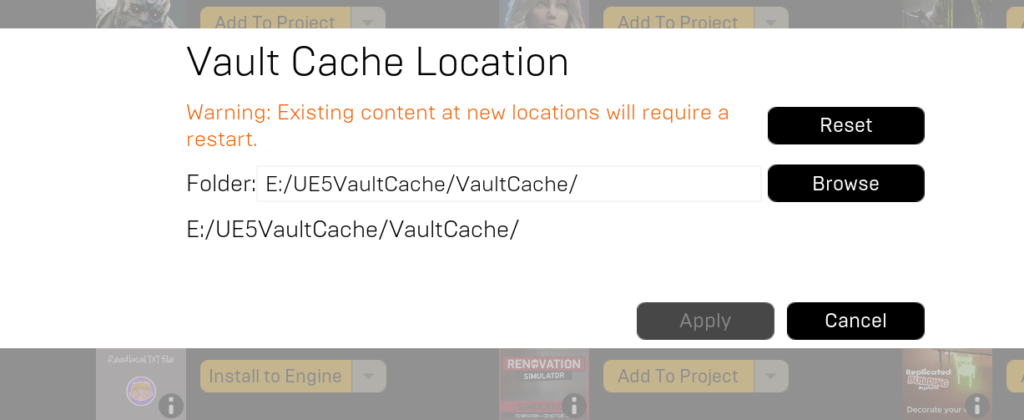
A Vault location screen will appear and you can use the Browse button to change the location of the cache, go ahead and click on it.
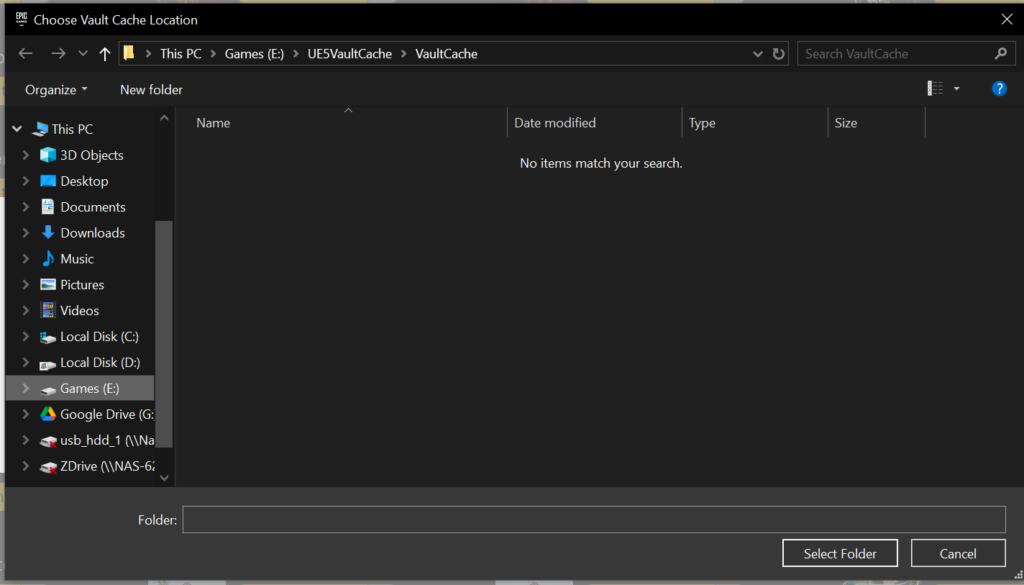
A windows explorer window will open and you can point it in the direction of where you now want to store it. I suggest a non-primary drive or external drive with sufficient space.
Conclusion
In conclusion, by relocating your Vault cache, you’ve taken a significant step towards optimizing your system’s performance. This simple adjustment frees up precious space on your primary drive, alleviating the burden that once caused your rig to stutter and slow down. No longer will you find yourself perplexed by the ominous red line signaling dwindling disk space. Instead, you can revel in the newfound efficiency and speed of your workflow, unencumbered by storage woes. It’s a small change with a substantial impact, ensuring that you can focus on unleashing your creative vision without the distraction of storage constraints
It has been a little while since I have been able to put a blog post up about the progress of Project Alpha RPG (Title in development). While I have been doing a some development unfortunately i have not been able to do anywhere as much as i would have liked to and the game is no where as far along as i would have hoped it would be since the date I started.
The main reasoning behind not being as far along as I had hoped to be is a combination of work, life and creative burn out. I am coming into a holiday period in my work and which will allow me to have a lot more free time over the next few weeks. This will be great because I am hoping to set aside enough time to develop the game to a point where i can release the first prototype of the game.
In order to get to this stage, I am happy to show a road map to prototype V01:
Complete mapping out Mid-town (Name in development) – 40% complete
Create interior’s for shops and other buildings in Mid-town – 5% complete
Add NPC’s and events to Mid-Town – 10% complete
Develop a town notice board for quests (Mid-town) – 0%
Generate and develop quests to be given from the notice board and NPC’s in the town – 5% complete
Complete Tavern (1F, 2F and cellar) Including internal quests – 60%
Complete Sewer, Mapping is complete however eventing and questing areas are needing to be setup (thinking about a secret shop hidden in the sewer). Overall 45% complete
Script NPC dialog – 15%
Implement dialog – 10%
Script at least 2 NPC’s to allow them to join the players party (have an existing NPC in mind)
Debug and fix battle system (calculations are preventing player taking damage) – ???%
Create classes for player and NPC’s (currently standard RPG MV classes) – 25% complete
Test and expand upon reputation system – 40% complete
Develop Initial Game start and basic path for the prototype – 35% complete.
Currently out of those tasks completion of this goal is about 19% overall, So lets break down each one of the goals above and establish the where I am currently up to, what I feel i need to do and thoughts on how i may expand on that at this point or maybe into the future.
Complete mapping out Mid-town
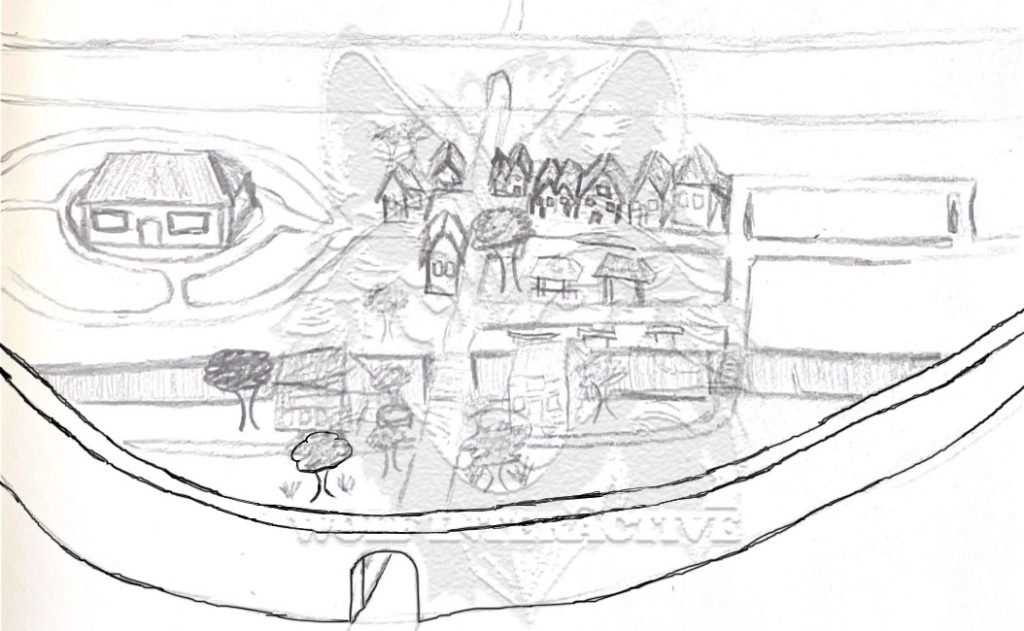
So as it stands I consider “Mid-town” to be about 40% complete and to be honest my concept drawing of the town isnt much more complete then that. as you can see by the image.
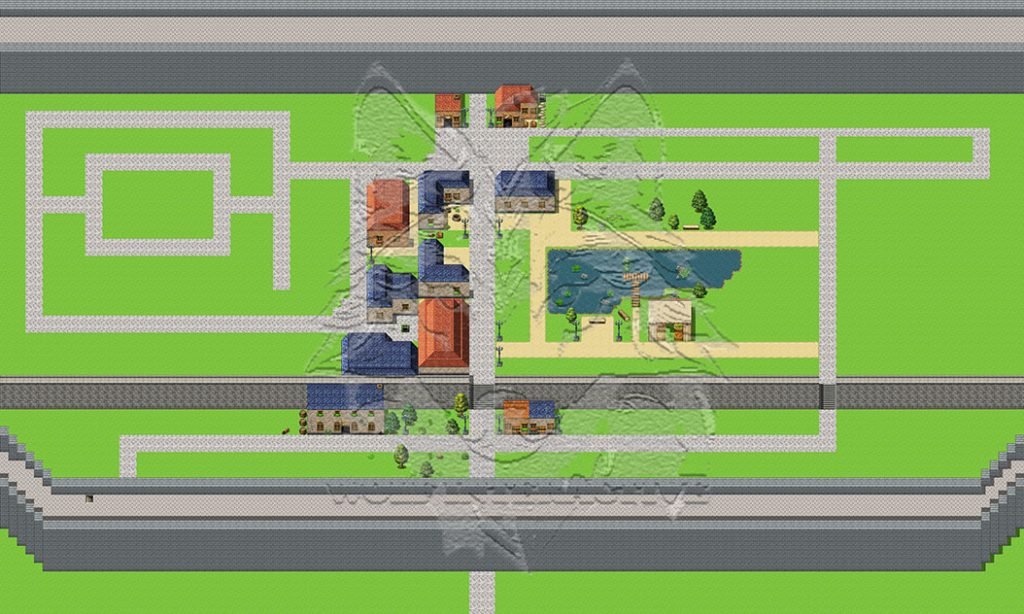
Well maybe it was a bit more complete then i remembered however I never finished it. However it did give me enough to go off to start developing it in engine with a few tweeks and changes as seen below.
From the image above you can see that it is not at all near being complete. You can see the tavern is in the bottom section of the map and then the main town above, there are also currently two shops at the top of the map which may very well eventually move because there will be an entry to the upper town and castle. So I may alter this plan to have a guard post instead.
To the left there is a circle that will be the main guard building which will be where the player can interact with some NPCs and it could eventually also be the gaol.
To the right, there will eventually be houses that may or may not be accessible and this could also be determined by a few different variables.
For this to reach 100% completion I will need to finish painting/ building all of the buildings, foliage, water and lights. As it stands i am not sure exactly what sure what I am going to do in the lower half. I do know i want to show some sort of shanty town outside the main wall be it old run down wood buildings or tents.
Create interior’s for shops and other buildings in Mid-town
The only interior that is mostly complete is the tavern building which I will elaborate more on later in this blog.
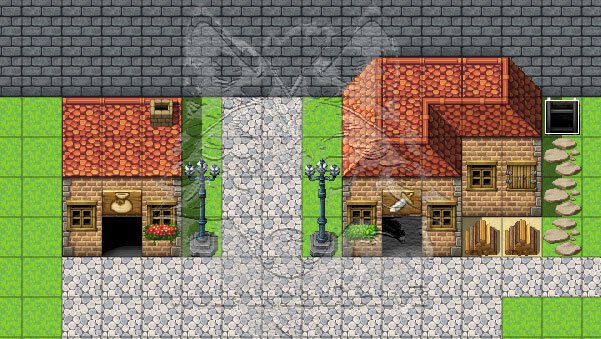
I will need to concept a few interiors for the homes as well as the shops which will be throughout the game as the player progresses. Mid-town at current only has two other shops on the town map and that is the main shop and the weapon shop.
In the top right you can see a ladder access which takes the player to the sewer. I am planning on having these access locked until the player completes a quest that they perhaps get a key to open these access points. there is another south of this location.
Depending on the size of the outside will determine the size of the shop on the inside, in the image the general shop will be relatively small where as the weapon shop may have a back area with a smithing station. I have yet to even consider a crafting mechanic for this game. at all..
Add NPC’s and events to Mid-Town
At this stage in development there is only one NPC visible in the town itself and that was more to act as a reference for a little tent stall I was concepting. This particular NPC currently does not have a name nor any programming. Please feel free to leave a suggestion on their name. The sprite is also only a place holder for now and may eventually change.
Overall I would like to add at least a dozen NPC’s that will wonder around the town and that just grunt or utter pleasantries to the player.
I would also like at least four or five NPC’s that will communicate more in depth and perhaps provide a quest. They may also only interact with the player after they have completed a quest for that NPC from the notice board.
Develop a town notice board for quests (Mid-town)
Firstly I need to prototype this concept further and find or create some sort of sprite for it to be in the town itself either in the town center or near the stairs the player has to climb to enter the town proper. The only thing I have close to this concept is a note on the wall in the tavern. So I will need to setup an event and script a choice function for the player to select quests from the board.
I would really like to have a pool of quests that this board could call upon randomly and display five or so at a time.
So there is a little bit to figure out with this goal as well as seeing if i can integrate it with the already present quest tracker (I am considering doing a separate post on this)
Generate and develop quests to be given from the notice board and NPC’s in the town
For the quest board to be usable there needs to be quests for it to show to the player, for this to be accomplished I’ll have to brain storm at least a dozen or more ideas for quests the player can do around town such as find a missing item, catch a NPC’s run away pet or to venture into the sewer and defeat enemies or even complete bounty’s for the guard.
Complete Tavern (1F, 2F and cellar) Including internal quests
Ok so complete it almost is, alot of what the game currently has in it was tested and practiced in this little tavern and I feel that it may get a make over to the second concept image I showed in the last post.
First floor is the most complete and has NPC’s sitting at the table and one is walking around which i am thinking could be a party NPC, you’ll need to complete a few quests for that character first.
There is also a quest on the wall to collect the empty plates for the tavern owner behind the bar. for the moment the NPC is transparent and can be walked through to access the cellar however I plan to change this and add an excuse me option to their conversation tree to move them for the player to get past, this will be appear after you complete a few quests for the tavern owner. I also need to come up with a name for the NPC
At this point the 2F is complete except for NPC’s and events, I might add a few sleeping NPC’s in some of the beds which will perhaps have locked doors.
When the player sleeps at the tavern they are teleported to one of the rooms after the fade out and in.
Lastly for the Tavern is the Cellar and it is one of the more complete rooms, however I may change this to have some sort of different appearance or a chance of an enemy attack.
But for now this serves as the main entrance to the sewers which for the the prototype will be one of the main questing areas as well as the area the player can battle and level up.
Complete Sewer, Mapping is complete however eventing and questing areas are needing to be setup (thinking about a secret shop hidden in the sewer)
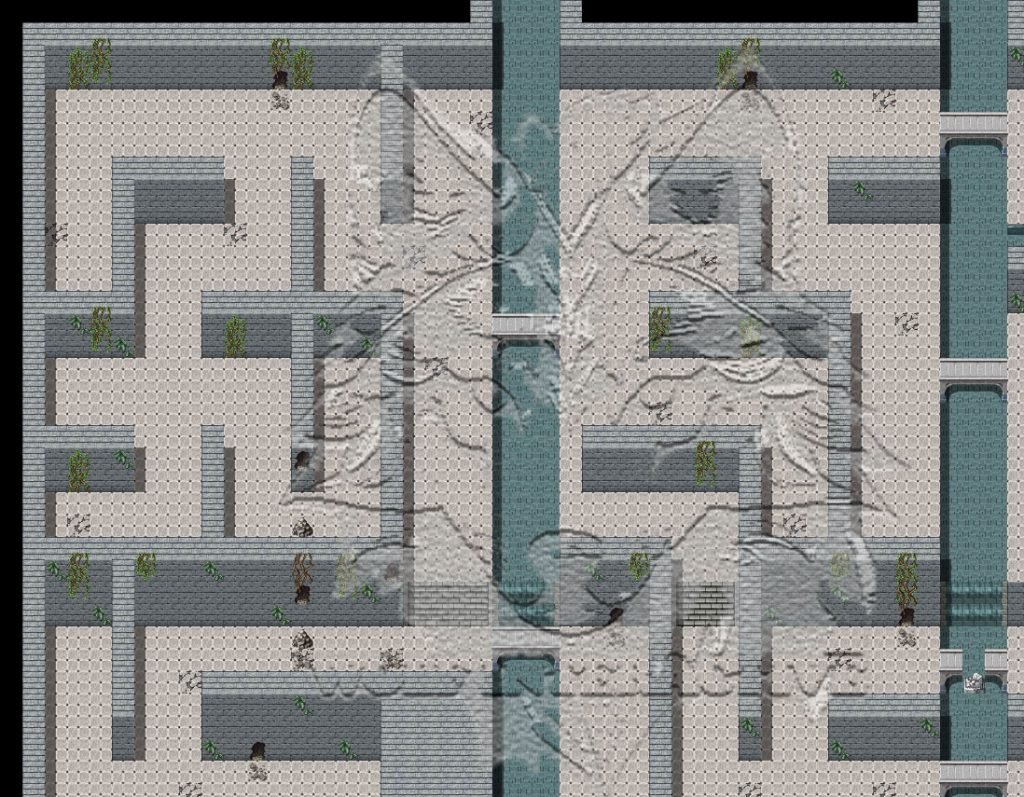
This by far is the biggest map in the entire prototype and the most intricate. I have probably put the most time into designing, mapping out and painting this map mostly because for this stage of development it is the main area that the player is going to operate in.
It has areas where the player steps through door ways to get through the wall and some of those doors lead to little maps inside of the sewer it self. I have toyed with the idea of having a sub cavernous area under the sewer however I have yet to decide this.
The image doesn’t show the full extent of the map however i would say this is about 20% of the final product. There will also be other aspects to the sewer and I’m planning on having a secret shop located somewhere. Currently there are active enemies which i will talk a little about below.
Script NPC dialog
As it stands there really isn’t a lot of dialog written for the game, just a couple of lines for really the only two interactive NPC’s at this point. I would like to write enough to make the game and quests interesting and not generic. I would also like most if not all interactions to have a choice to the player results may be determined by the players reputation
Implement dialog
Some Dialog has been implemented for testing purposes. however I do require most of what I will script to be implemented in game.
Script at least 2 NPC’s to allow them to join the players party
For the testers to get a good taste of what the game is meant to be like I am going to need at least two NPC’s to be able to join the players party however this is going to require the player to do some quests and increase their reputation with that person or their general reputation.
Debug and fix battle system (calculations are preventing player taking damage)
Currently the battle system works and the NPC’s take damage from the player but there are a few enemies that don’t seem to be able to damage the player, so I’m going to have to look at the calculations and do some math to get this working correctly.
Currently there are rats, bats and thieves for the player to fight in the sewer. I am not planning to have weird creatures and monsters in the game however some different enemies or allies maybe conjured or summoned by a mage or the like.
Create classes for player and NPC’s (currently standard RPG MV classes)
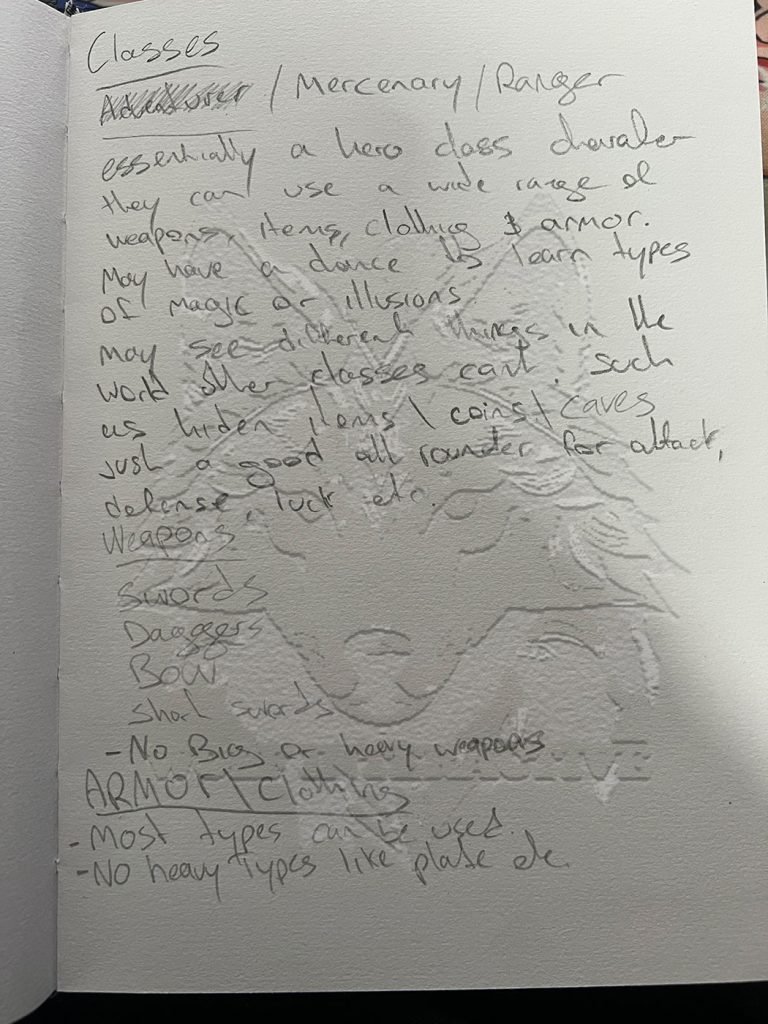
At the moment i am using the standard classes that come with RPG maker, While they are ok they are not complete and are only there as a base so I have started to write different classes out in my Codex book. I have yet to implement any of the classes I have written out.
At this stage for the prototype i am planning on having three different classes
Mercenary / Ranger
Knight / Paladin
Archer / Rogue
I will probably do a sub blog at some point to talk about these different classes however eventually I am intending on having a class upgrade system that will allow the player or NPC follows to be upgraded.
Test and expand upon reputation system
Currently I have a basic reputation system in place that when a player completes a quest it adds a certain value to global variable called reputation, yet to be implemented is the system that only allows certain interactions to occur when the players rep is over a certain amount. I also need to implement events that contribute negative reputation such as theft. once this is in place be careful because guards may come in waves to arrest you and take you to gaol
Develop Initial Game start and basic path for the prototype
So this is a hard one to plan for or to map for progress as it is the prototype as a whole, the way that I see it i would like the player to at least have a good hour or two of game play in the prototype. It will also need some clues to point the player in the right direction to move through what is playable in the first version. This means dialogue, quests, mostly complete back end systems, sound and a part story that can assist the player testing the core functions of the prototype.
Thank you for reading this blog entry into my game development series, once I am able to get to the prototype version I will be looking for testers to test and document their findings to then help with the second prototype so make sure you sign up and register to get notifications for when I do post.
For those that do want to test, I am planning to provide you with a document to complete for the prototype and I would also like to say thank you for your contribution by having you become apart of the game. So you will have your own NPC, Quest line and house which you can design yourself or by giving me some ideas on what you would like.
For some strange reason this post is missing some information and screenshots I will need to fix this post
Why?
In Unreal Engine 5, the ability to interact with items is a fundamental aspect of many games. One of the most common interactions is picking up items as our character moves over them. This mechanic not only enriches gameplay but also adds layers of complexity and engagement. Imagine your character collecting coins, gathering resources, or picking up key items essential for progression. By implementing item pickup and counting systems, we can create immersive and rewarding experiences for players, enhancing both the challenge and the satisfaction of the game.
The Process
If the object is a staticmesh you will need to convert it to a BP do so by adding the item into editor and then using the blueprint button convert selection to blueprint.
If the object is a staticmesh you will need to convert it to a BP do so by adding the item into editor and then using the blueprint button convert selection to blueprint.
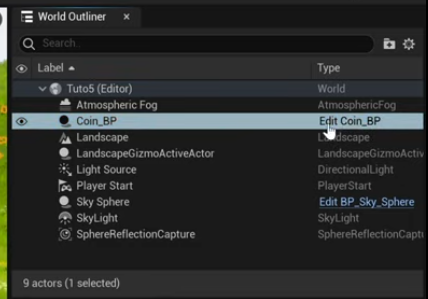
Edit the added object blueprint from the world outliner.
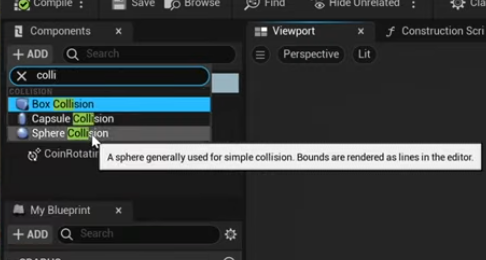
Once in the editor open viewport and you will need to add a collider. (which one depends on the item)
Now rescale the collider to match the item
Next scroll down in the right menu and find events. Select on component begin overlap
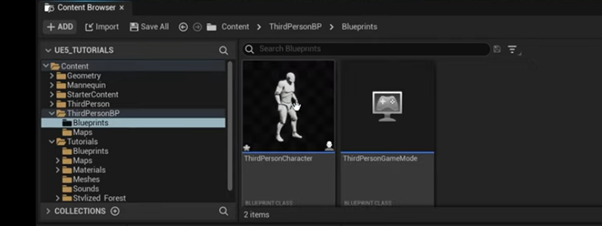
In the editor cast the event to the character. If using the 3rd person template cast to ThirdPersonCharacter and add other actor from the event into the object of the cast then to show the item has been picked up connect the cast to a DestroyActor (don’t forget to compile)
Create a counter for the item
What good is an item if we do not know what we have, or how many we have picked up? Lets create a simple counter.
First open up your Character Blueprint (First person/ 3rd person/ top down)
Select viewport from the top tab and then create an overlap event from the details menu (on the right)
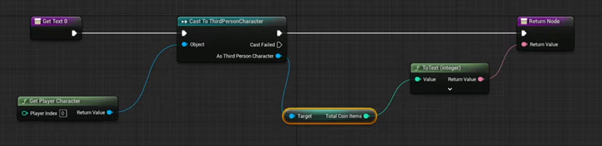
The event will be triggered by the coin actor with a Cast to “object name”, we will also create a Variable as an integer and call it TotalCoinItems and specify the default value will be 0. We will the Set the value by dragging off the cast and getting our variable and adding 1 and connect it to our set
To add a counter to the screen you will need to add a GUI widget and bind a text box and use the following code
Conclusion
This is how we are able to interact with items on a basic level and have a counter on the screen showing the amount of items we have picked up.
For some strange reason this post is missing some information and screenshots I will need to fix this post
The crouch. One of humanity’s most basic movements. Humans have been crouching since they figured out that going under things doesn’t always require us to crawl. Sometimes in games we need to duck under objects or sneak past enemies so this mechanic can be very versatile and we can build many different game mechanics into it as an example some of these could be to improve accuracy when shooting / Snipping, to reduce the characters detection rate when sneaking some games have even used crouching jump combination to reach higher platforms. All in all it can be a very useful thing to have in your game.
Resources
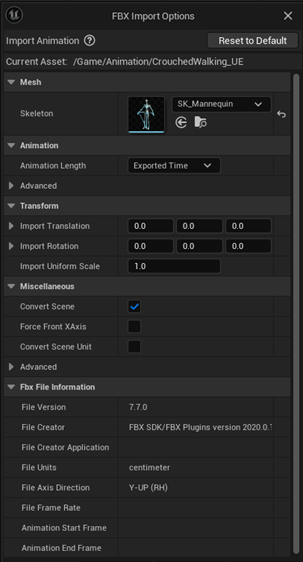
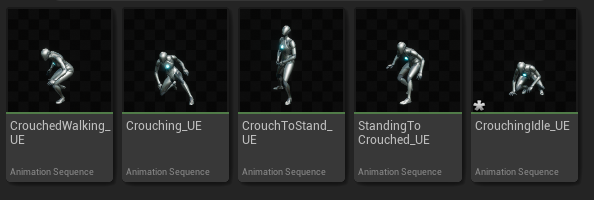
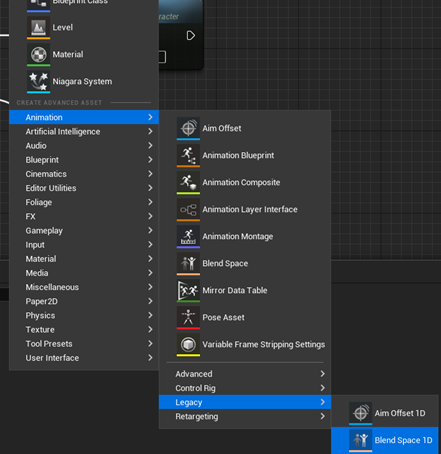
Provided Crouching Animations converted from Mixamo
Since 5.3.1 released we do action mapping a little bit different, no long are we going into your project settings and mapping from there. Now we are adding an Input action and adding that to a IMC (you can have multiple of these)
Now we are going to create a new input. Navigate to Content>Thirdperson>input>Actions. Right click and go to input and select input action and name it IA_Crouch. Once created open it and leave all the options as default and click save and close it.
Now we need to add it to our input mapping context, should be in the previous folder. Its call IMC_Default, open this up so we can add our mapping.
Use the plus button and from the drop down select our IA we just created and bind it to the Left CTRL key and make sure you save.
For our next step we are going to open our character Blue print (ThirdpersonBP) and setup the blue print for crouching.
Left click and search and add the action map we just created IA_Crouch and click on its expand arrow. Drag from the Started pin and search for and add the crouch function. From the completed pin add Un Crouched.
Select the Character Movement in the components tab on the top left and search for crouch.
Here we are going to click on the option at the bottom called can crouch.
We can also change our crouch speed as well as our height. The height options changes our collision capsule so we can fit under objects or landscaping you can change this if you wish. This wont make your actor animate into a crouch yet it will just reduce the size of the collision capsule. If you decide to test it at this point all you will see is the camera move. (You can also make the collision capsule Visible to test also)
Another thing that you can do at this point is that If you feel the camera movement isn’t smooth enough you are able to enable camera lag. What this will do is smooth-en the camera movement when you toggle the crouch. In order to do this select camera boom in the components tab then search for lag in the details tab and enable camera lag
Animation configuration.
Next we are going to setup the animation, we need to import the animations that are compressed in the CrouchAnim.zip file. You can click and drag or add them how you see fit. Create a folder under content call it Animation (Can add a subfolder if you wish) and add them here. You will be prompted with a FBX import options, target the SK_Mannequin skeleton and import all. Once done you should see all Five animations imported. (We are only going to use two for now, however having the others there will be good for future use)
Before we setup the blend space we need to modify the CrouchedWalking Animation to stop it repeating so open it up and on the left under asset Details we are going to enable two options EnableRootMotion and Force Root Lock
Now we are going to setup our animation blend space. To do so right click in your animations folder and goto Animations>Legacy>Blendspace 1D and select the sk_manequin and call it ABS_Crouch
Open up ABS_Crouch and Under the Asset details tab find the horizontal axis and change the name to Speed and set the Maximum Axis Value to the speed you set in the blueprint. Default is 300. Also change your grid divisions to 2 and select snap to grid.
Now on the right under asset browser find your crouch idle and drag it to the left side of the time line and then find your Crouchedwalking and drag it to the right side of the timeline.
If you hold Left CTRL and move your mouse over the time line the animation should play.
Save and Exit.
Configuring the AnimGraph in the character BP
In the content browser navigate to Content>Characters>manneqiuns>Animations and select the ABP_Manny. (this also works with custom characters.)
Find the Sequence node in the middle of the current screen and select add pin, next either get the movement component or copy and paste it from one of the existing one’s on the screen. Drag from the pin on the new movement node and add is crouching. Right click the return value and promote it to a variable and call it isCrouching? Now connect the Set to the new pin you created earlier.
Now goto the eventgraph tab in the top middle and when it is open access the AnimGraph this should be a tab in the middle top section of the screen and open up the locomotion state machine. You should see something like this
Create a new state machine and call it Crouched drag off the pin and create a new Cache pose and call it crouched.
Open the Crouched State machine and add a new state from the entry and call it crouched locomotion.
Open Crouched locomotion and add in our ABS_Crouch animation from the asset browser to the right and connect it to the result. Then from the speed pin drag it out and get ground speed.
Go back to the main AnimGraph page and open up Main States State machine. Add a new state and call it Crouched Locomotion and connect it to locomotion and back (this can be tricky at first, try dragging from the border)
Click on the locomotion to crouched locomotion. Add the variable isCrouching? And connected it to the result.
Now do the same for Crouched locomotion to Locomotion, add the variable isCrouching? From the pin drag it out and add a NOT bool and connect it all to the result.
Open up crouched locomotion now by double clicking now add our cached pose (Crouched) to the result
Compile and save.
Conclusion
You have now created a crouch input action and designed an animation blend space to facilitate crouching. This means you can now duck under low objects and hide behind cover like a true stealth master. Well done!
This versatile mechanic opens up a world of possibilities, from enhancing shooting accuracy to reducing detection rates. How you choose to implement and balance these pros and cons is up to you. Happy crouching!