
Build a leaderboard that actually remembers the champions. This written version follows the full Blueprint walkthrough, with screenshots for each part of the build. Click any screenshot for its full-size view.
A high score board is one of those features that looks simple on the surface. Get a score, put it on the screen, done!
There is one small problem though.
If we simply store our high score inside a normal Blueprint, the moment the player closes the game that information disappears. Not particularly useful if somebody finally beats the high score, celebrates their victory, closes the game and discovers that Unreal Engine has promptly forgotten all about it.
In this tutorial we are going to create a basic high score board that can store player names and scores and, most importantly, preserve those scores between game sessions.
To do this we are going to use four parts of Unreal Engine:
• A Struct to define what information makes up a high score.
• A SaveGame Blueprint to permanently save our high scores.
• A GameInstance Blueprint to manage the score information while the game is running.
• A Widget Blueprint to display the scores to the player.
Why Are We Using These?
Before we start connecting Blueprint nodes together, it is worth understanding what each part actually does.
Think of our high score system as a small filing system.
The Struct tells Unreal what information belongs on each score card. The GameInstance is the person currently holding and organising those cards while the game is running. The SaveGame is the filing cabinet where those cards are placed so they are still there next time the game starts. Finally, the Widget is simply the nice-looking board on the wall that allows the player to see them.
Keeping these jobs separate makes our system much easier to understand and expand later.
WATCH THE WALKTHROUGH
Video tutorial
Prefer to follow along in Unreal Engine? Here is the full video version. You can use the written guide and screenshots below alongside it.
 Play the full high score board tutorial
Step 1: Creating the High Score Struct
Our first job is to decide what information makes up a high score.
In the Content Browser, right-click and select:
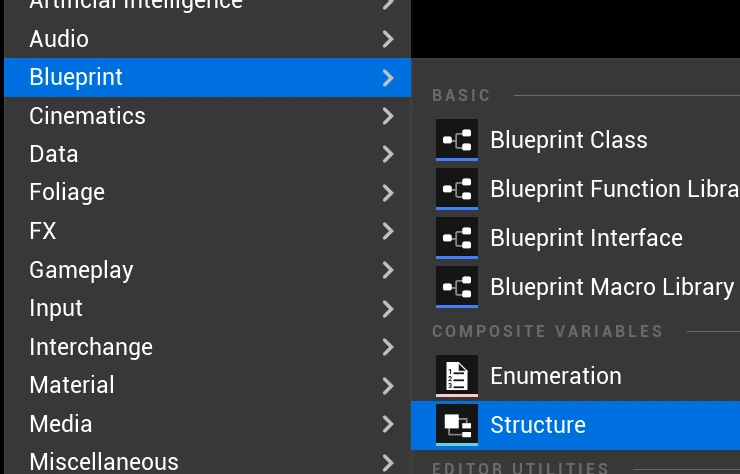
Name the new Structure ST_HighScore
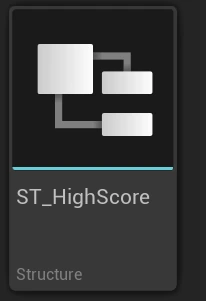
Open the Struct and add the following variables:

For now, that is all we need. Each entry in our scoreboard can now contain both the player's name and the score they achieved.
Anthony | 12500
Sarah   | 10250
Dave    | 8900
Later you could expand this Struct to include things such as the date the score was achieved, the level played, difficulty setting or even the character used.
Step 2: Creating the SaveGame Blueprint
Now that Unreal knows what a high score looks like, we need somewhere to permanently store them.
Right-click inside the Content Browser and select Blueprint Class
Search for: SaveGame
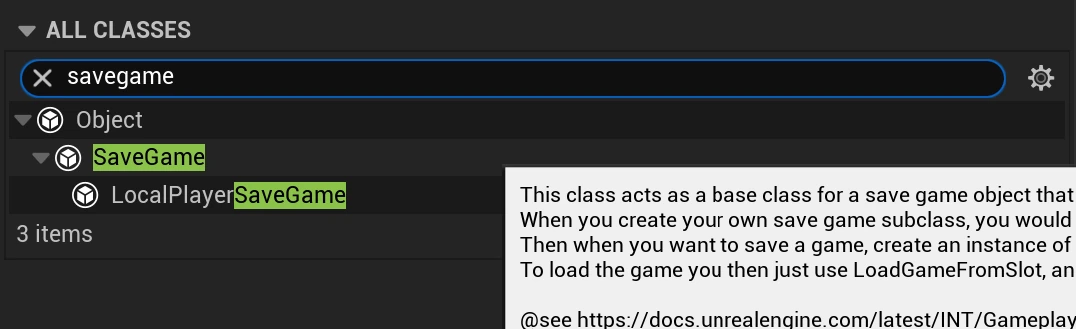
Create the Blueprint and name it BP_HighScoreSave
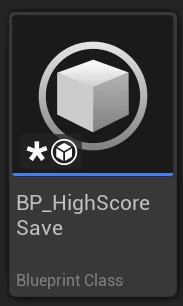
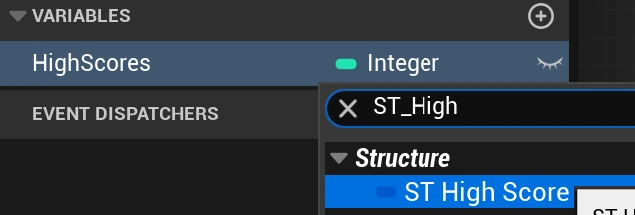
Open the Blueprint and create a new variable called HighScores and set its type to ST_HighScore
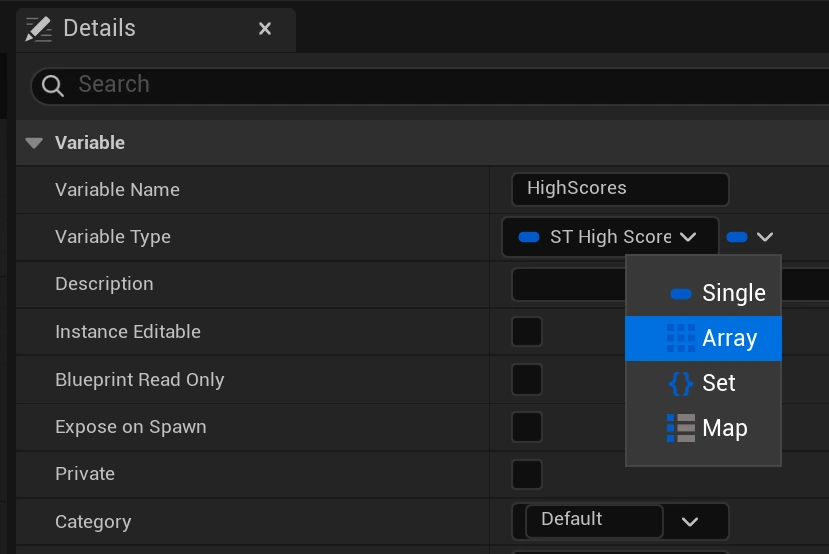
Then in the details section turn it into an Array.
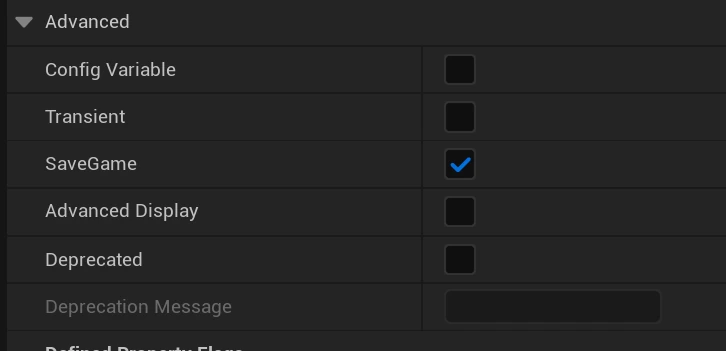
While we are here goto Advanced and make sure SaveGame is ticked.
Why an array?
Because we don't want to store just one score. We want to store a collection of score entries.
HighScores
    Entry 1
    Entry 2
    Entry 3
    Entry 4
    Entry 5
Each entry contains the PlayerName and Score values we created in our Struct.
Step 3: Creating the GameInstance
Next we need something to manage our scoreboard while the game is running.
Create another Blueprint class and choose GameInstance
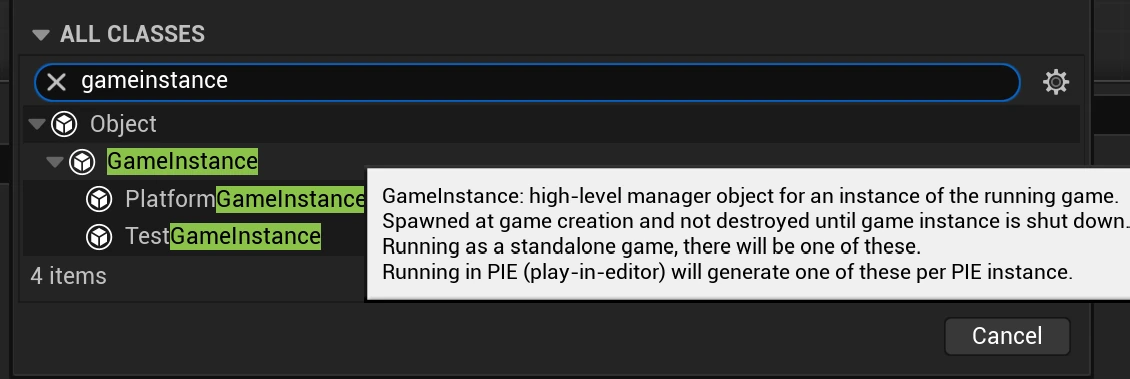
Name it BP_ScoreGameInstance
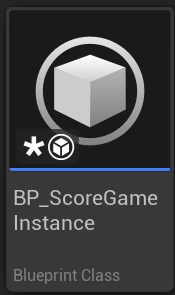
The GameInstance is useful here because it remains active even when the player changes levels.
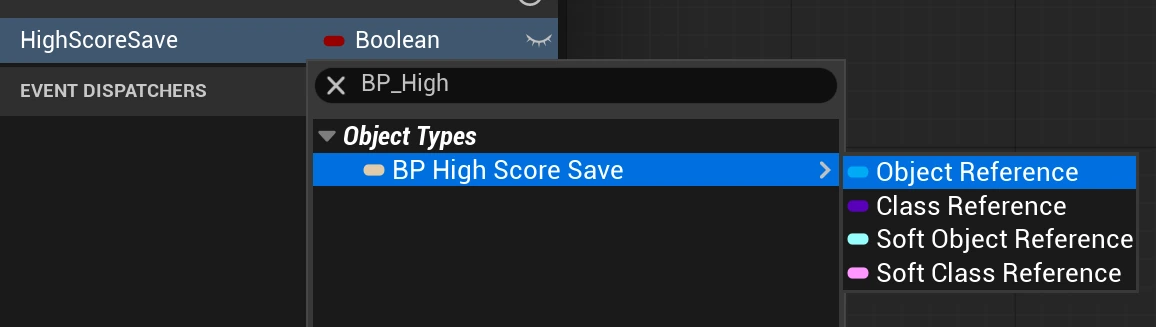
Create a variable called HighScoreSave
Set its type to BP_HighScoreSave Object Reference
Tell Unreal to Use Our GameInstance
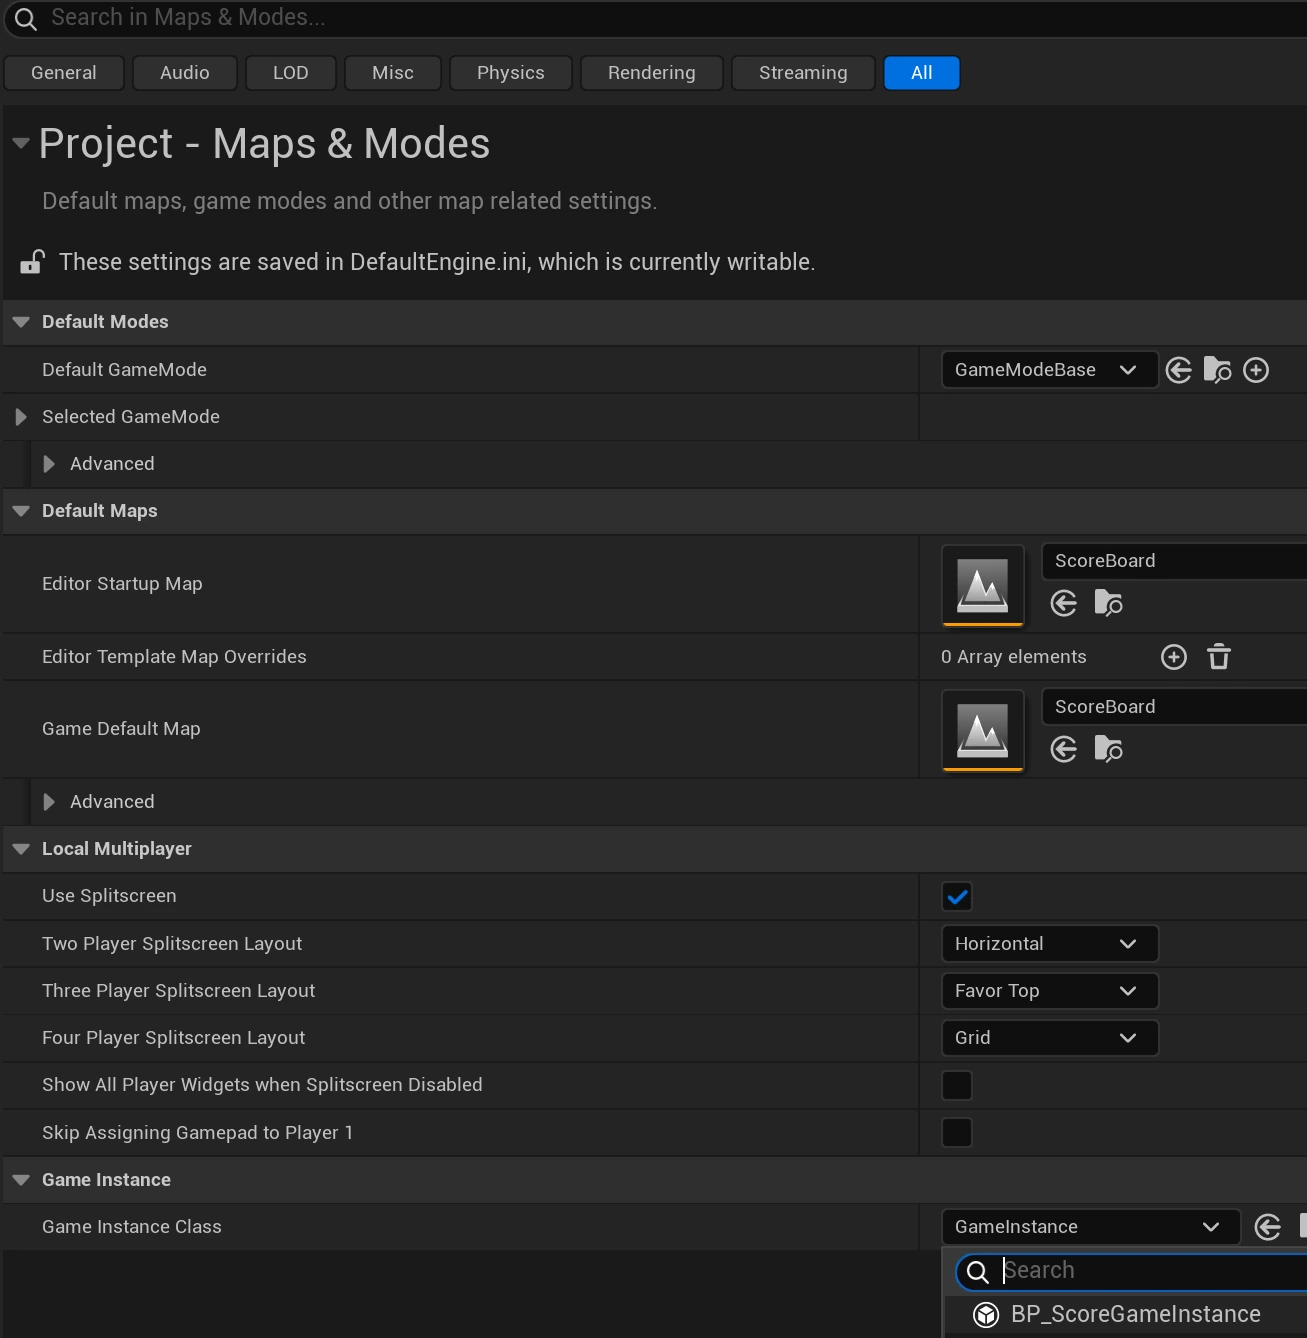
Creating a GameInstance does not automatically make Unreal use it.
Open project settings from the edit menu
Find Maps & Modes
Locate Game Instance Class
Change it to BP_ScoreGameInstance
Now our GameInstance will be created when the game starts.
Step 4: Loading the Existing Scores
When the game starts, we need to check whether a high score file already exists.
Open BP_ScoreGameInstance.
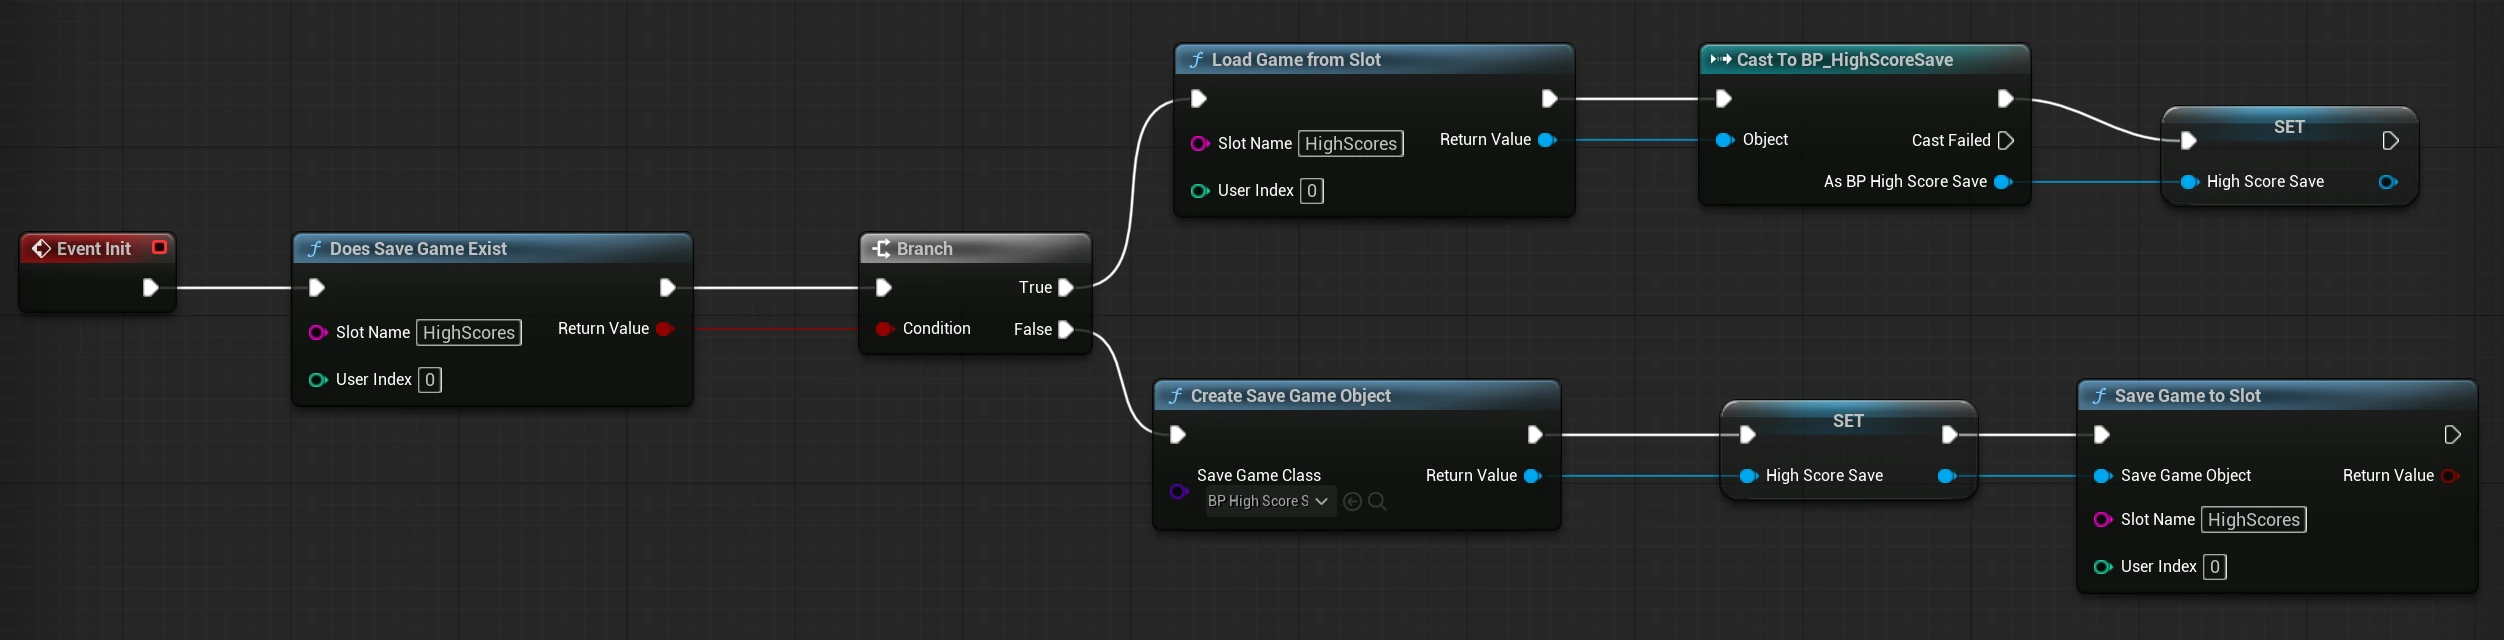
Add the Event Init node, add Does Save Game Exist
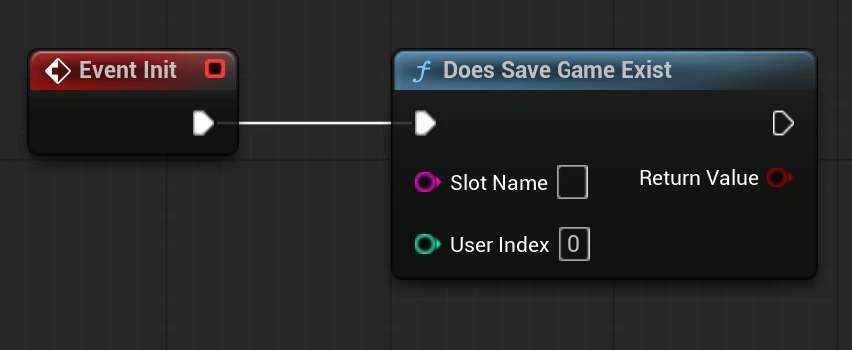
For the Slot Name enter HighScores (make sure you don’t add a blank space and it’s spelt exactly the same)
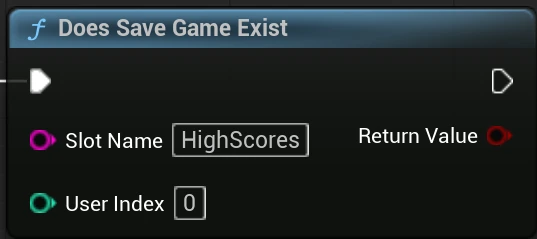
This checks the player's computer for our saved scoreboard.
From here we have two possibilities.
If the save exists, we load it. If it does not exist, we create one.
Event Init
      |
Does Save Game Exist?
      |
    Branch
    /    \
 True    False
  |        |
Load      Create
Save      Save
If the Save Exists
From the True output, add Load Game From Slot
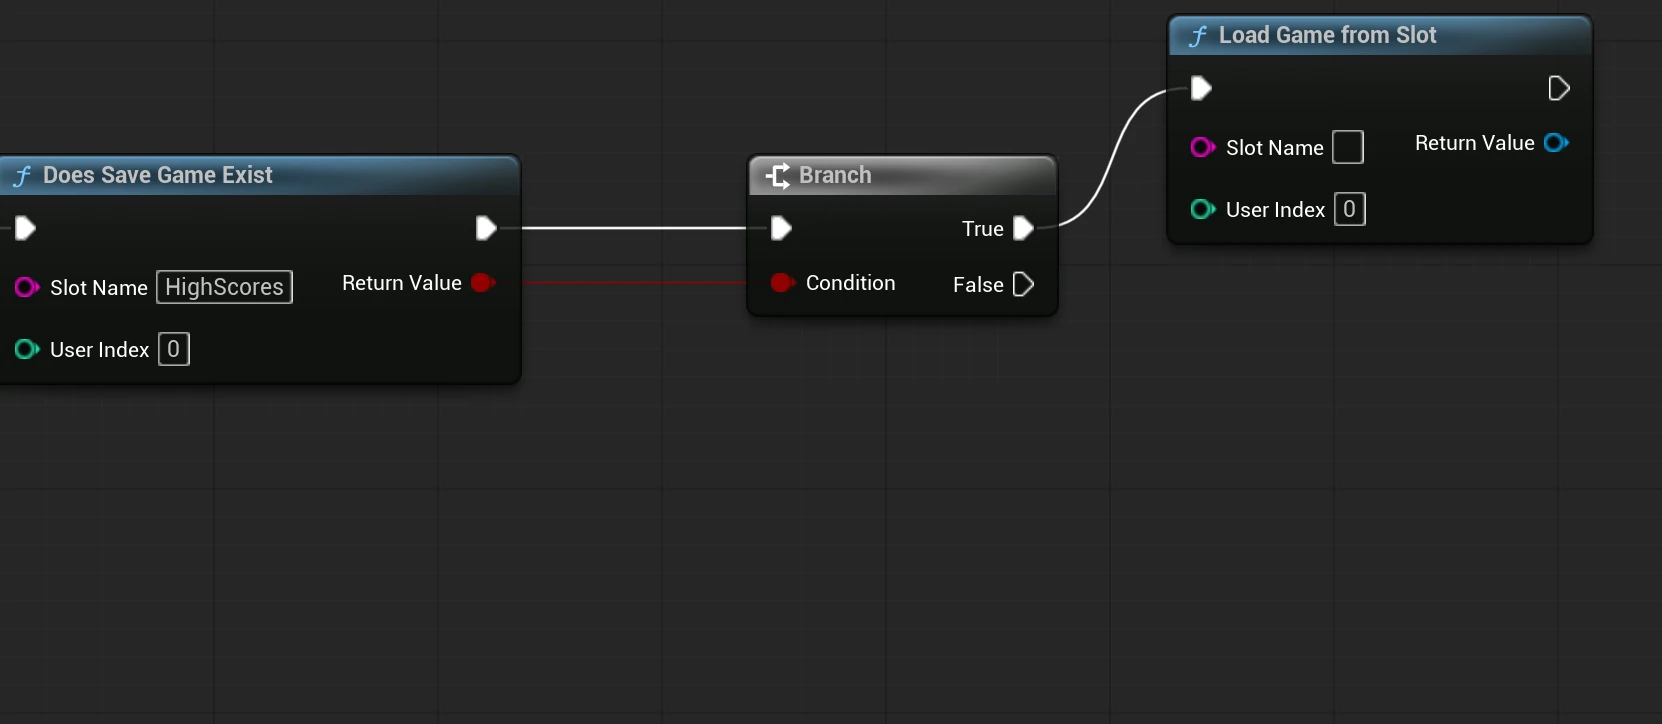
Use the Slot Name HighScores (make sure you don’t add a blank space and it’s spelt exactly the same)
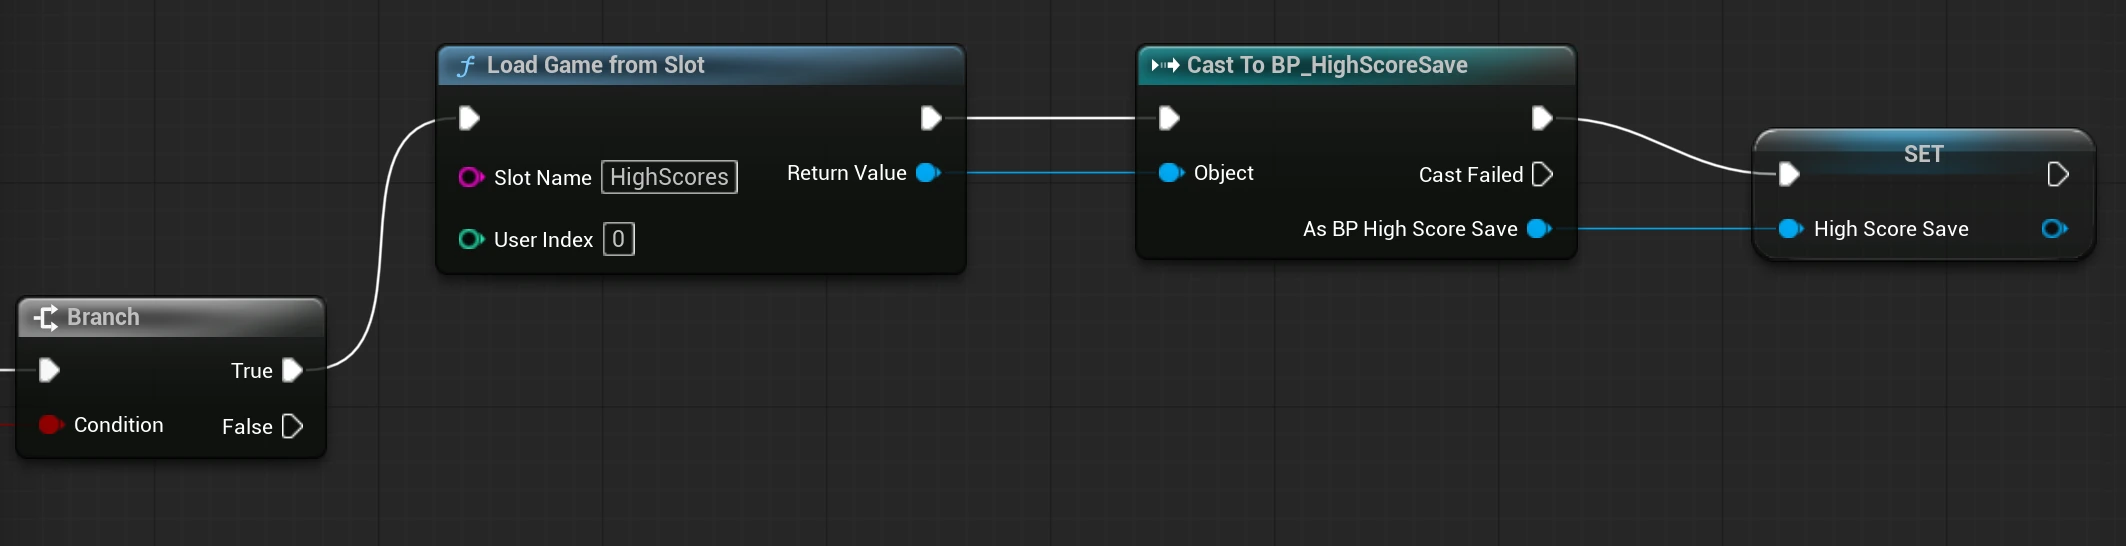
Cast the returned object to BP_HighScoreSave
Then set our existing HighScoreSave variable using the result. Our existing scores are now available to the GameInstance.
If the Save Does Not Exist
From the False output, add: Create Save Game Object
Set the Save Game Class to BP_HighScoreSave
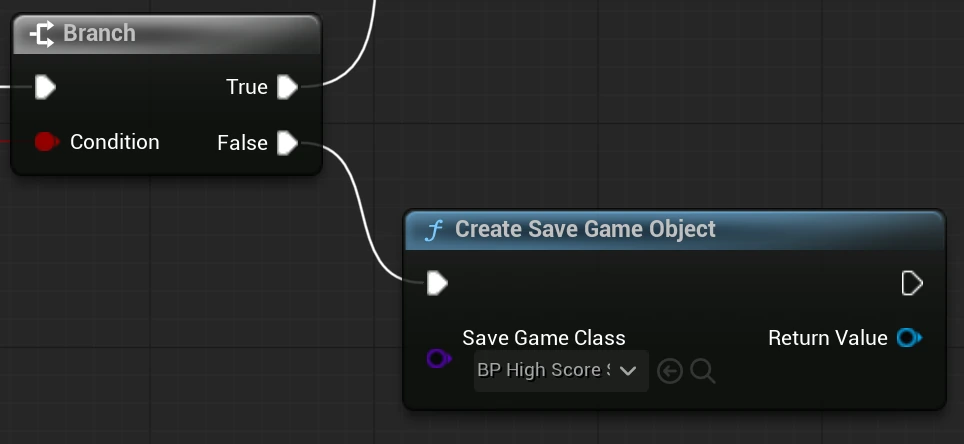
Set the HighScoreSave variable using the Return Value from Create Save Game Object. Then add Save Game to Slot, set the Slot Name to HighScores, and connect the HighScoreSave output from the Set node to the Save Game Object input.
We now have an empty scoreboard ready for the player's first score.
Step 5: Prototyping a Score
Before we start saving high scores, we need an actual score to save. If your project already contains a score system you will be able to connect it in here, for now I will create a function to insert a random score for now.
Create the Current Score
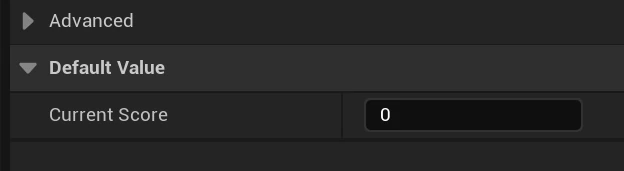
Open BP_ScoreGameInstance and create a new Integer variable called CurrentScore

In the details panel leave its default value at 0. This variable represents the score for the current game.
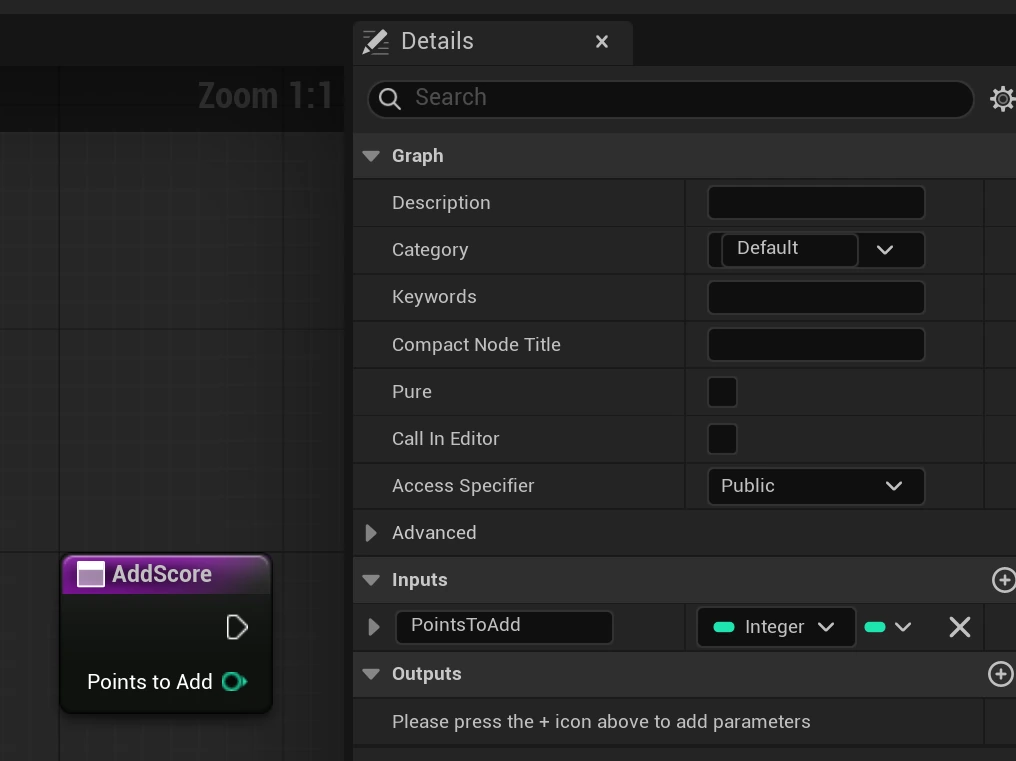
Now create a new Function called AddScore
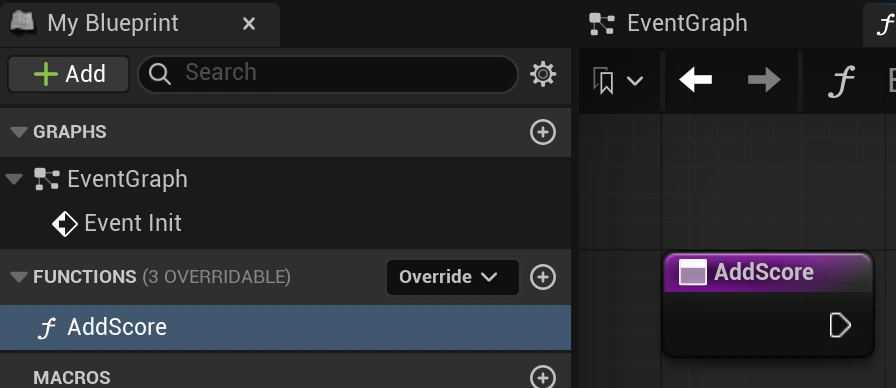
In the details panel give the function one Integer input called PointsToAdd.
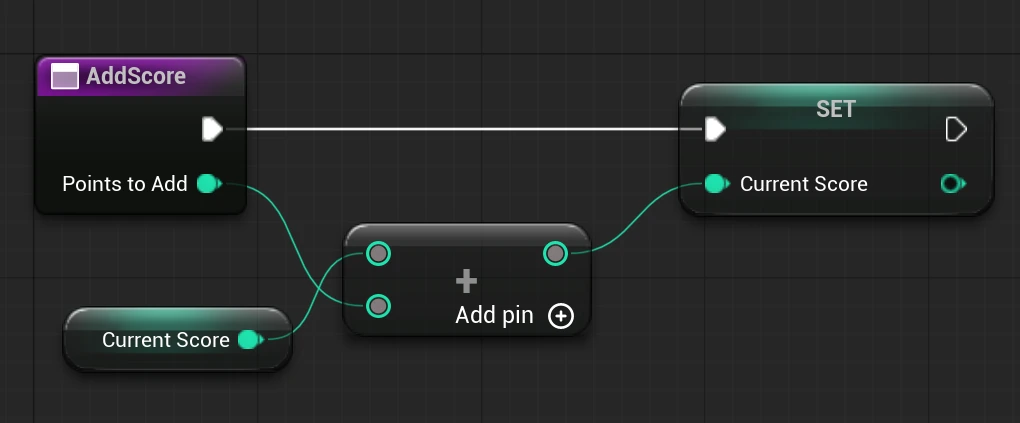
Inside the function, get CurrentScore, add PointsToAdd, and set CurrentScore using the result.
Step 6: Adding a New High Score
Now we need a way to add new scores.
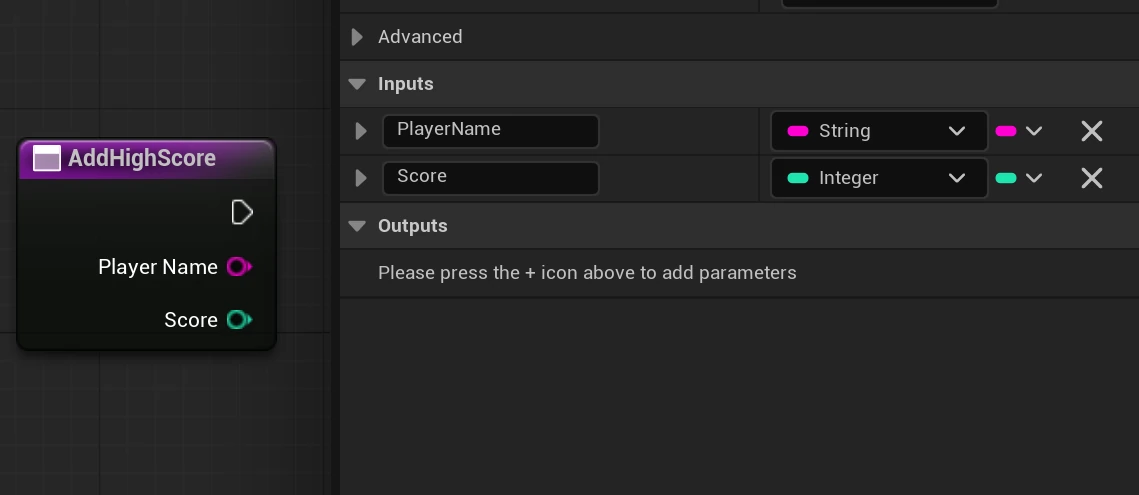
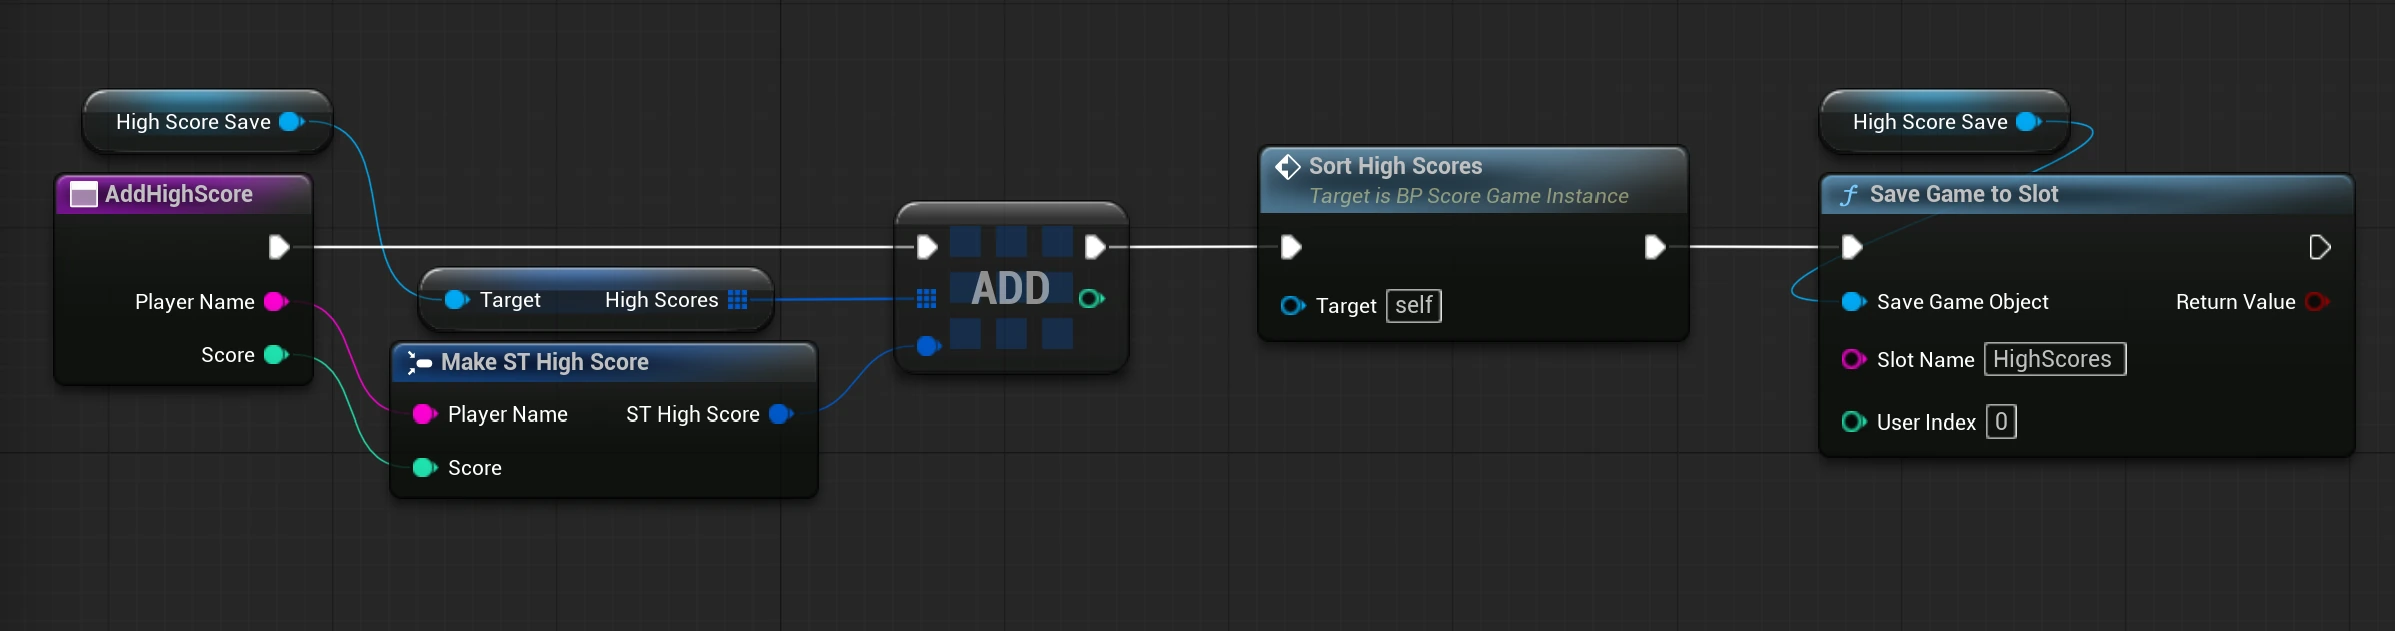
Inside BP_ScoreGameInstance, create a new Function called AddHighScore
Give the function two inputs PlayerName “String” and Score “Integer”
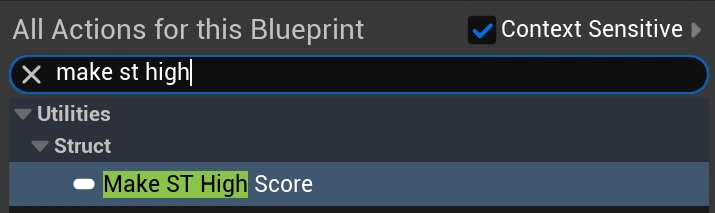
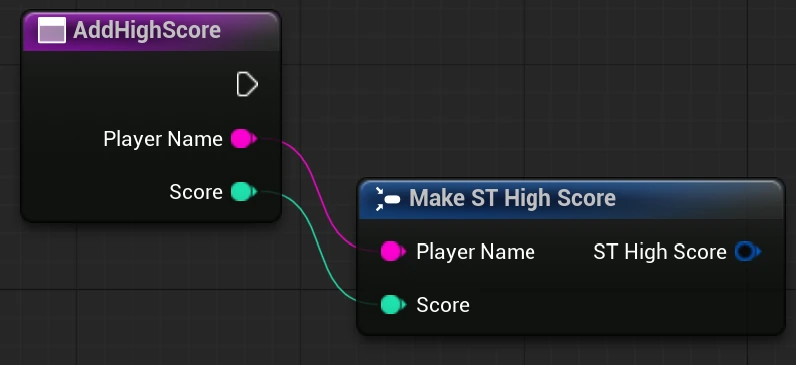
Inside the function, right click and create an ST High Score using Make STHigh Score
Connect our PlayerName and Score inputs.
GET HighScoreSave and from that get the HighScores array.
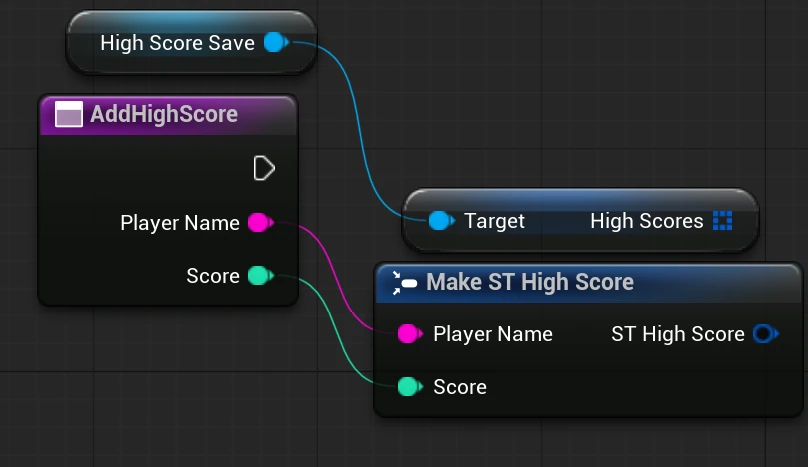
From Get High Scores, drag off the array pin and add an Add node.
Connect the ST High Score output to the Item pin on the Add node.
Finally, connect the white execution pin from the AddHighScore function to the white execution input on the Add node.
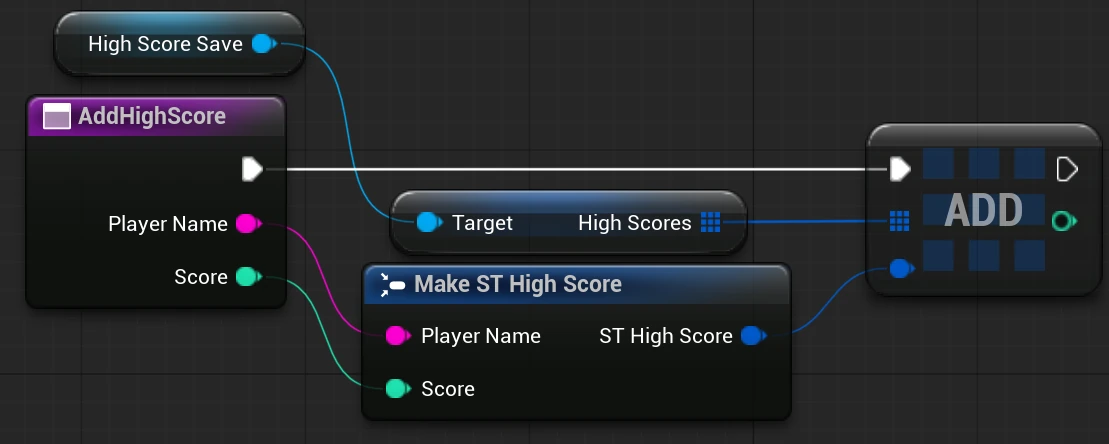
Our new score is now part of the scoreboard. There is one important step left though.
At this point the score only exists while the game is running. We need to save it.
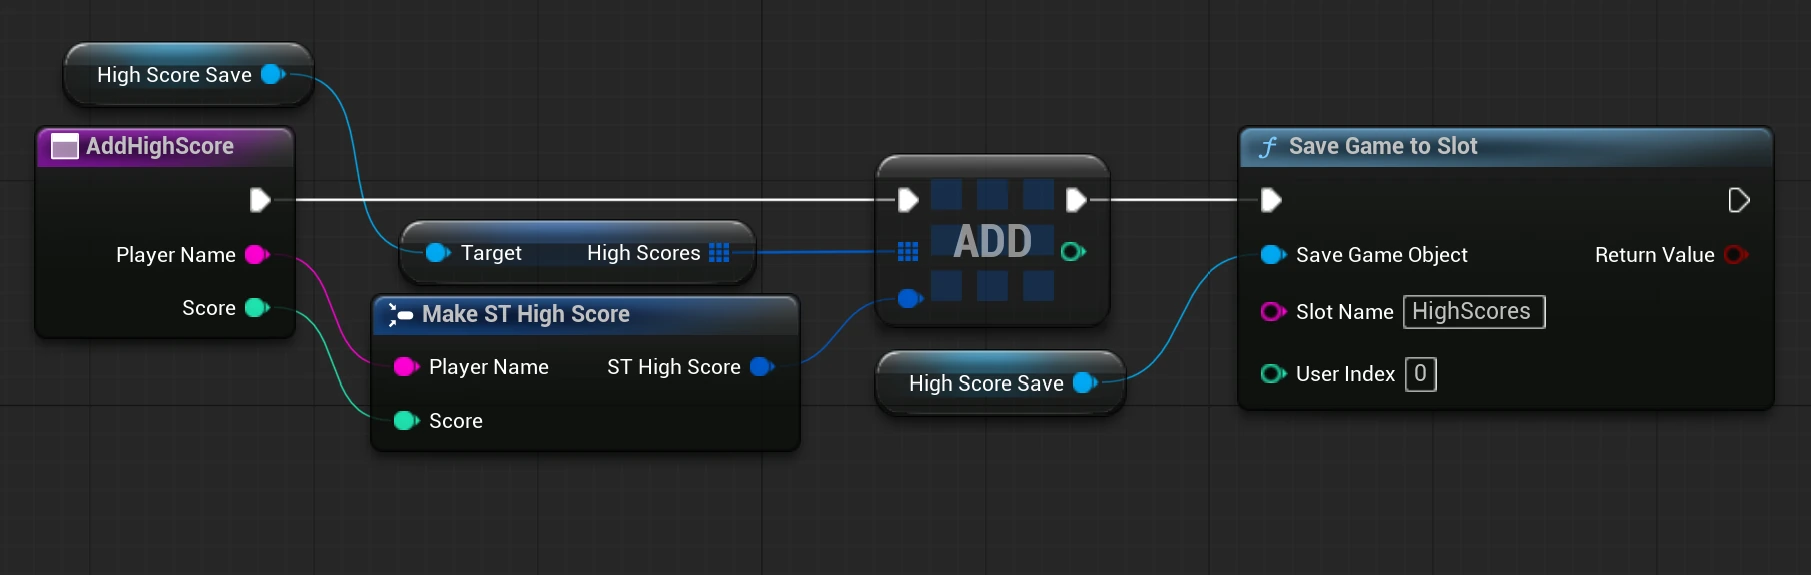
From the execution output of the Add node, add a Save Game To Slot node.
Connect the HighScoreSave variable to the Save Game Object input and once again use HighScores as the Slot Name.
Our new score is now added to the array and saved to disk. If the player closes the game and launches it again, the score will still be available.
If the player closes the game, launches it again tomorrow and loads the scoreboard, the score will still be there.
Step 7: Keeping the Scores in Order
At the moment we can add scores, but they may appear in the order they were added.
A high score board is considerably less impressive if the champion is hiding somewhere between Barry with 200 points and somebody who accidentally scored 14.
We therefore need to arrange our scores from highest to lowest.
Create another Function inside BP_ScoreGameInstance called SortHighScores
For a small Top 5 or Top 10 scoreboard, a simple bubble sort is easy to understand and more than fast enough. The idea is to compare two neighbouring score entries. If the second score is higher than the first, we swap them.
How the Comparison Works
Imagine our array currently contains:
[0] Anthony   5000
[1] Sarah     9000
[2] Dave      3000
First we compare Anthony and Sarah. Sarah has the higher score, so those two entries swap places:
[0] Sarah     9000
[1] Anthony   5000
[2] Dave      3000
We then compare Anthony and Dave. Anthony is already higher, so nothing needs to change.
Laying Out the Blueprint Loops
The easiest Blueprint version uses two For Loops. The outer loop repeats the sorting pass, while the inner loop walks through the array comparing neighbouring entries.
Right click and get a for loop, connect the SortHighScores function to it.
Get HighScoreSave, from it Get High scores Arry and then from that get the length
from the length array get a subtract node, bottom left field add a 1 and then connected the node to the last index of the for loop.
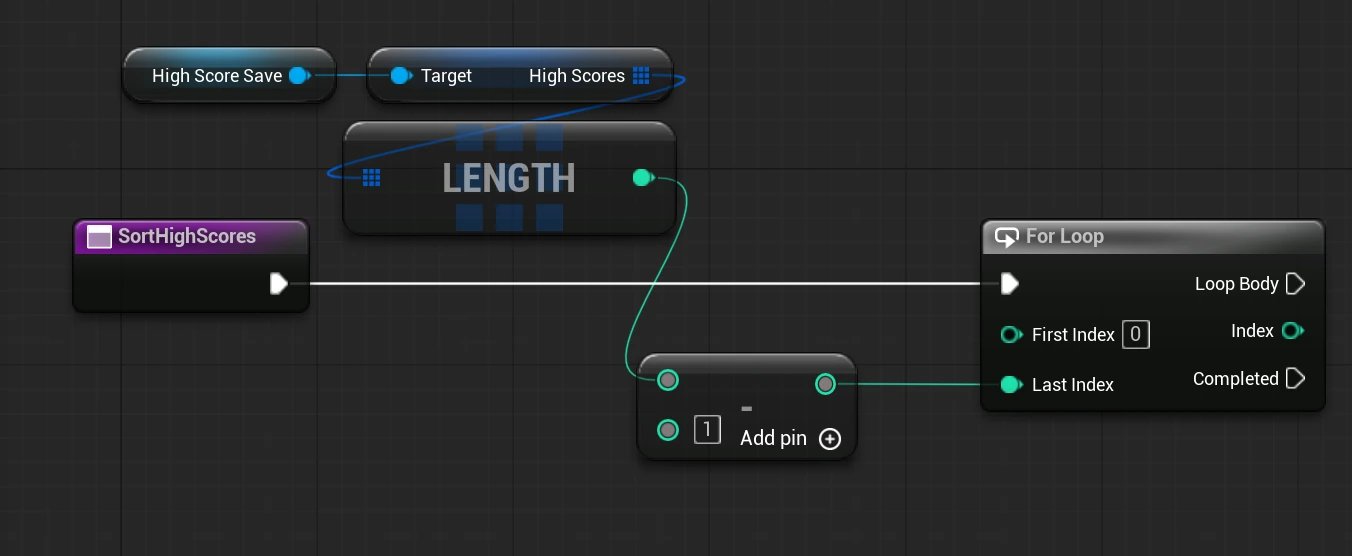
Next we are going to drag off of the for loop, loop body and add another for loop.
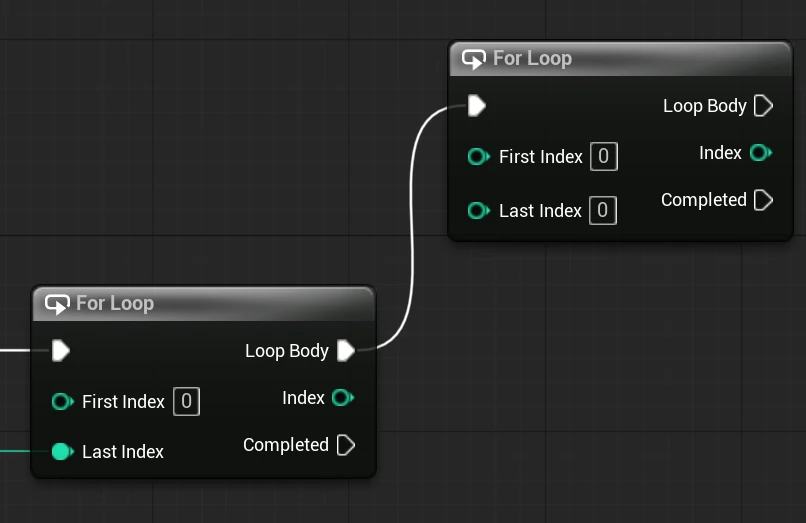
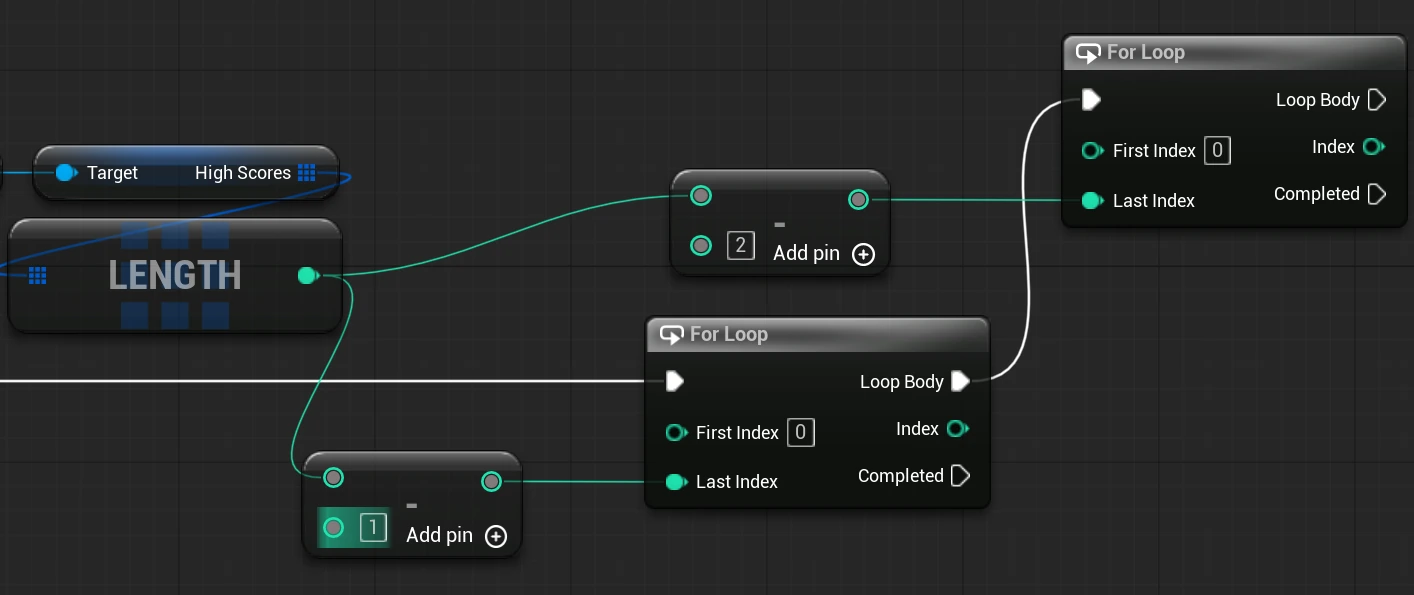
From the Array length drag off it again and add another subtract, this time enter 2 in the bottom left corner and connect it to the last index of the second for loop.
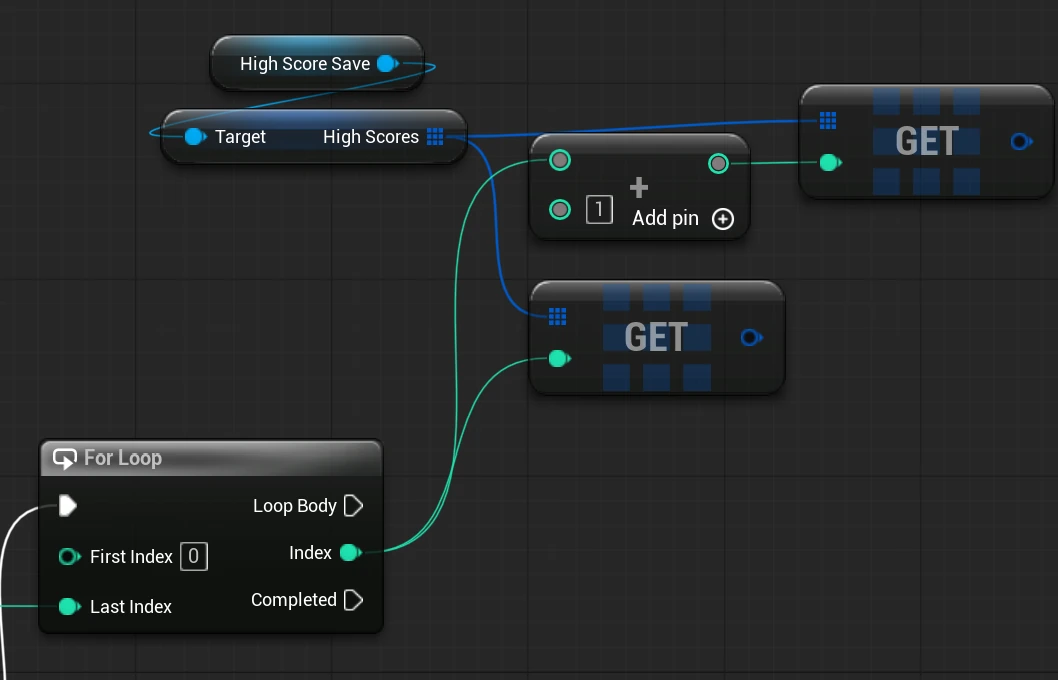
First, Get High score save again, drag off it and Get High Scores array.
Drag off of get High Scores array and Get (a copy) twice.
Drag off of the index pin of the inner loop (2nd one) and directly connect it to one of the gets.
Drag off of the index pin again this time get an add node, in the bottom left corner put a 1 and then connect it to the second get.
From each get drag off of its and get a break ST High Score, From the top one drag off of the score and get a greater then comparison. Connect the score from the lower one to the bottom of the coparison.
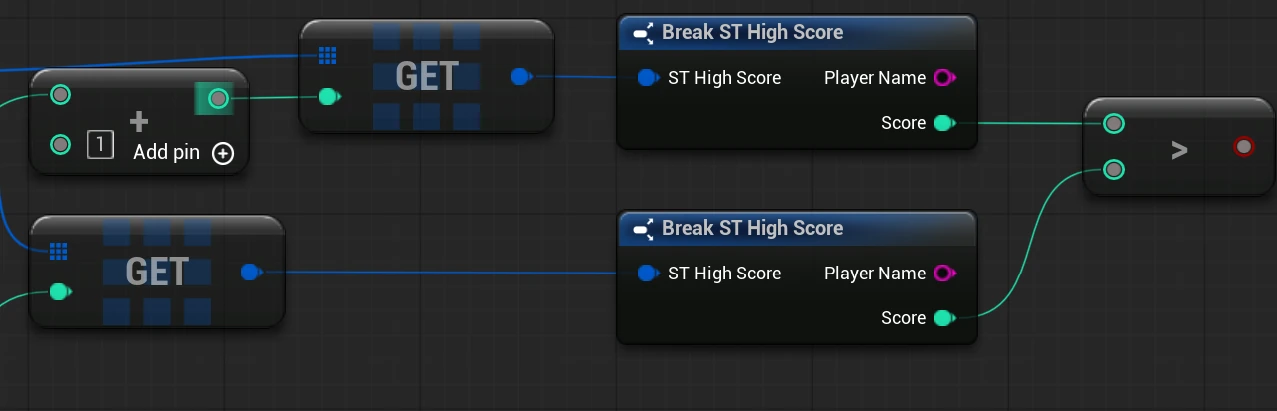
What this is asking is the next score higher then the current score?
Lets now add our branch condition, from the loop body of the inner loop (2nd one) drag off of loop body and add a branch.
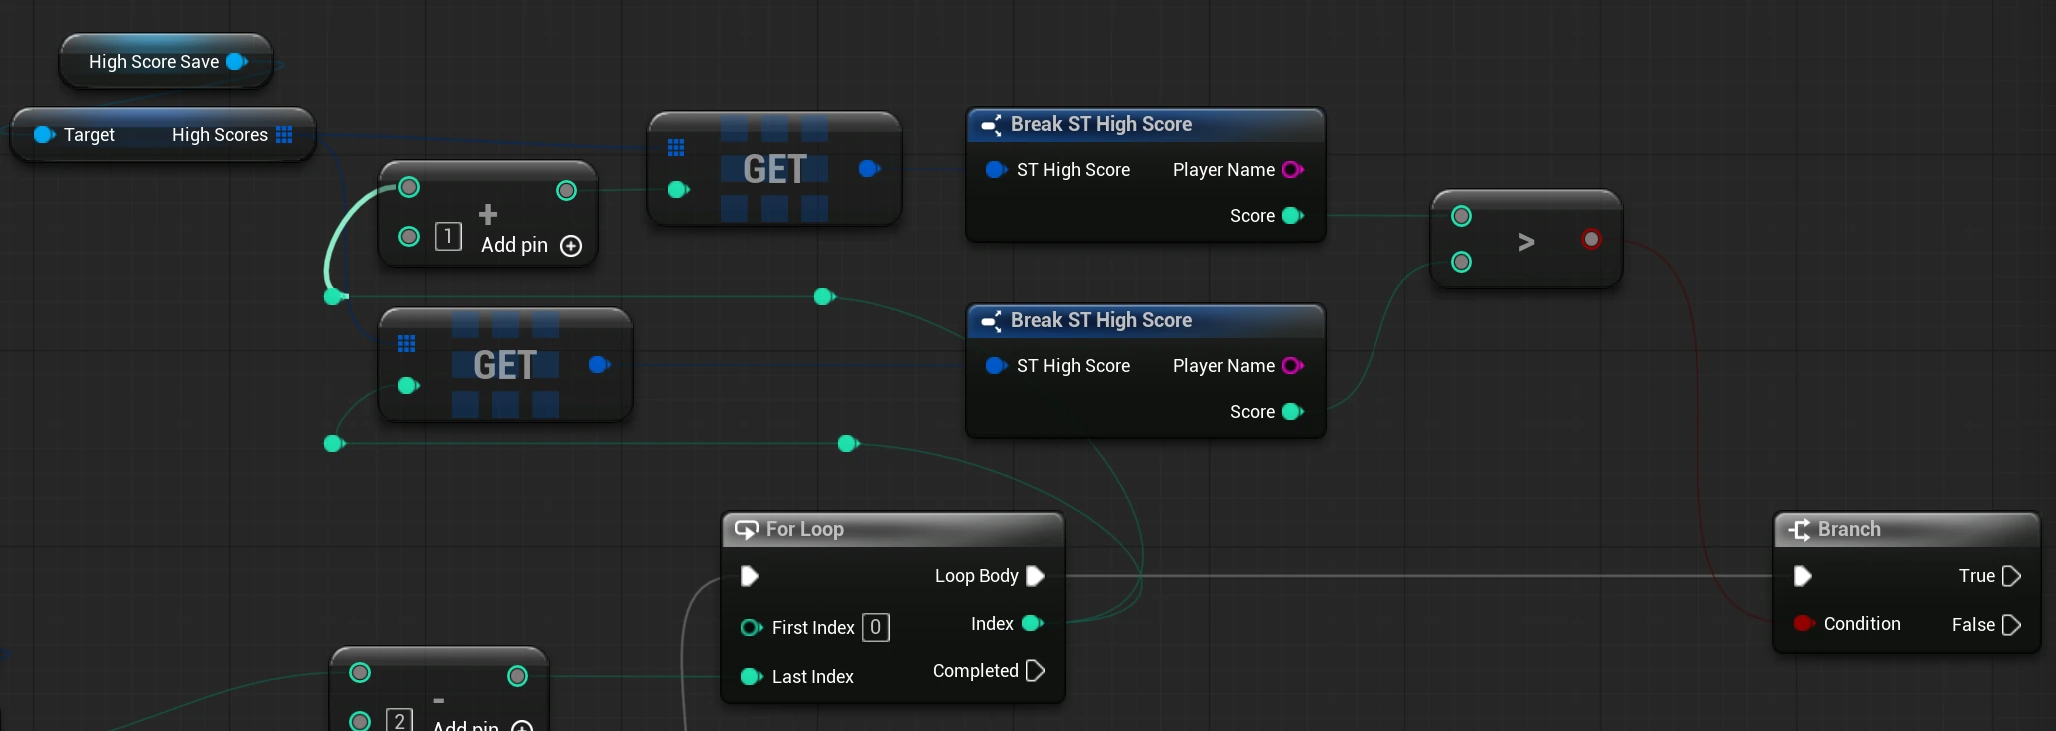
From the true pin in the branch drag out and add a Swap array element.
Get HighScoreSave, get HighScores Array and connect it to the array pin
Connect the index pin from the inner loop (2nd) and connect it to the first index pin
From the +1 node connect it to the second index pin.
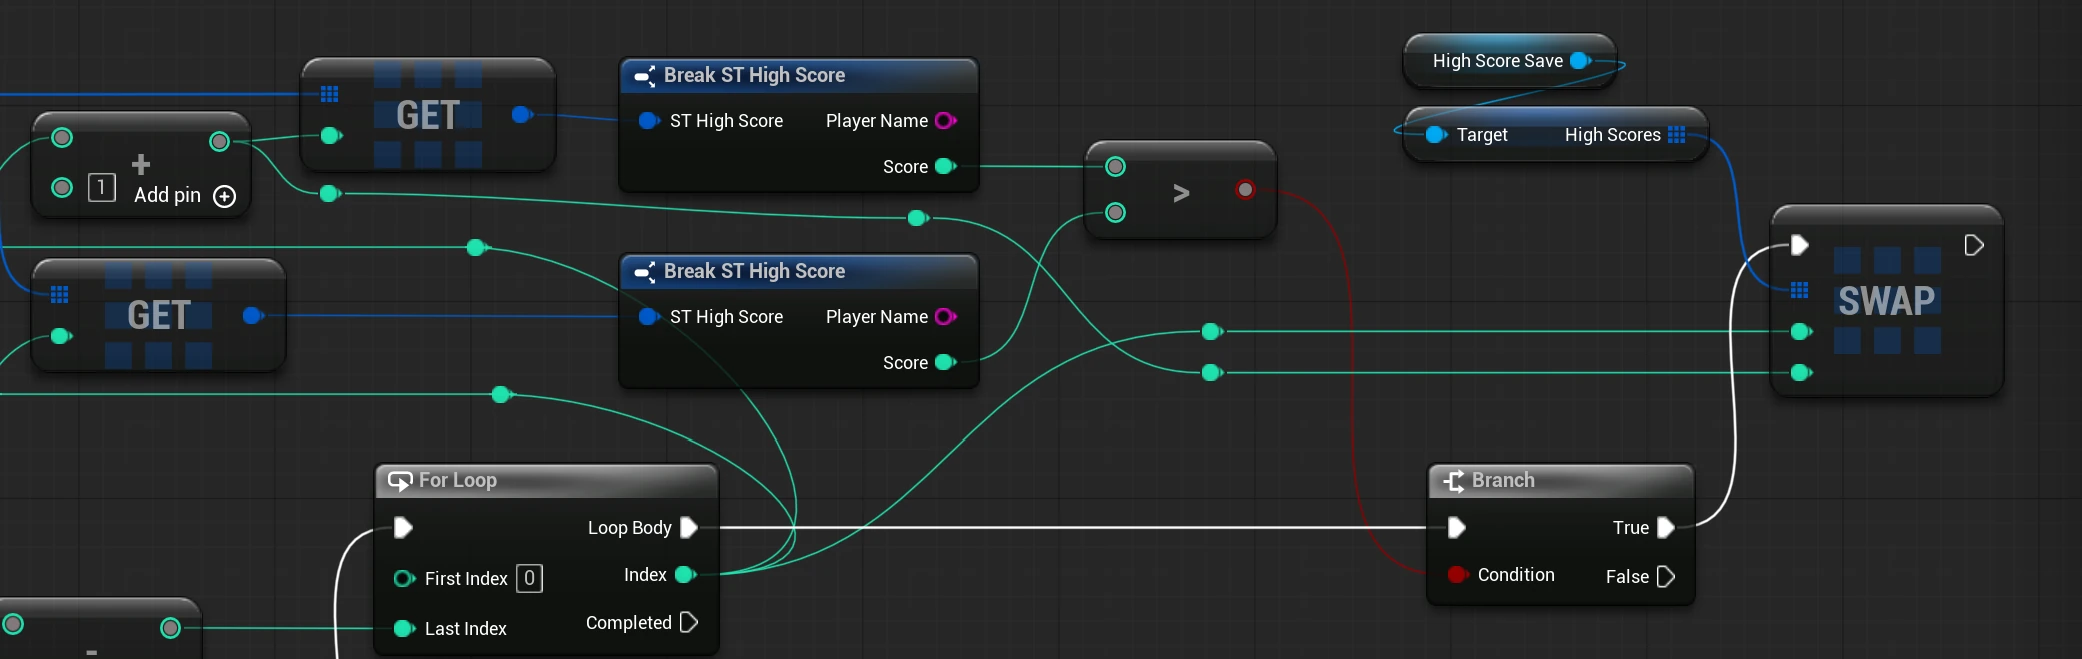
The False output of the Branch can stay unconnected. That simply means, “these two are already in the right order, carry on.”
The whole function should look like this:
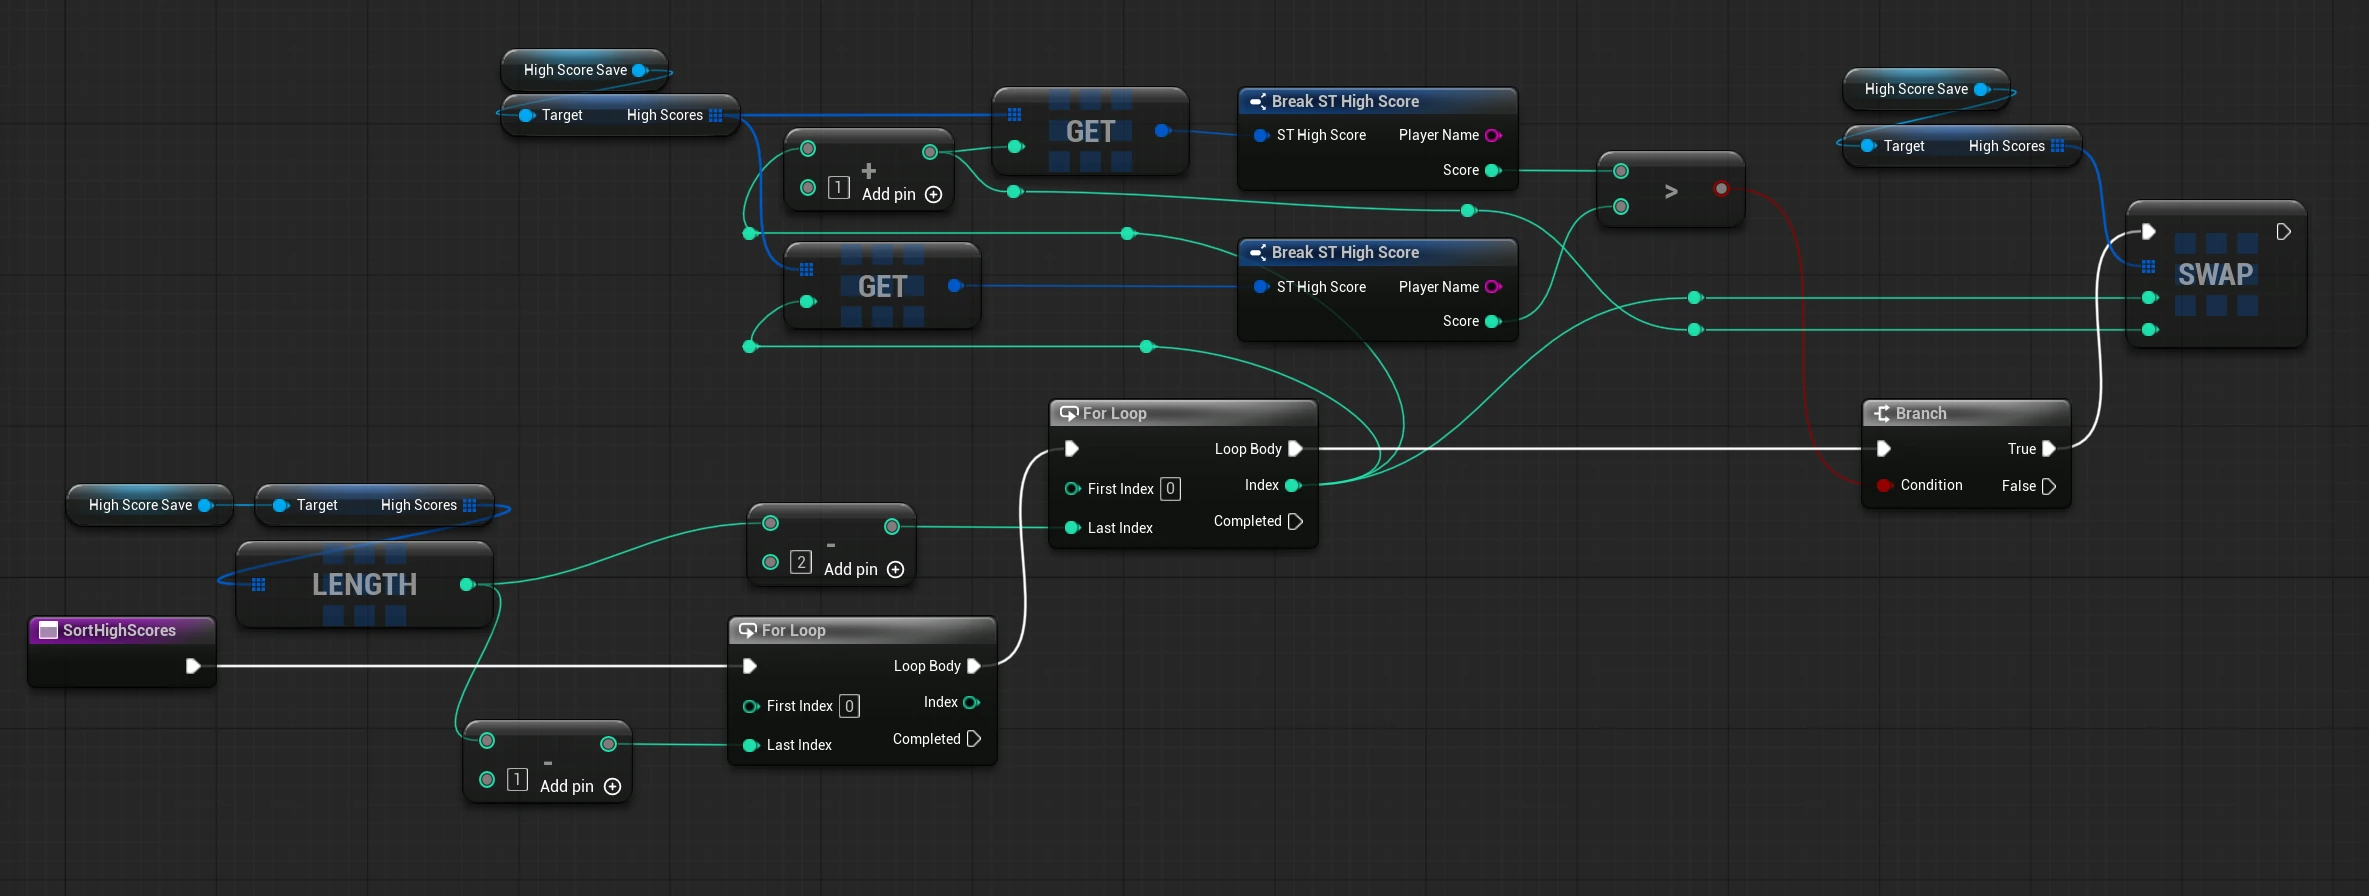
To sort the Scoreboard as we enter scores we need to make a slight change to the AddHighScore function.
Between the Add and Save game to slot we are just going to add the SortHighScores Function
Trim the Scoreboard
Once the array is sorted, you can keep only the number of scores you actually want to display. For a Top 10 scoreboard:
Make some space between the sort high scores and save game to slot nodes.
Get our HighScoreSave Variable again and from it get our High Score array.
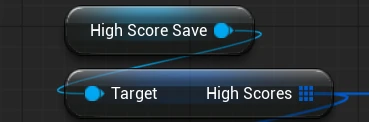
From the array get a length node then from it get a greater then comparison node.
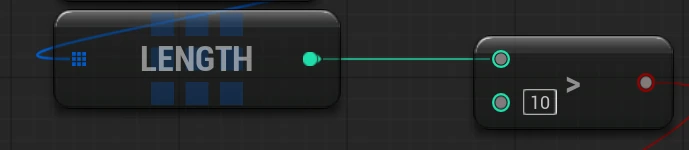
Make the bottom left value 10, then add a branch between sort high score and save game slot.
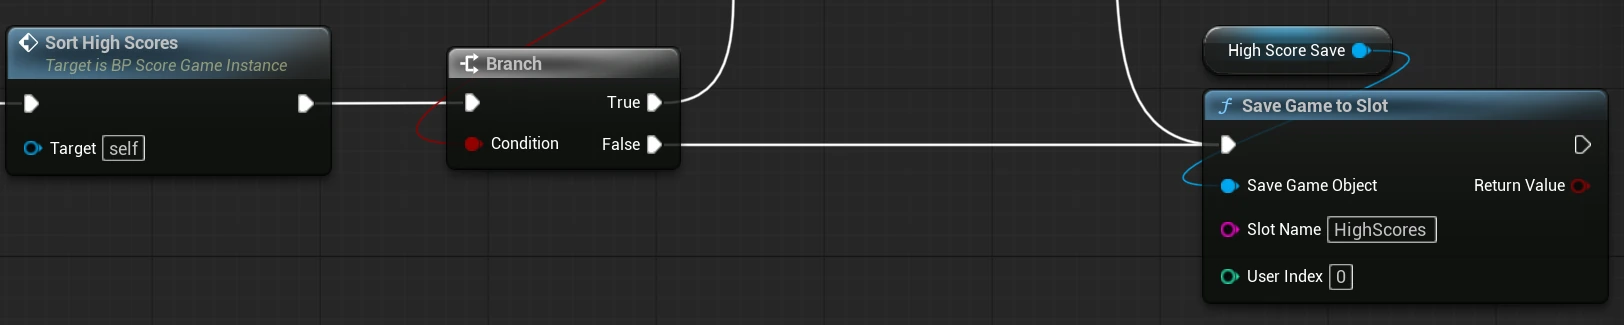
Connect the greater then node condition to the branch condition.
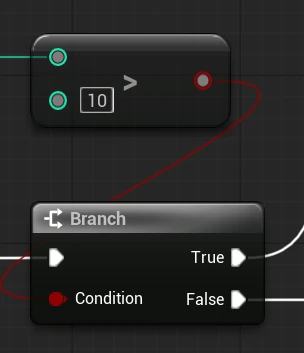
From the true branch get a remove index, set its value to 10 and connect the high scores array to its array pin.
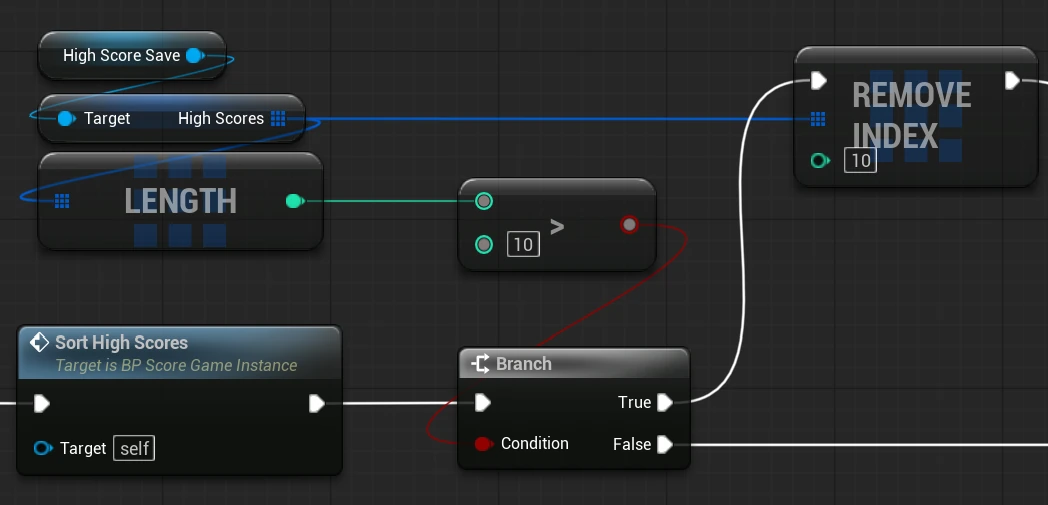
Connect the remove index to the save game to slot, connect the false path of the branch to the save game to slot.
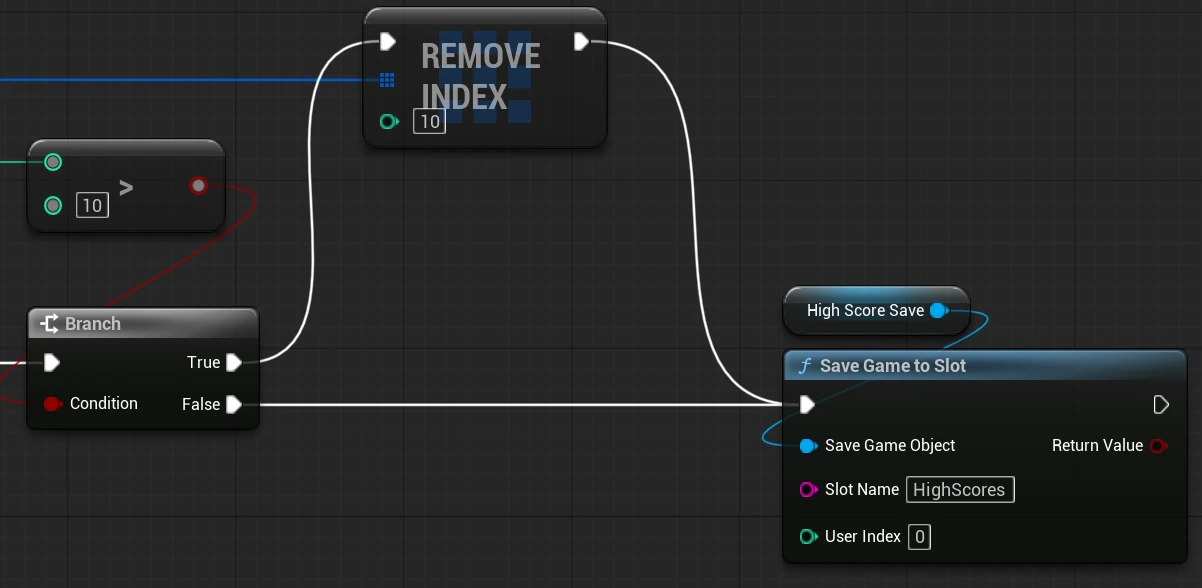
Because arrays begin at index 0, the first ten scores occupy indexes 0 through 9. If the array contains more than ten entries, removing index 10 removes the 11th-place score after the array has been sorted.
Step 8: Creating the Scoreboard Widget
Now that all of our data is working behind the scenes, we can finally show it to the player.
Create a new Widget Blueprint called WBP_Scoreboard
Open the Designer.
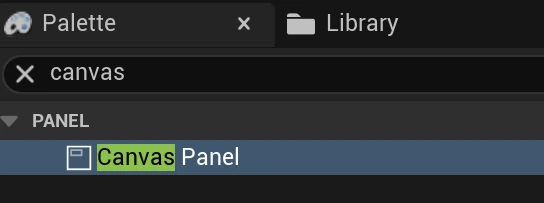
Add a Canvas Panel by searching for it and dragging it into the design space or Hierarchy panel
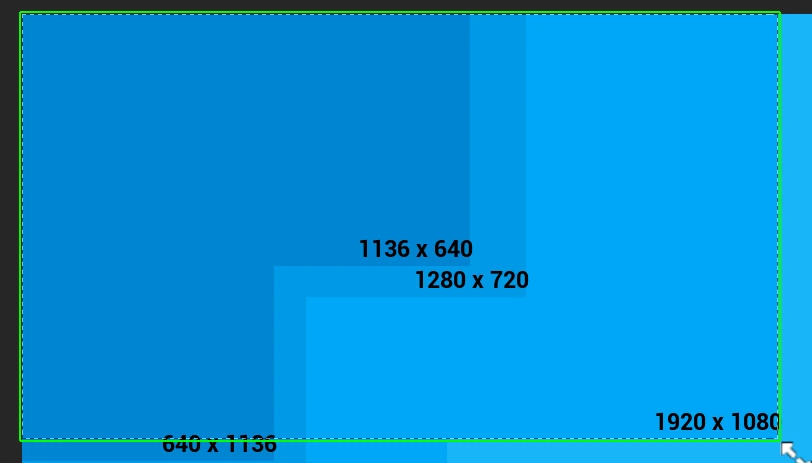
Adjust the canvas size to: 1920 × 1080
Add a Size Box to the Canvas
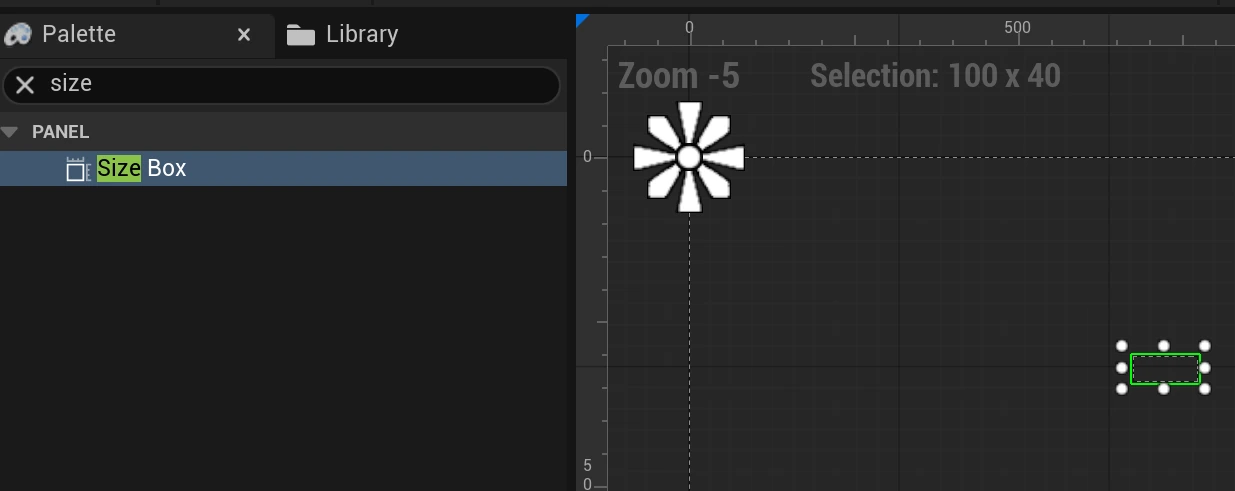
Set the Size Box to roughly 700 × 650
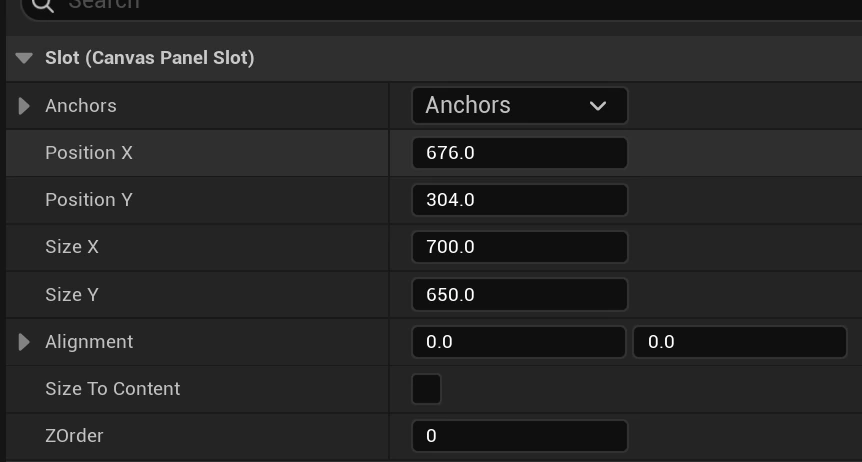
Set its Anchor to the centre of the screen
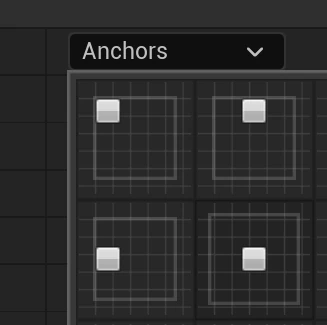
Set its Alignment to X 0.5, Y 0.5

Set its Position to X 0, Y 0

That gives you a scoreboard panel that remains centred regardless of resolution rather than being positioned by absolute screen coordinates.
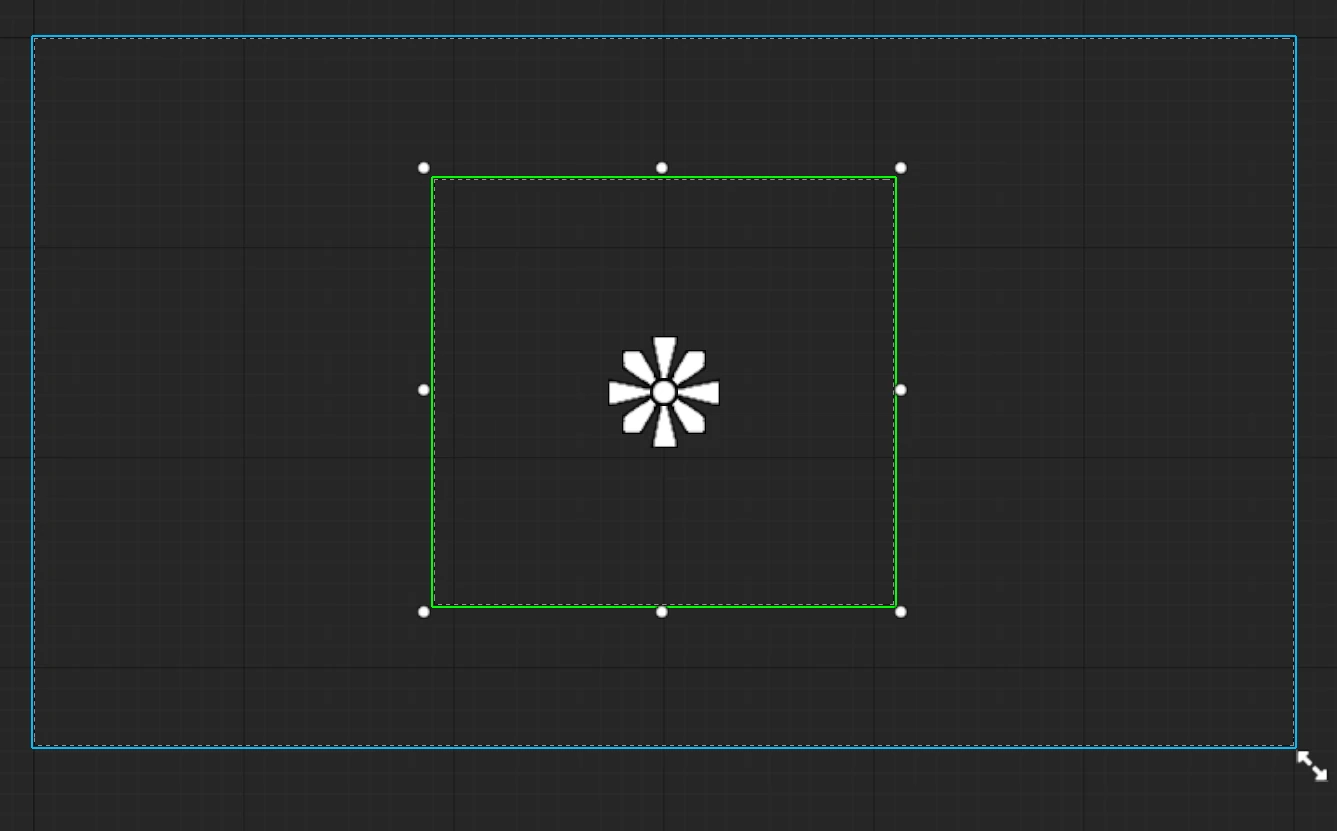
In the common drop down find border and drag it onto the size box (either in designer or the Hierarchy panel)
For the Border we will add a few simple settings so it behaves like an actual scoreboard panel instead of just being an invisible wrapper.
• Padding: about 24 on all sides
• Brush Color / Tint: a dark grey or near-black with a little transparency
• Horizontal Alignment: Fill
• Vertical Alignment: Fill
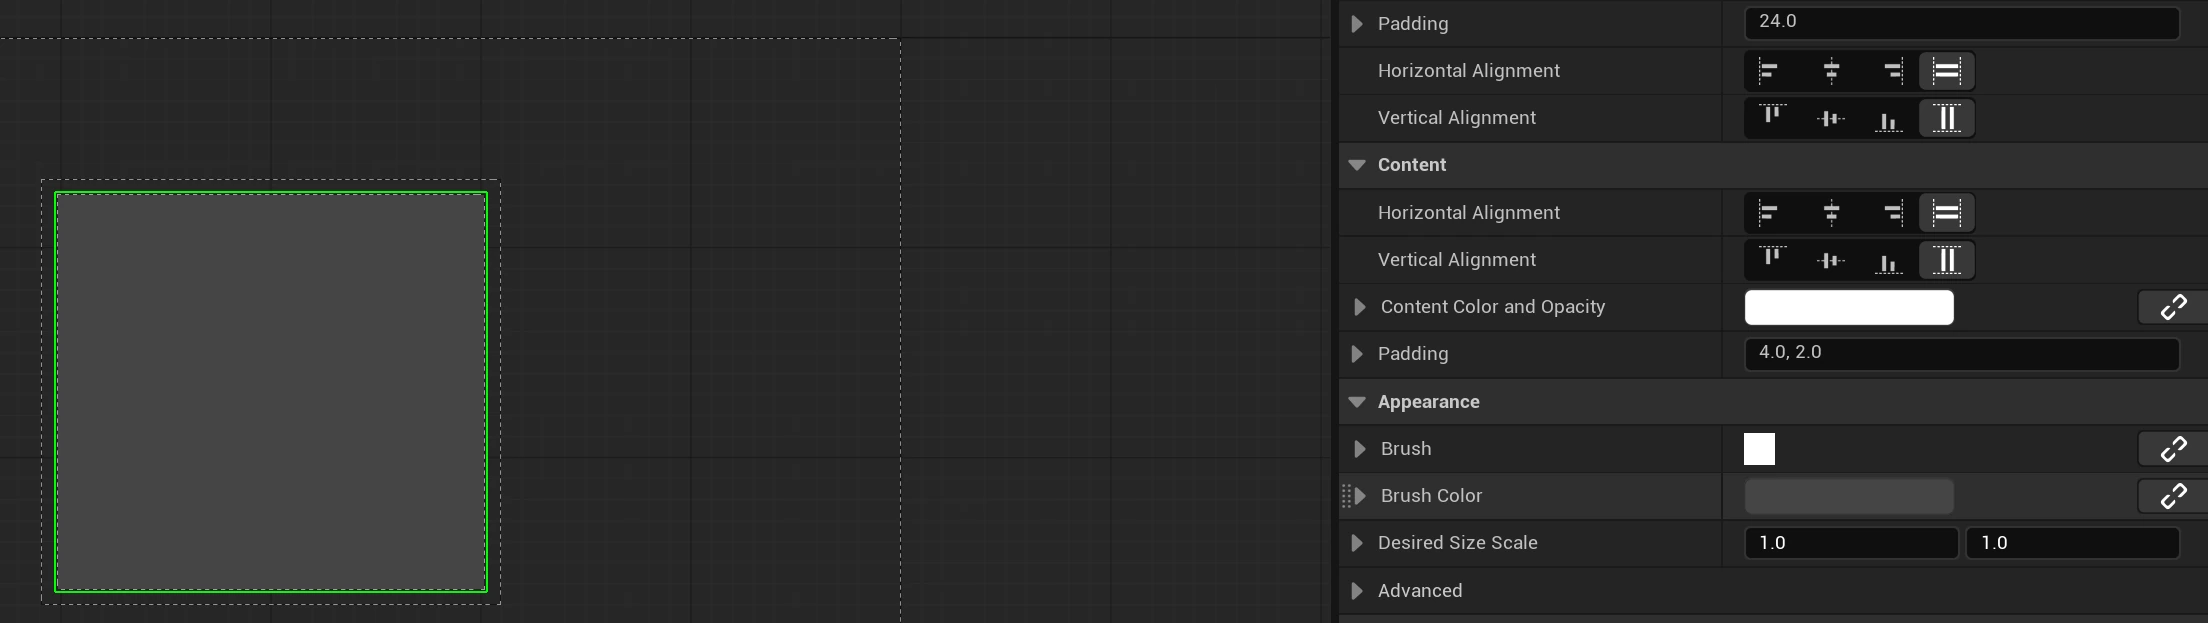
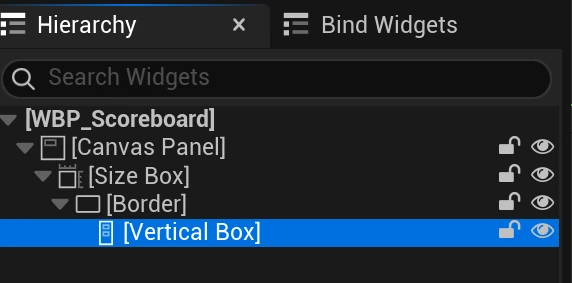
Next we will add a vertical box to the border and just make sure it fills both horizontally and vertically.
Your Hierarchy should start to look like this.
Next we are going to drag in a Text block onto the vertical box.
• Text: HIGH SCORES
• Horizontal Alignment: Center
• Justification: Center (may need to search for the setting)
• Font Size: around 32–36
• Slot Padding: something like 0, 0, 0, 16
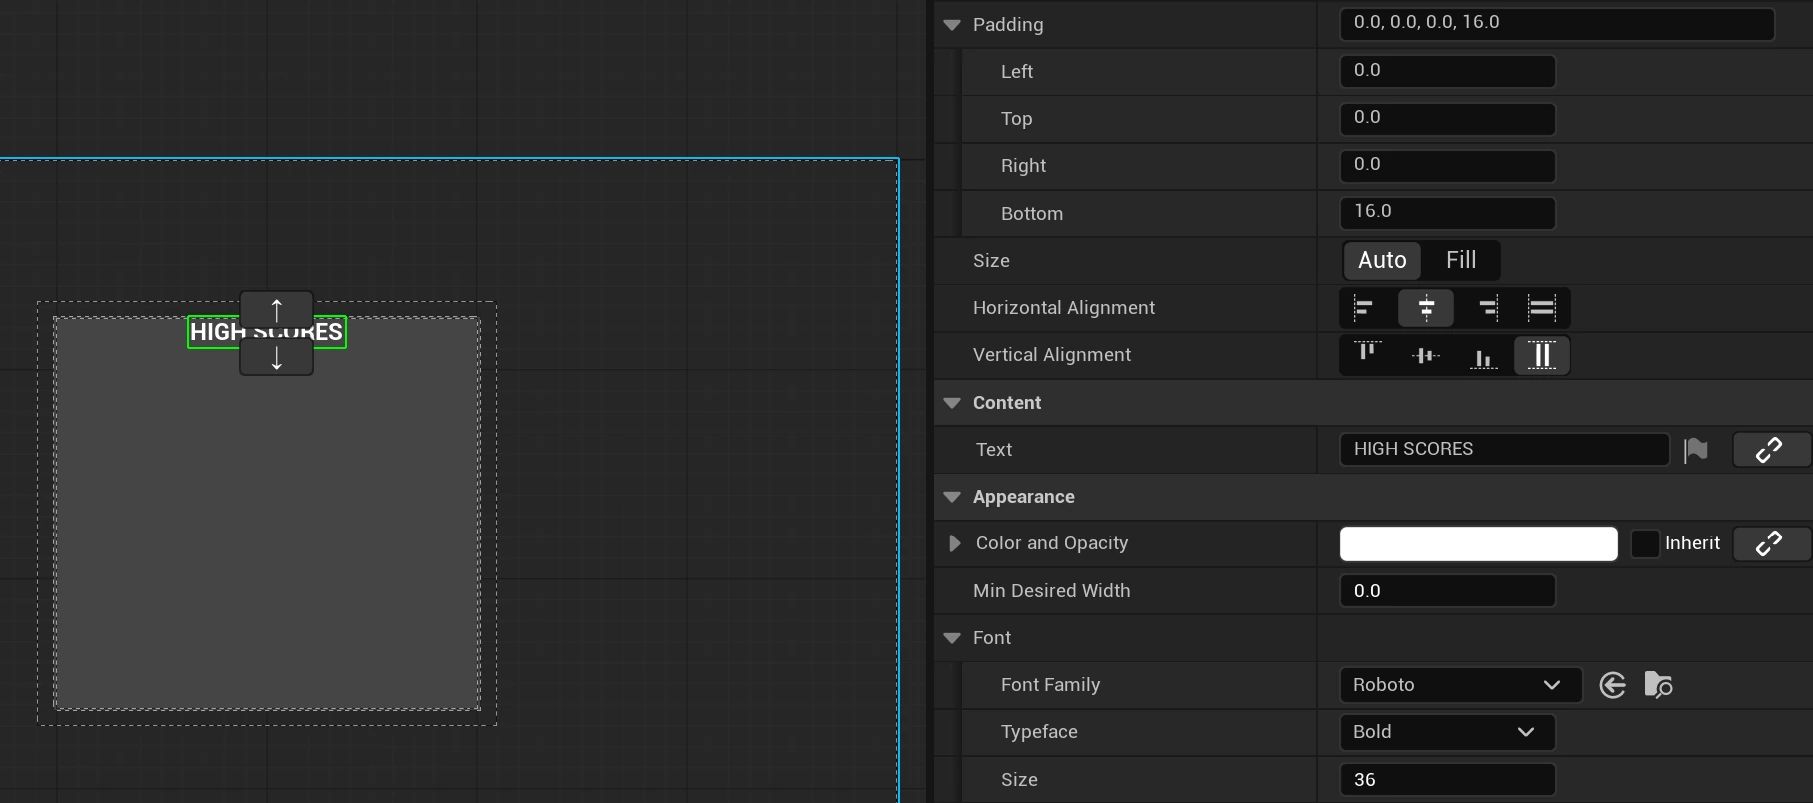
Next, add a Horizontal Box directly underneath the HIGH SCORES heading inside the Vertical Box. Inside this Horizontal Box, add three separate Text Blocks and set their text to:
• RANK
• PLAYER NAME
• SCORE
For each one make sure you set the size to fill and value for each one should be RANK: 0.20, PLAYER NAME: 0.55 and SCORE should be 0.25. also need to make sure their justification are all centred
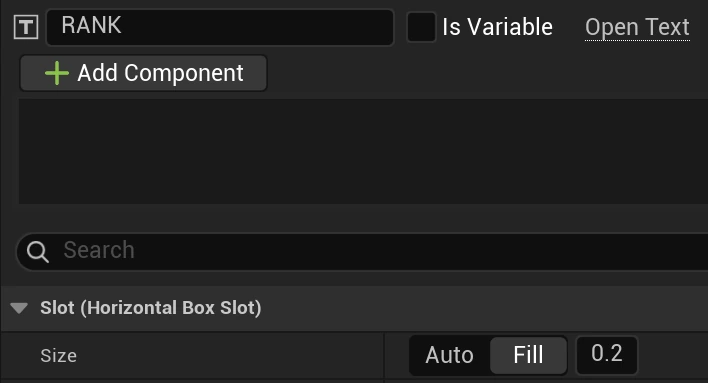
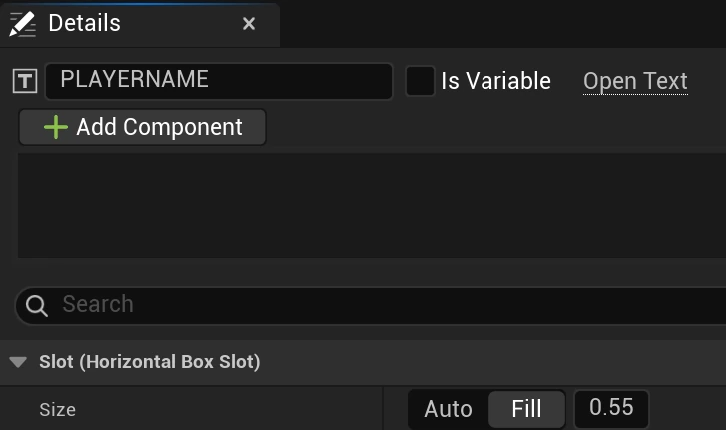
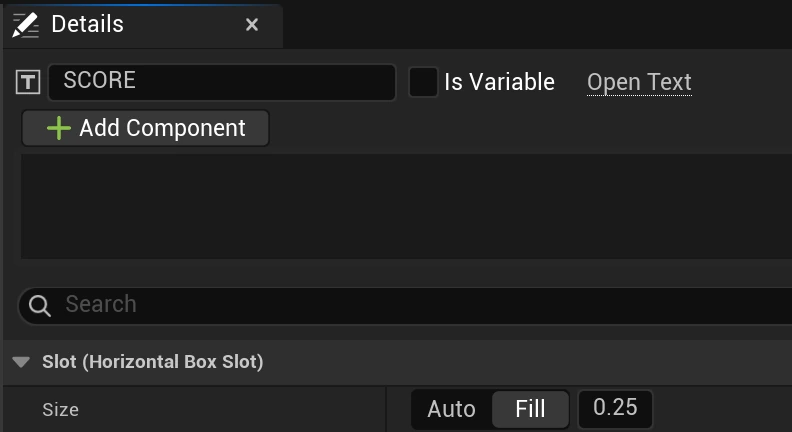
With that completed we should have something looking like this.
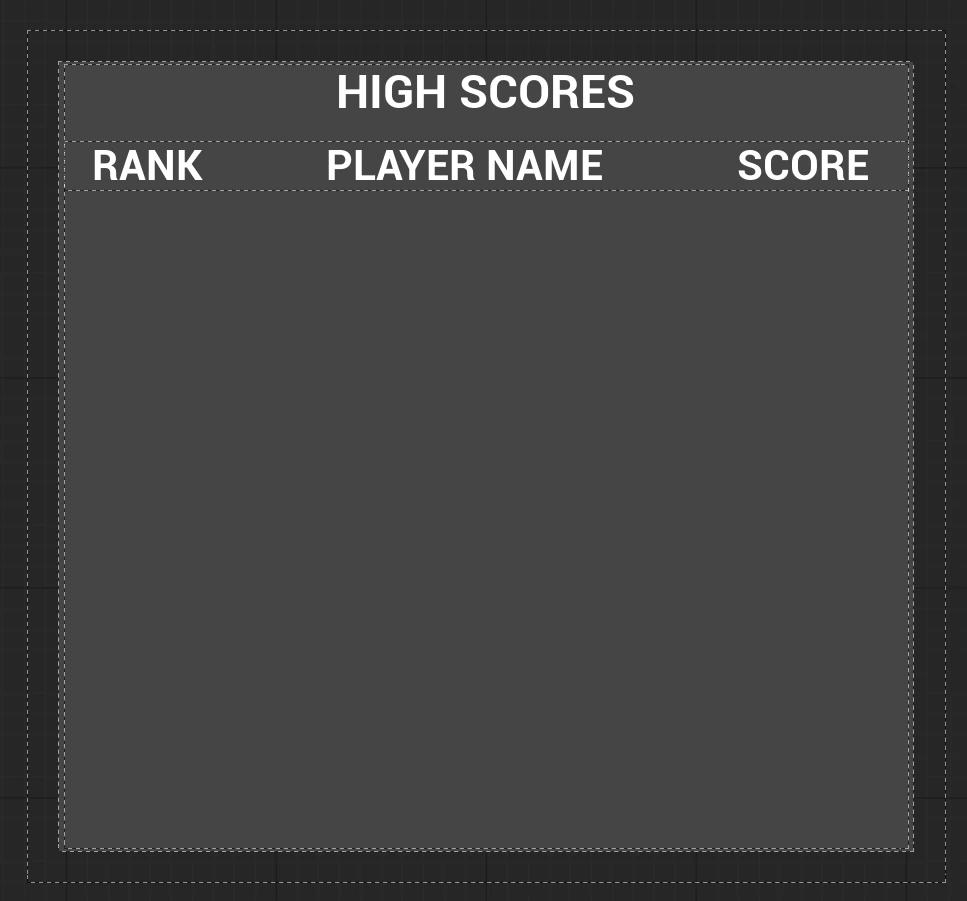
Rather than manually creating ten different rows, we are going to create one reusable score row.
We will now add the container that will hold the actual high-score entries.
Find vertical box and drag it into the designer directly underneath the RANK, PLAYER NAME, SCORE.
In the details panel we are going to name this box VB_ScoreRows and tick the box is Variable.

Make sure its size is set to fill and both vertical and horizontal alignment also should be set to fill
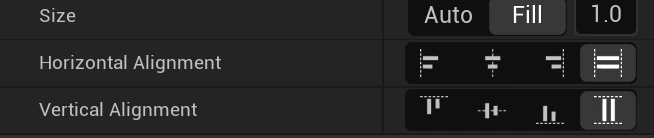
VB_ScoreRows is where we’ll dynamically insert:
1 ANTHONY 12500
2 SARAH 11000
3 DAVE 8500
Step 9: Creating a Score Row
Create another Widget Blueprint called WBP_ScoreRow
Inside the Designer, add a Horizontal Box, in that box add three text blocks with the names TXT_RANK, TXT_PLAYER NAME and TXT_SCORE also make sure it “Is Variable” is ticked.
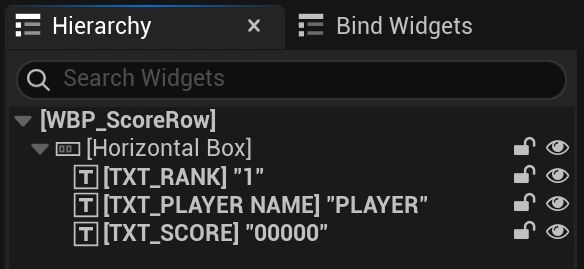
Then give its three Text Blocks the same Fill proportions and justification as the scoreboard headings:
Rank: 0.20 (Center)
Player Name: 0.55 (Center)
Score: 0.25 (Center)
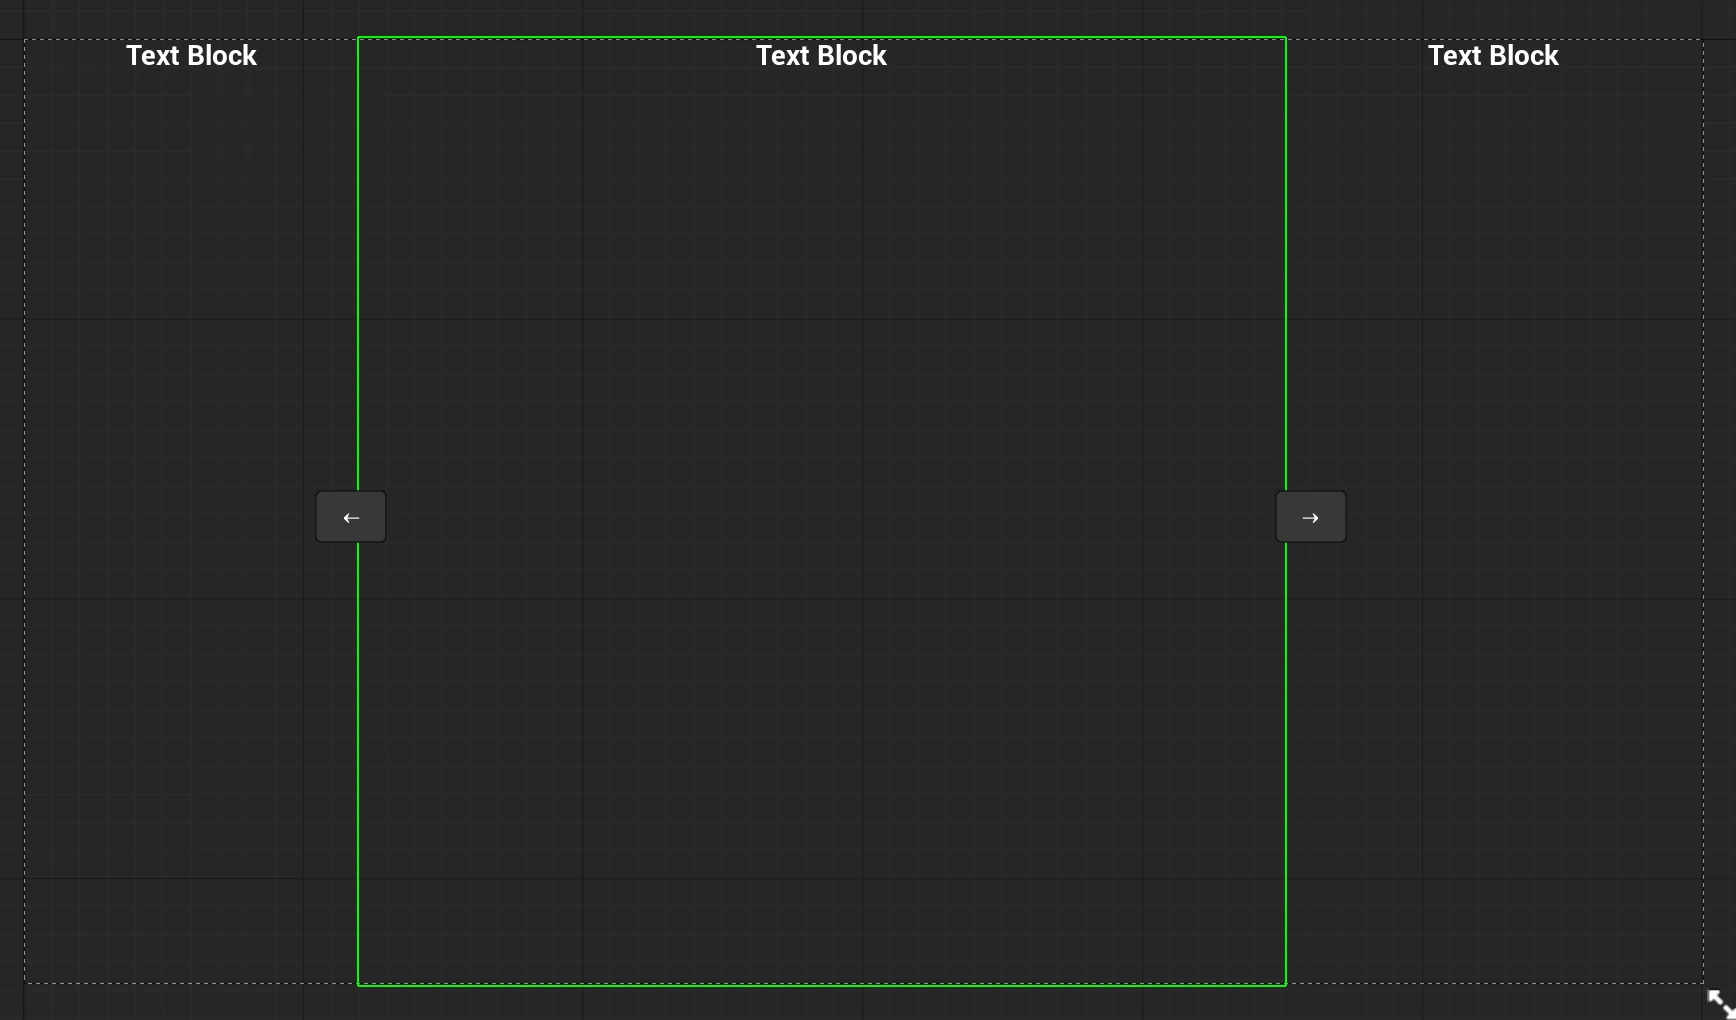
Put simple placeholder text in each Text Block so you can see the row layout while designing it.
I’d used:
Rank: 1
Player Name: PLAYER
Score: 00000
We now need to create variables for the information the row needs: Rank (int), PlayerName (string) and Score (int)
Goto the graph editor (top right corner of the screen)

Then in the My Blueprint panel create the three variables and for all three make sure that you tick Instance Editable and Expose on Spawn
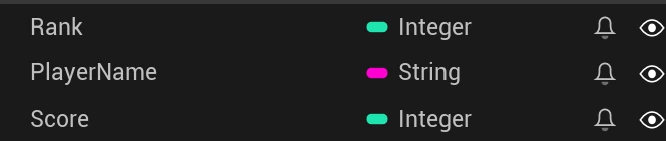
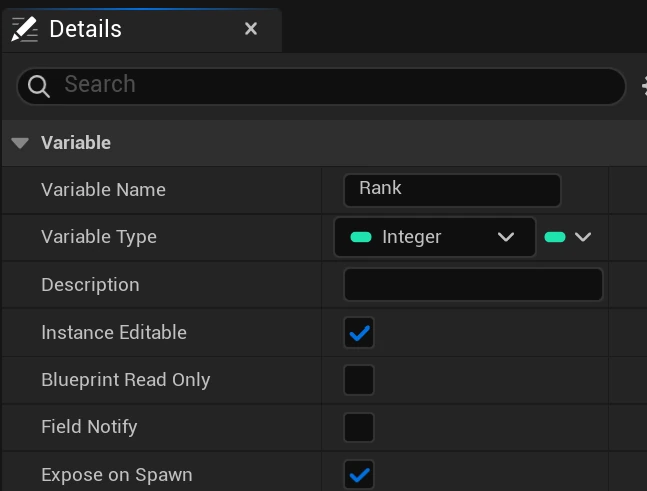
That second part is important because later, when WBP_Scoreboard creates each score row, the Create WBP_ScoreRow node will give us input pins for Rank, Player Name and Score.
use Event Pre Construct, and we are going to build three chains using TXT_ RANK, TXT_PLAYERNAME, TXT_SCORE, so drag each one in and GET them.
From each one drag off of it and SetText (Text)
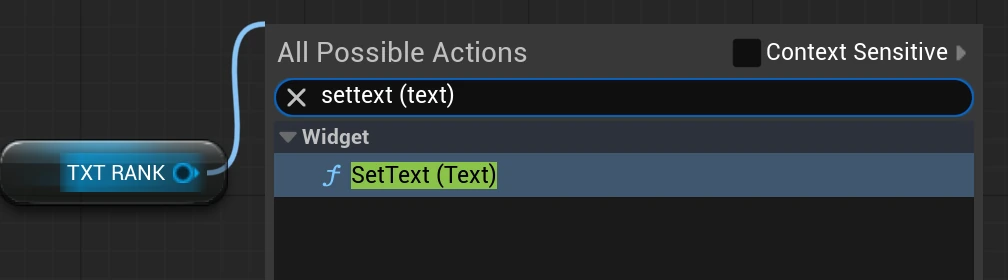
Connect them all up
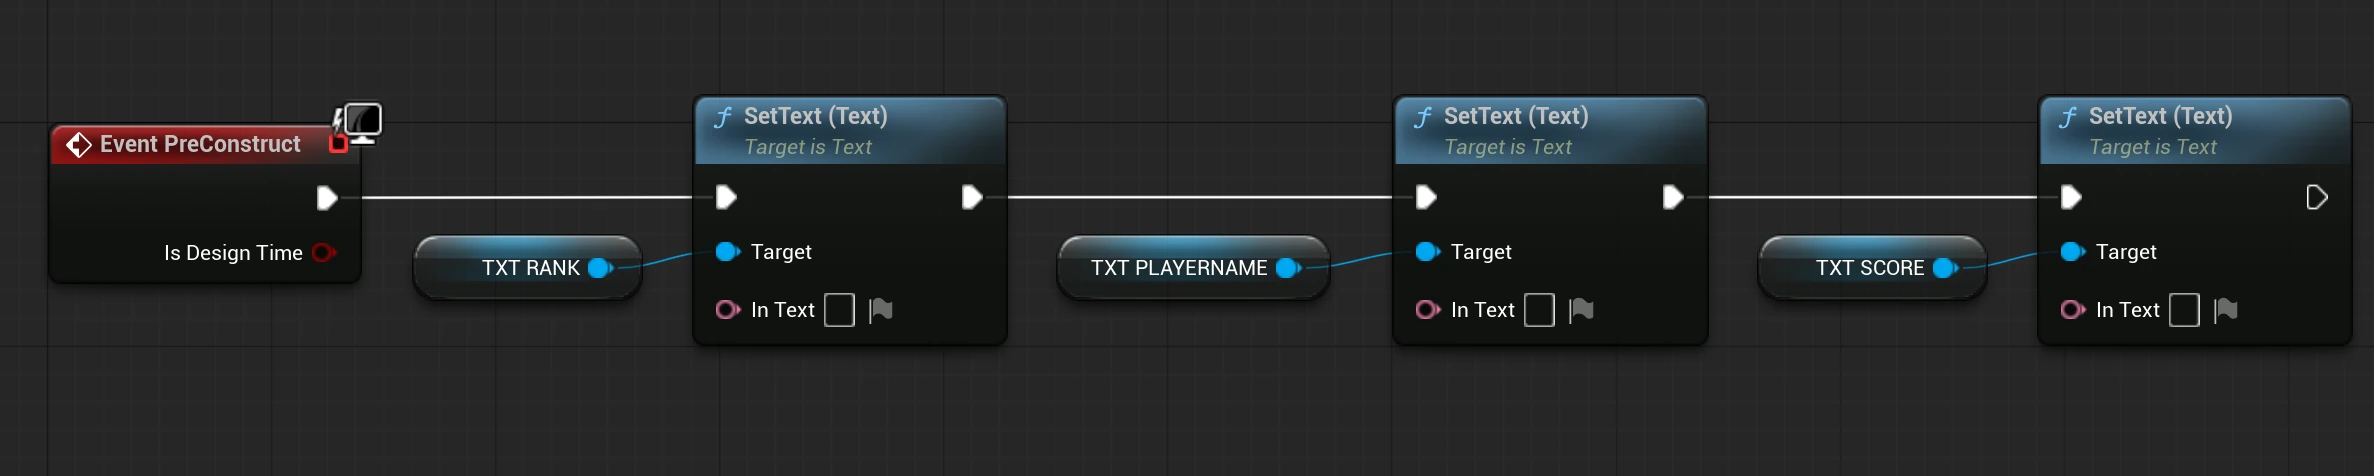
Then for all of the in text pins connect the appropriate variable we made earlier, should look like this.
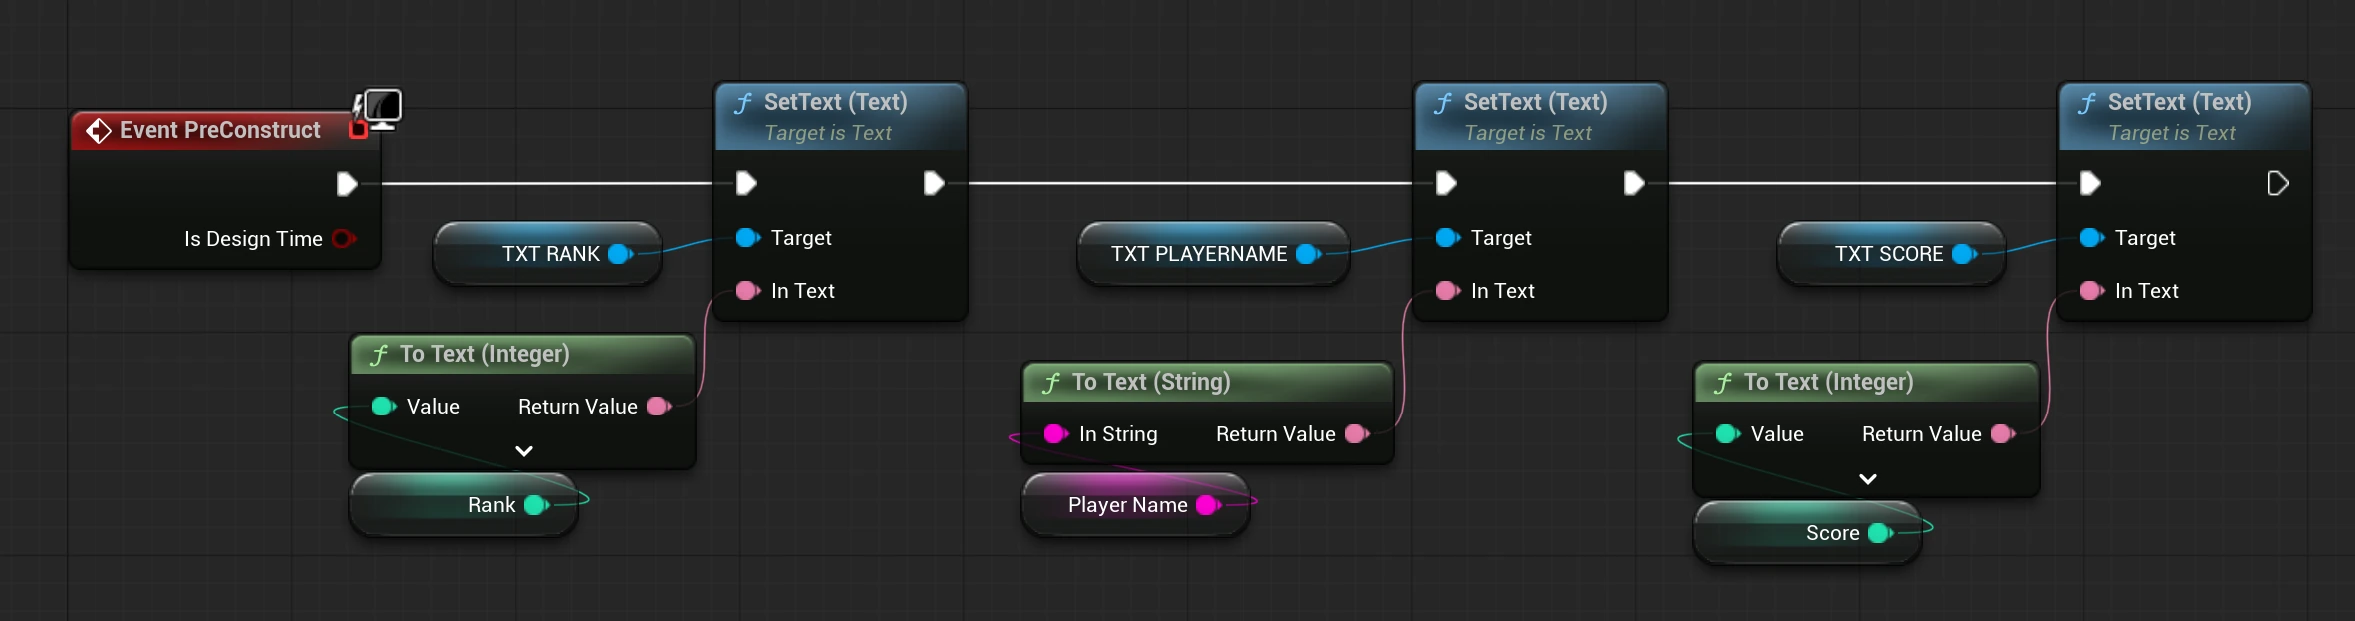
We can now create as many scoreboard rows as we need without rebuilding the interface every time.
Go back to WBP_Scoreboard, so we can start filling VB_ScoreRows with the saved scores.
Open the Graph view.
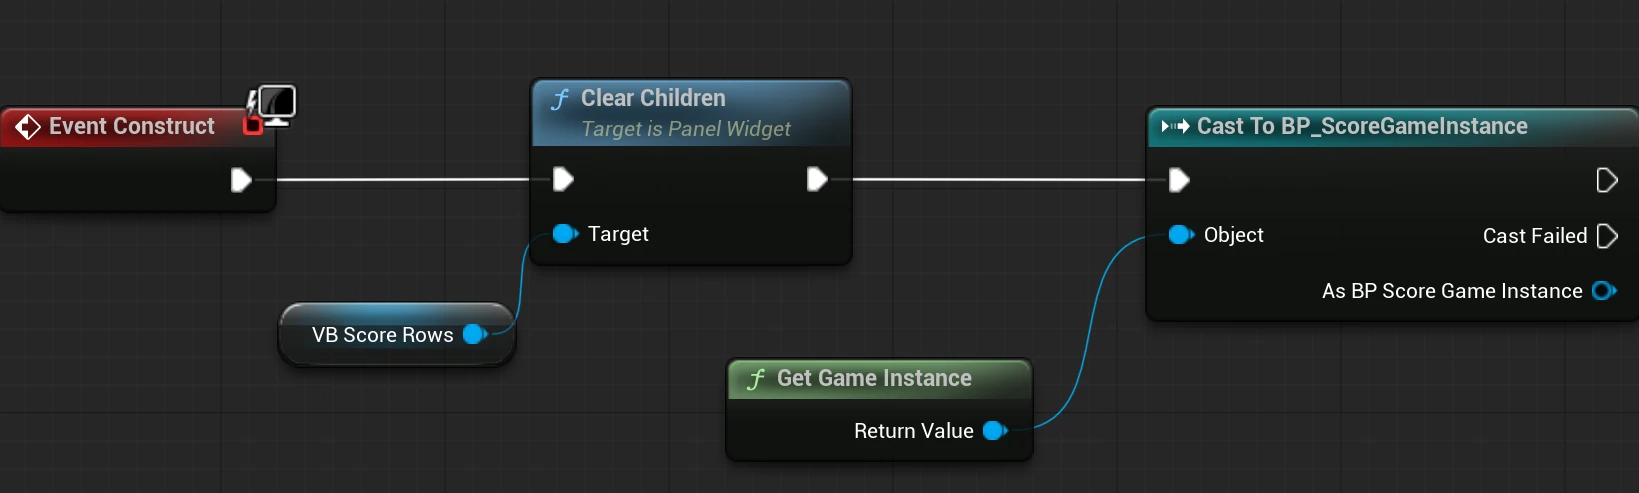
This time we are going to use event construct.
Drag VB_ScoreRows into the graph as a Get.
From it, add Clear Children and connect event construct to it.
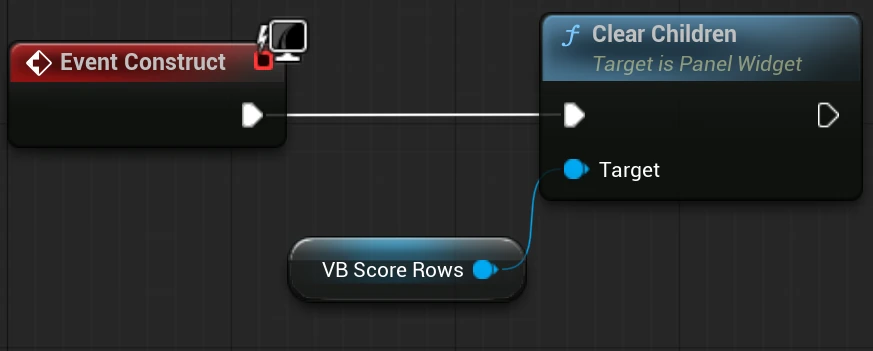
Next right click and search Get Game Instance and add it in.
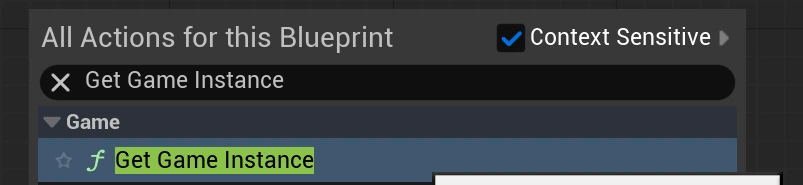
From Get Game Instance, drag off of it and search for cast to BP_ScoreGameInstance. (if you can not see that result you may need to compile the widget first, or even open and recompile the BP_ScoreGameInstance and save it again)
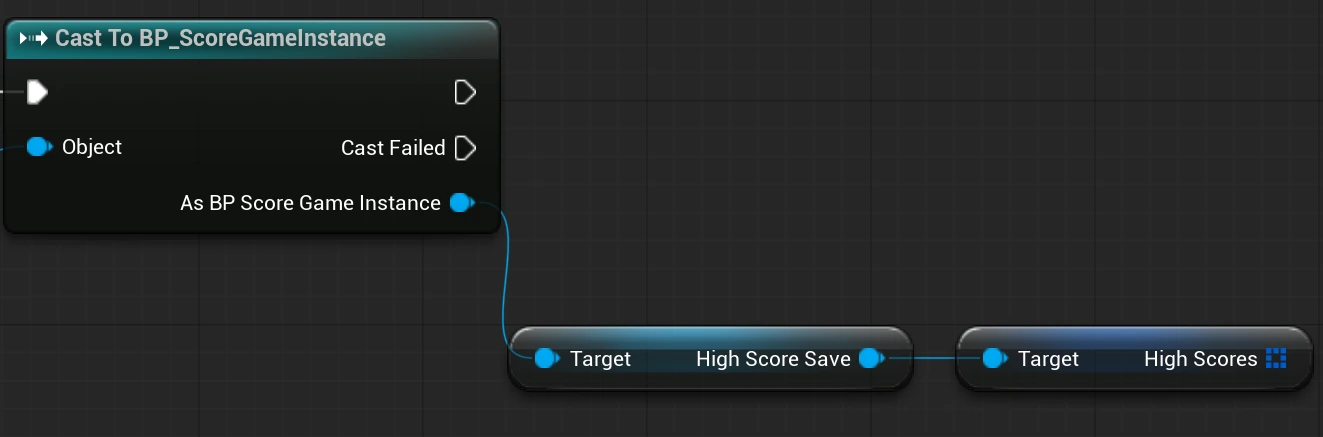
Once that’s in place, the next step is pulling out HighScoreSave, then HighScores.
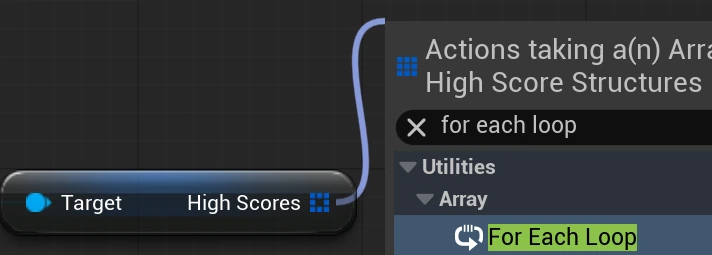
Lets now feed that into a For Each Loop.
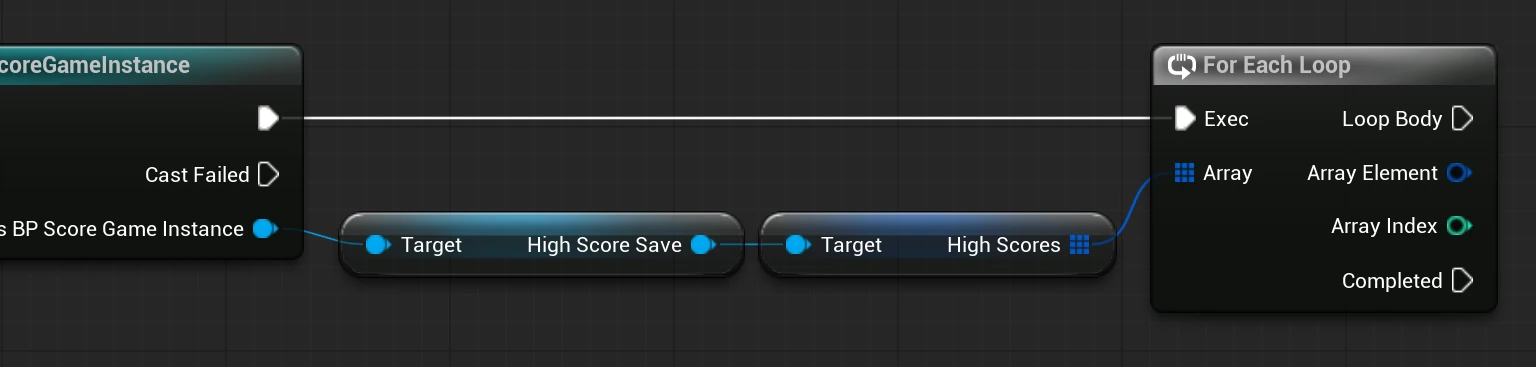
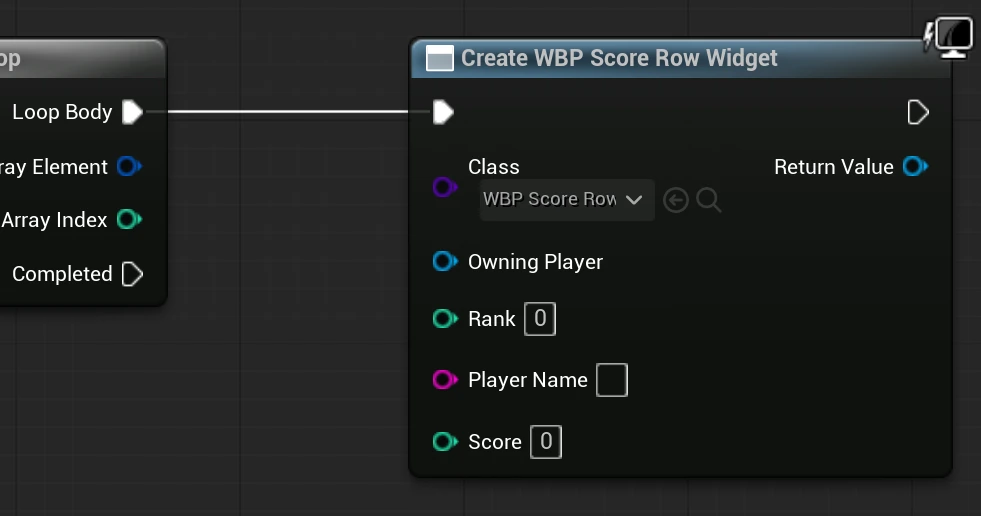
From the loop body add Create widget and select WBP_ScoreRow. Because we marked Rank, PlayerName, and Score as Expose on Spawn, you should see those three inputs on the Create Widget node.
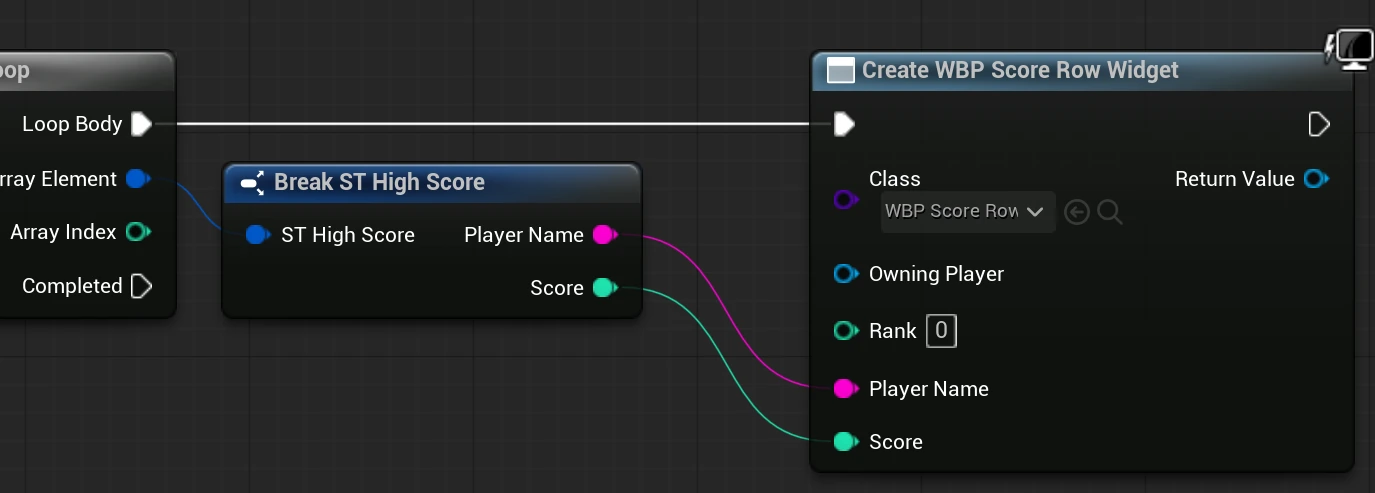
Drag from Array Element (on the loop) and add Break ST High Score.
Connect:
Player Name → PlayerName
Score → Score
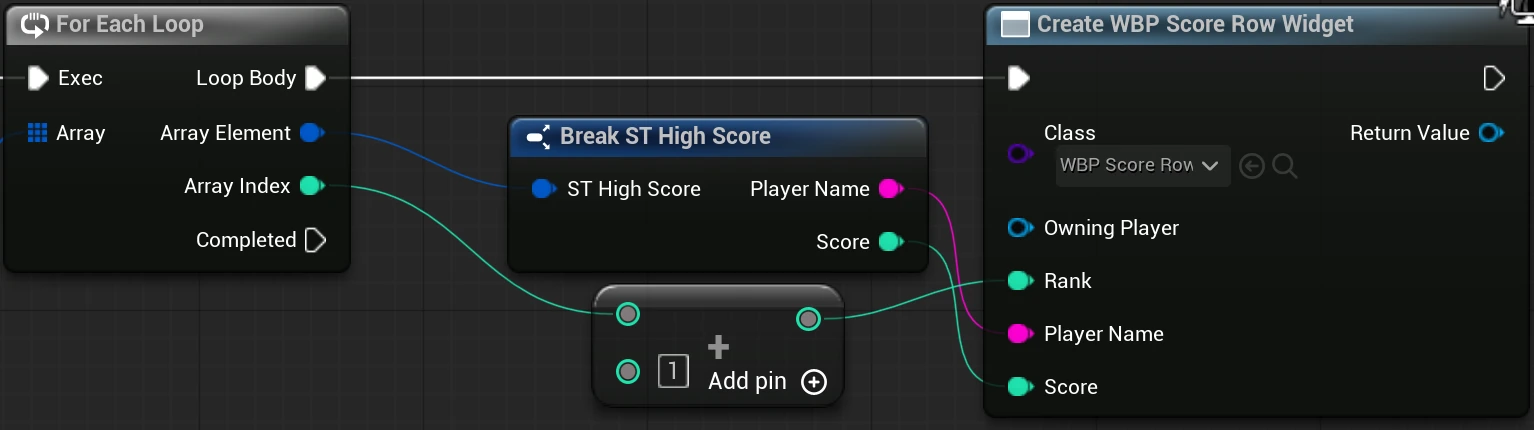
Drag from Array Index, add an Add node, set it to + 1, then connect that result to Rank.
We add 1 because arrays start at zero:
Array Index 0 → Rank 1
Array Index 1 → Rank 2
Array Index 2 → Rank 3
Now, lets put the information into the widget.
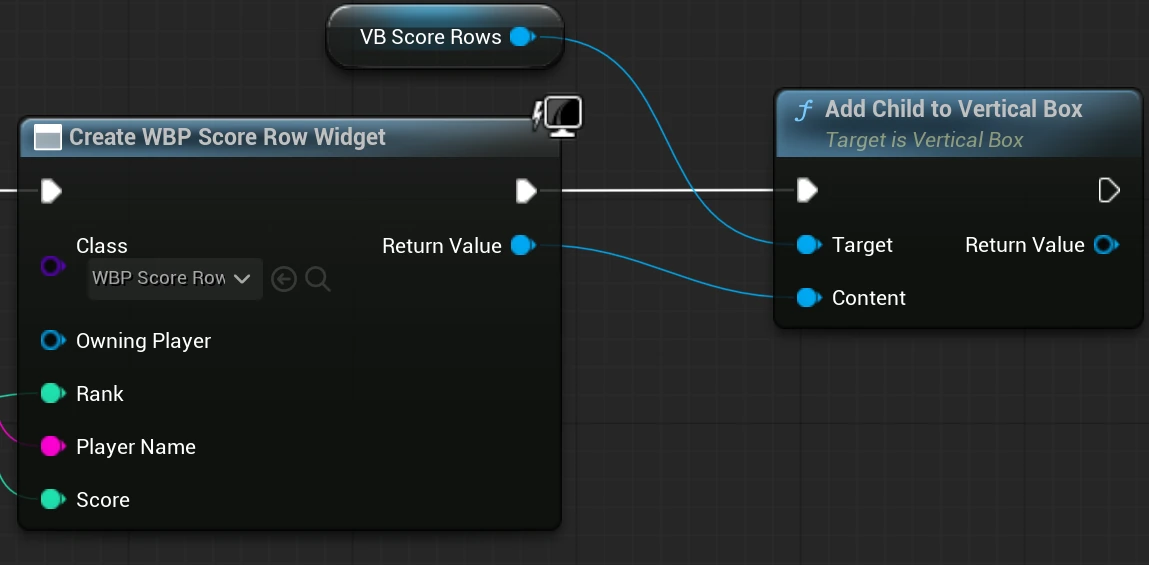
Drag VB_ScoreRows from the Variables panel into the graph as a Get.
Drag from it and search for Add Child to Vertical Box.
Connect the white execution output from Create WBP Score Row Widget into Add Child to Vertical Box.
Connect the Return Value from Create WBP Score Row Widget to the Content pin.
At this point we should probably test it, go back to your level and open level blueprint.
Call the widget (WBP_ScoreBoard), add it to viewport, set the input mode to UI only and set Show mouse cursor to true.
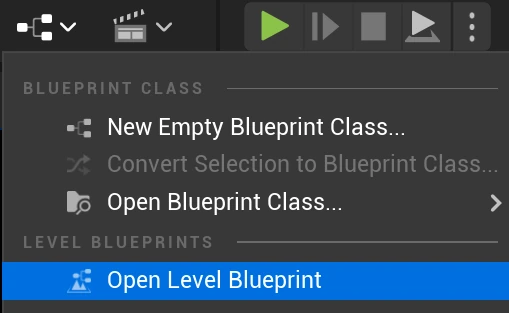
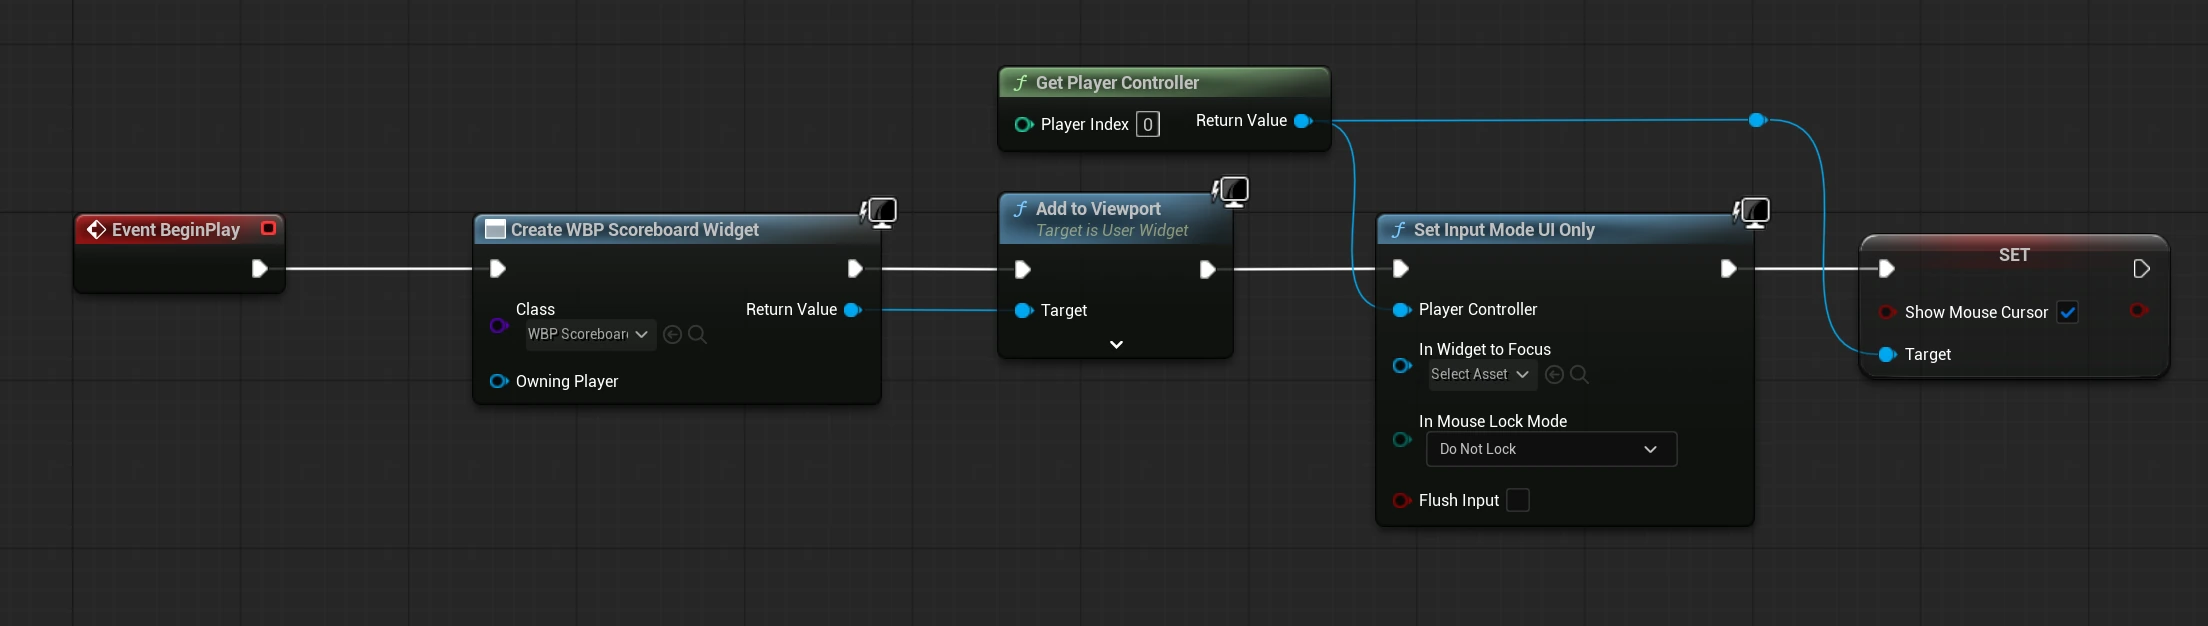
It should show you the scoreboard and everything should display ok!
Step 10: Letting the Player Enter Their Name
Our high score Struct already contains PlayerName, and AddHighScore already expects a PlayerName input. What we are missing is somewhere for the player to actually type it.
Create a new Widget Blueprint called WBP_SubmitScore
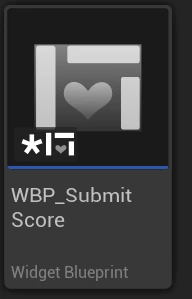
In the Designer, add a vertical box, textblock, a Editable Text Box and a Button. And label them appropriately. (I’m going to name my Text box TB_PlayerName and make it a variable)
You may also want to horizontally and vertically align the text block, change the justification of the text box and auto size the button. I have also added some padding to the bottom of the text block and the top of the button to create an air gap. But should look like this.

The Editable Text Box allows the player to type their name (so it is visible when typing you may want to go into appearance>TextStyle>Color and change it to black). When the Submit Score button is clicked the information is saved.
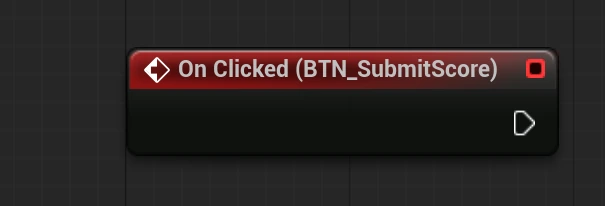
Select the button and scroll the details panel down until you see event on click use that and we will do some backend work. (if you don’t see it you will need to make the button a Variable by ticking is variable)
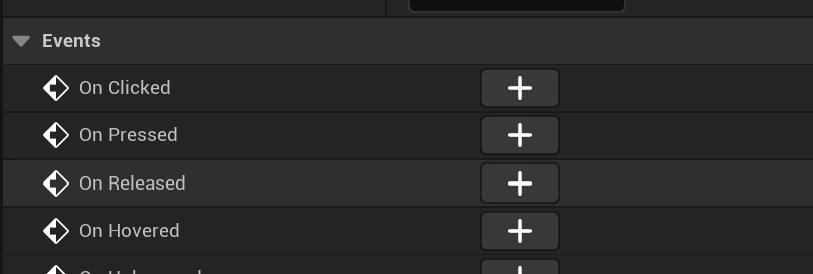
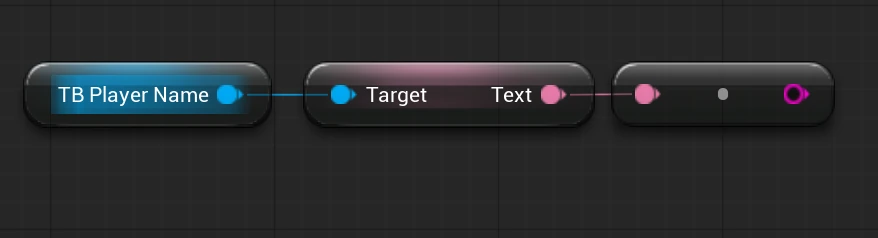
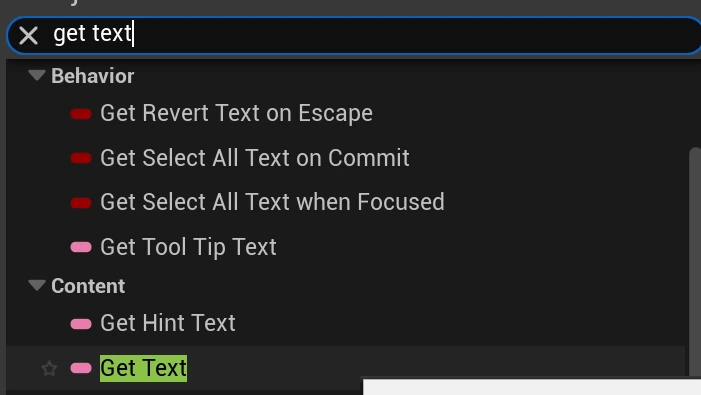
Drag TB_PlayerName into the graph as a GET, From it Get text (you may have to look for it) and then from it get to string (text)
Next right click and search for Get Game Instance, cast it to BP_ScoreGameInstance and call AddHighScore.
Connect it to the exec pin on the cast and then plug in the text – string node to the player name.
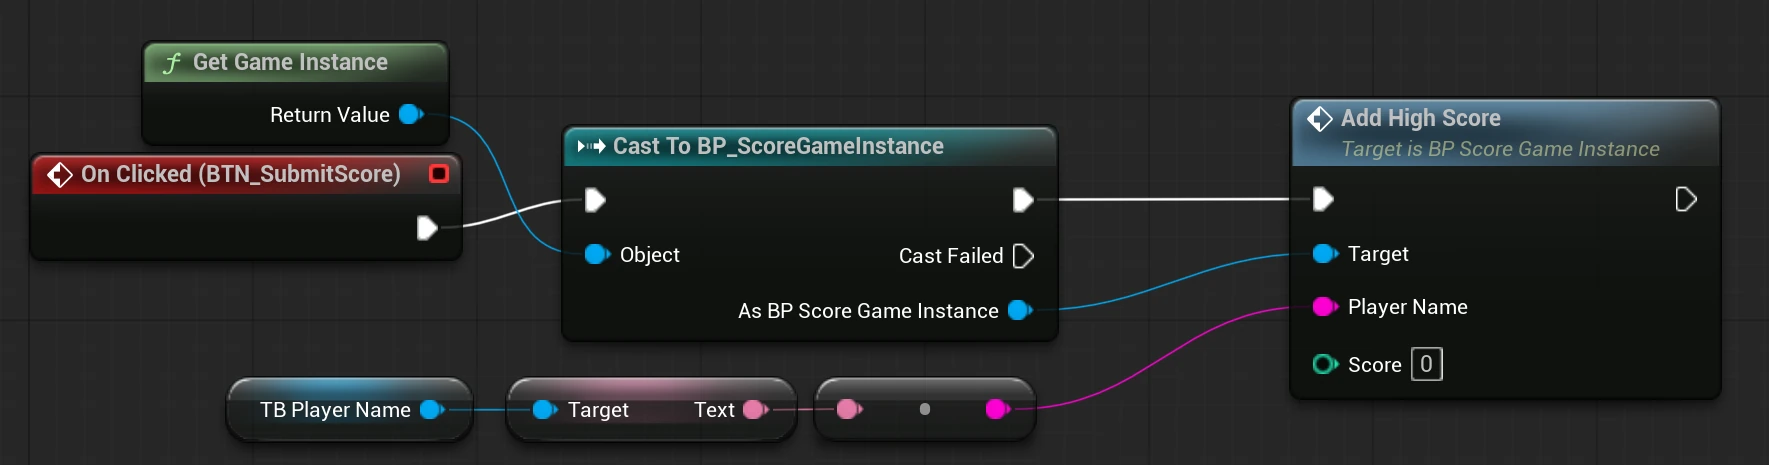
From the as BP score game instance pin pull out current score and plug that into the score pin of Add high score.
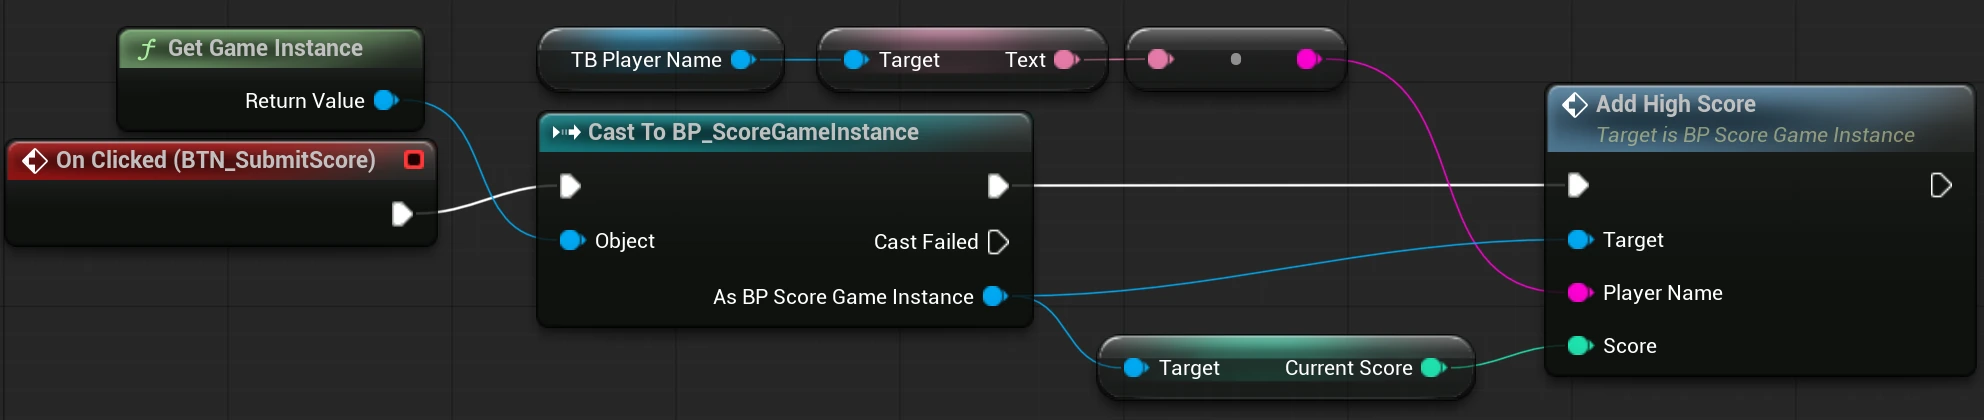
Before we finish off we just need to move the player to the highscore board.
Create a new widget and select our scoreboard, add to view port and then remove from parent (this removes the enter name)

This connects all of the parts of our prototype together: create the score, the player supplies the name, and AddHighScore sends both values into the persistent leaderboard.
Step 11: Testing the Scoreboard
Before calling this finished, make sure you test the important part: persistence.
For the first test, lets use the level blueprint temporarily.
Remove everything From event play this was just for previous testing of the UI.
Right click and Get Game Instance then cast to BP_ScoreGameInstance and connect that cast to eventBeginplay.
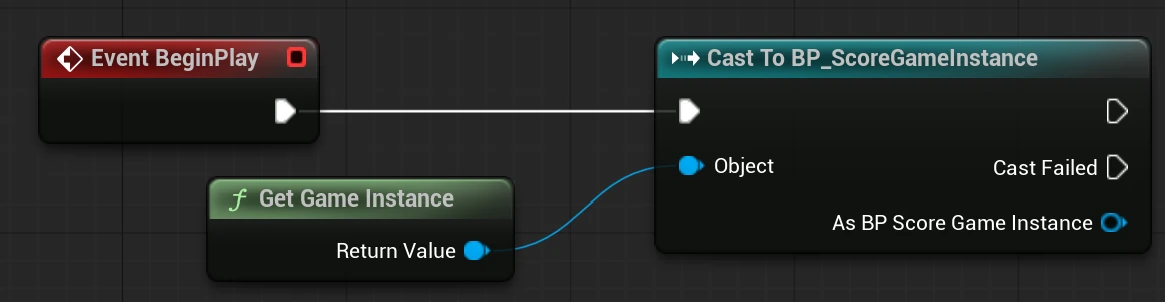
Now this part is completely temporary just to fill in our score without a gameplay system doing that for us. Once you incorporate a scoring system in your game you can delete this part.
open BP_ScoreGameInstance and create a new function (like before) and call it GenerateTestScore.
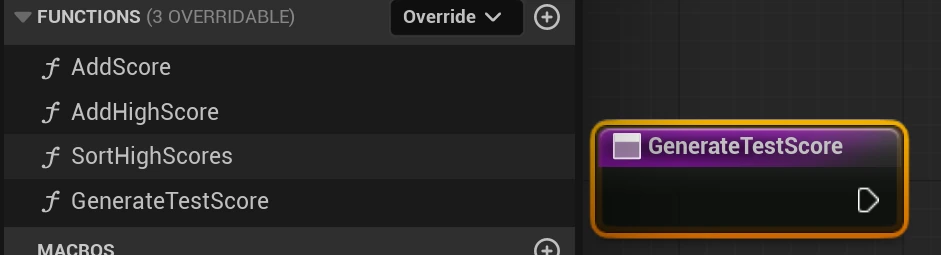
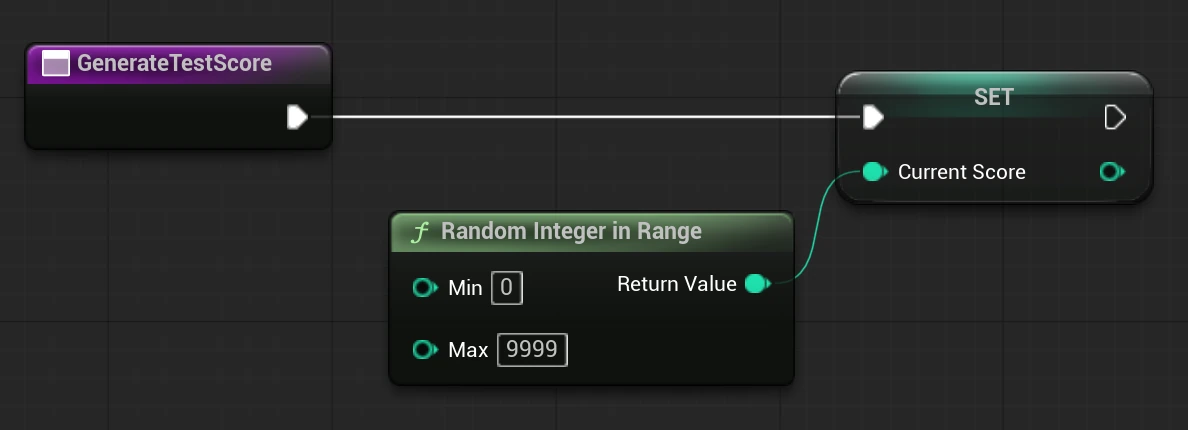
Right click and add a random integer in range and set min to 0 and max to 9999.
Set current score and connect the random integer to the set.
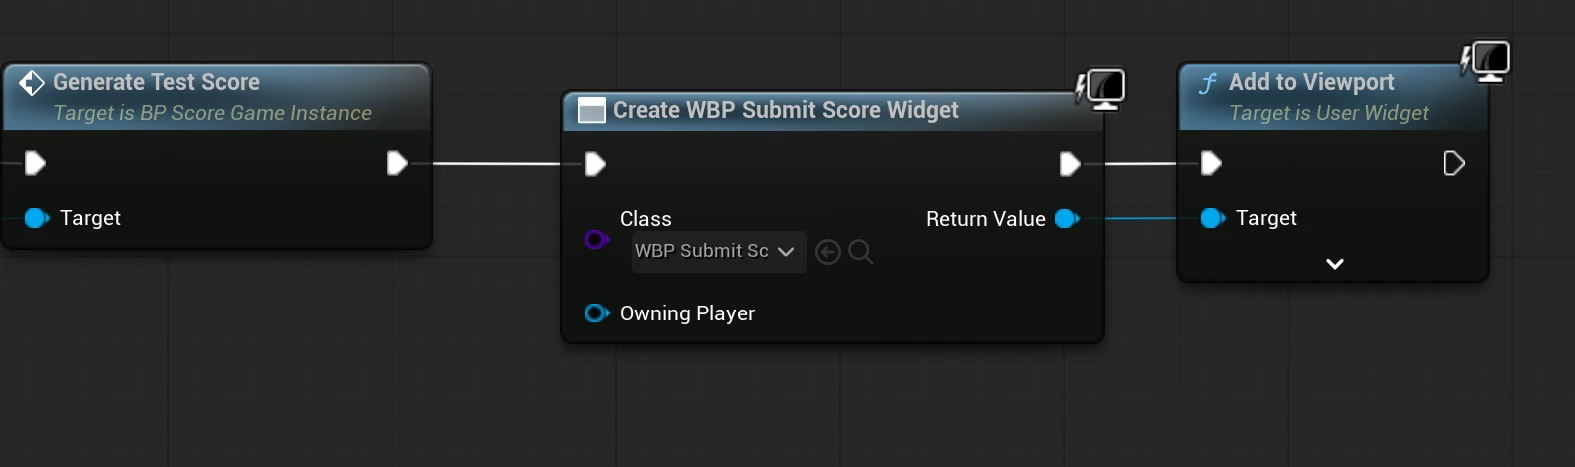
Return to the level blueprint and from the cast as bp_scoreGameInstance drag out and add generate test score.
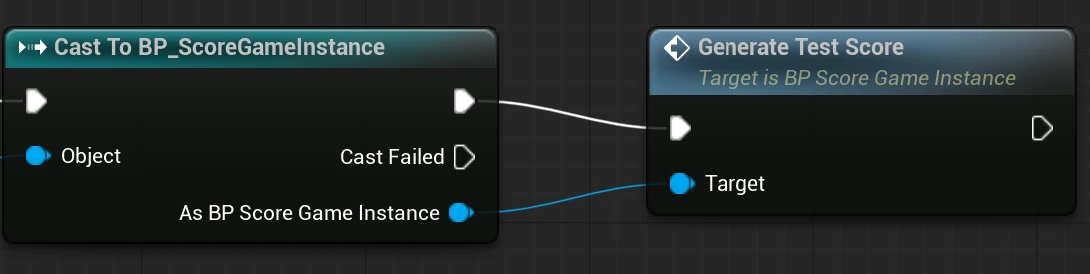
From there add create widget “WBP_SubmitScore” > add to viewport
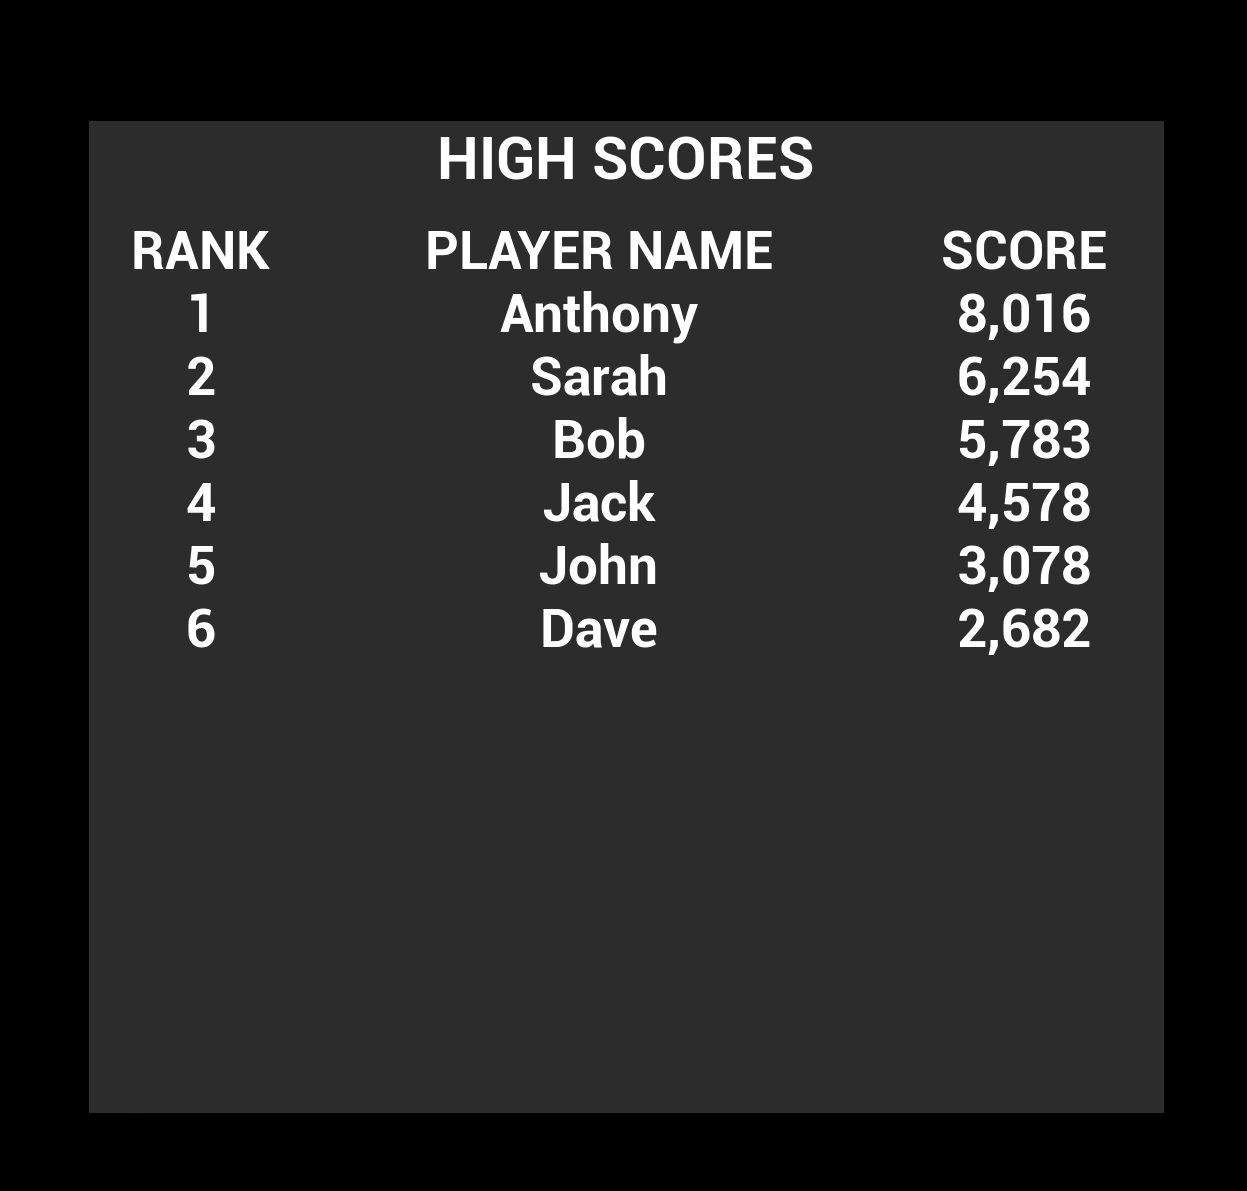
Sarah       1200
Anthony      750
Dave         450
Open the scoreboard and make sure the scores appear correctly.
Completely close the game.
Launch the game again.
Open the scoreboard.
If the scores are still there, congratulations! You have created a persistent high score system.
This is an important test because simply restarting a level is not enough. Remember that the GameInstance survives level changes, so we want to make sure the information is actually being loaded from the SaveGame file.

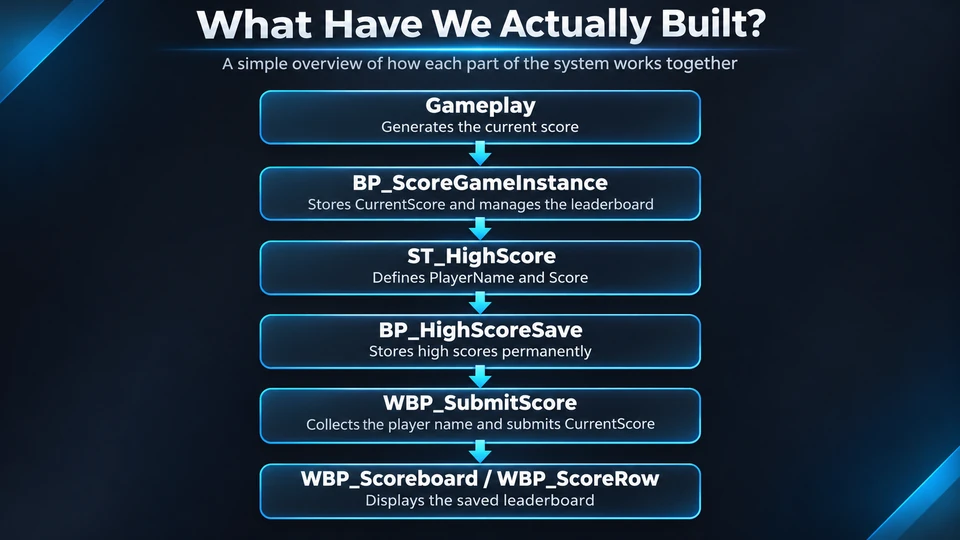
What Have We Actually Built?
Although this is a fairly simple system, we have used several important Unreal Engine concepts together.
Our final system looks like this:
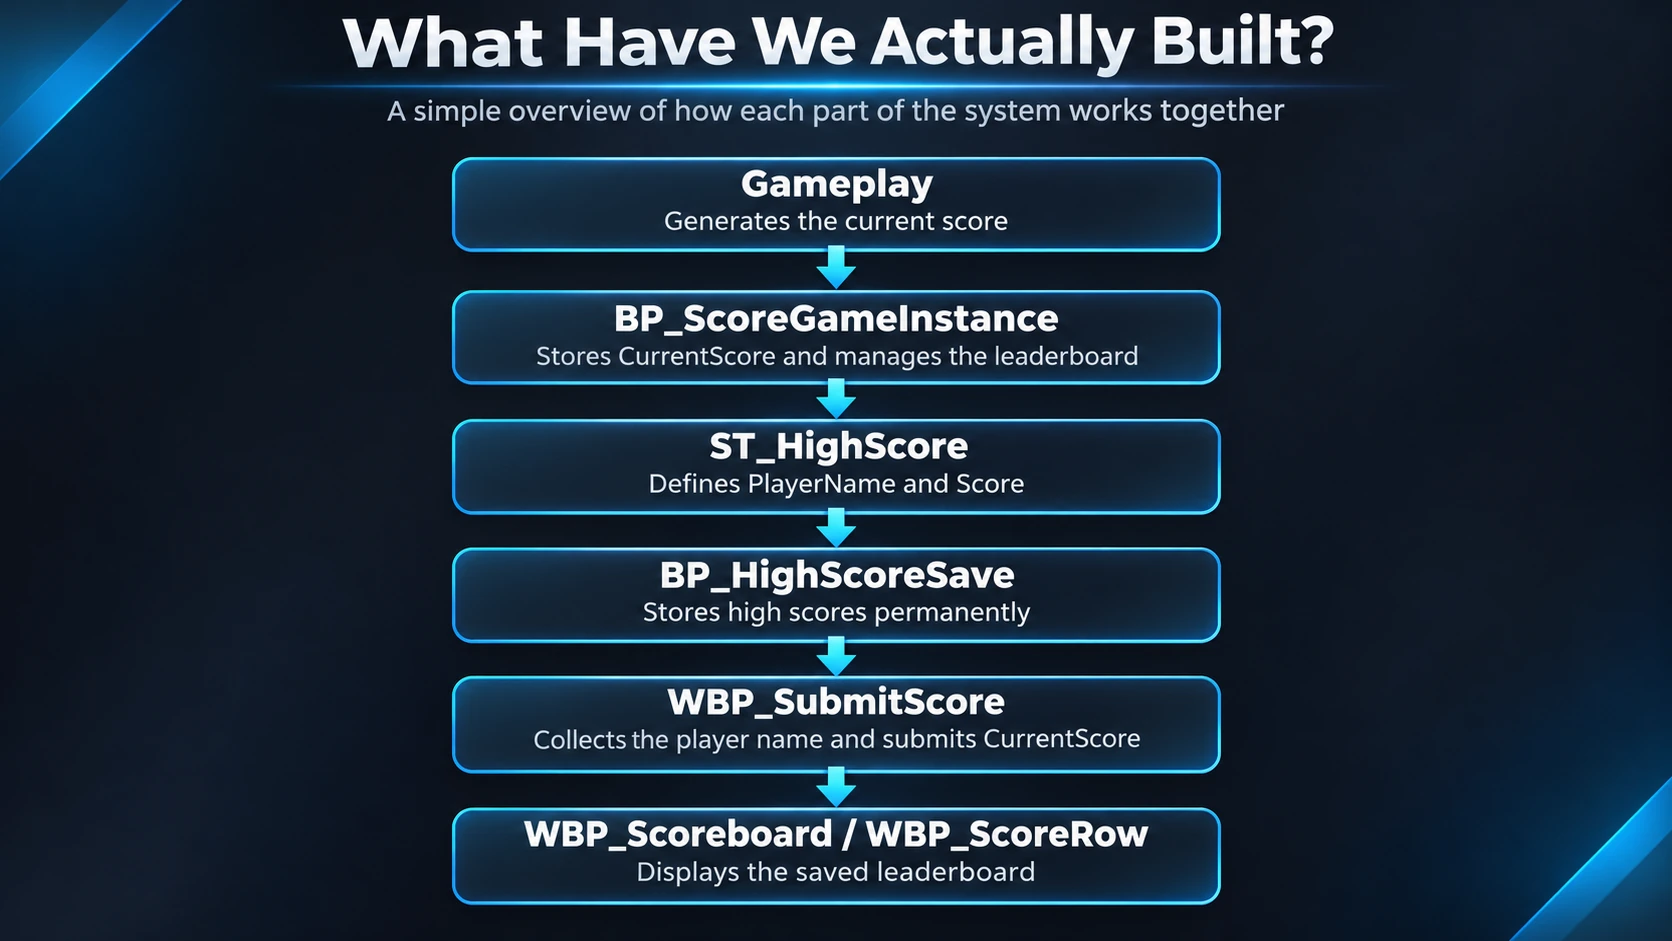
The important lesson here is that each part of the system has one clear responsibility.
The gameplay system generates the player's current score.
The Widget Blueprints handle player input and presentation.
The GameInstance manages the current score and leaderboard logic.
The SaveGame Blueprint handles persistence between game sessions.
The Struct defines the information stored for each high score entry.
Once you understand that separation, the same approach can be adapted for far more than a leaderboard. Player settings, unlocked levels, achievements, inventory information, progression data and other persistent game systems can all use similar principles.
For now though, we have something much more important.
Bragging rights that survive restarting the game.
KEEP A COPY
Download the complete PDF tutorial
The illustrated 37-page guide is available as a PDF, including the original Blueprint screenshots and step-by-step instructions. Keep it beside Unreal Engine or use it offline.
Download the illustrated tutorial (PDF, 37 pages) ↓Prefer to watch? Watch the video walkthrough on YouTube ↗.