Updated: This Tutorial has been updated to work with UE5.6+
Originally published: 15/12/2023
Why?
Having a swimming mechanic will add a lot of volume to any game. In the vast expanse of game design, the inclusion of a swimming mechanic not only expands the horizons of gameplay but also delves into uncharted depths of immersion. By integrating swimming mechanics, game worlds become boundless oceans teeming with exploration opportunities. Imagine traversing expansive bodies of water, uncovering hidden treasures beneath the waves, or embarking on epic underwater quests. The addition of swimming mechanics introduces a dynamic dimension to gameplay, enabling players to access locations that would otherwise be unreachable.
Required Files
Retargeted animations from mixamo:
Process
Setting up the level and adding the water body.
To swim we of course need a body of water to use. So we need to enable the water plugin. Goto Edit > plugins and search water. Enable water (experimental) and then restart the editor.

When the engine restarts if you see this error make sure you scroll the the left and click on the add entry to Defaultengine.ini – this is important! (however its stated as of UE5.6 you should no longer have to add entries to the defualtengine.ini file, however if you check collision presets on the waterbody and the preset for water is not there you will need to add this entry.)

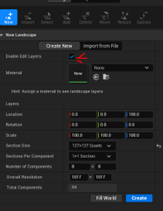
Create a basic level > remove the floor > add a basic landscape and enable edit layers.
Now we have our land scape lets add water, go to the quick add > all classes > type water > water body ocean. (or water of your choice)

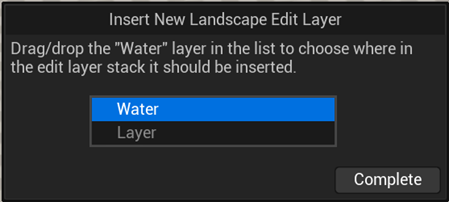
UE5.6+:
when adding the waterbody to the landscape you will now get an insert new landscape edit layer.
make sure that water layer is above the landscape layers. This will prevent changes to the landscapes height map from being directly affected by the water.
If you have a problem where you cant see the water or a beach etc, it maybe the position of your waterbody and the landscape. You may need to make sure they overlap by selecting them in the outliner and moving them around and adjusting the height.
Once you can see it lets adjust the area by making a small island, to do this we can adjust the area by clicking and then moving the splines > lets just make a small island.

When we enter the water we can not swim. That’s because we don’t have anything setup to tell it how to work. If you end up walking on top of the water click on the water body in the outliner, select the physics tab and scroll down till you see Collison presents. change this option to WaterBodyCollisions

UE5.6+: This may appear as WaterMeshCollision instead, If you are not seeing either you may need to check your error log>load errors and if it does have one about collision profile settings click add entry to defaultengine.ini. reload the level you are editing and check again for the collision setting.
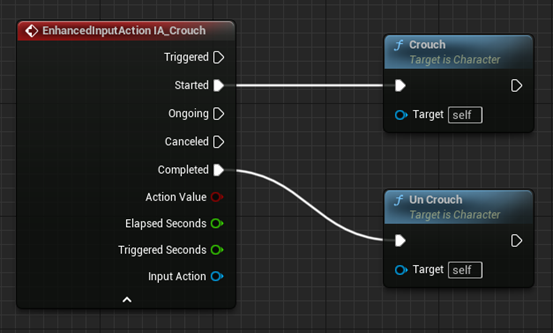
Setting up the character blueprint
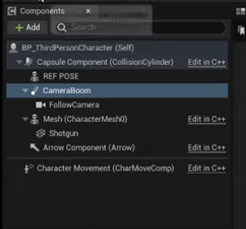
Open the Character blueprint you are using.
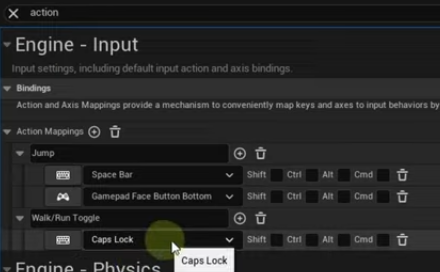
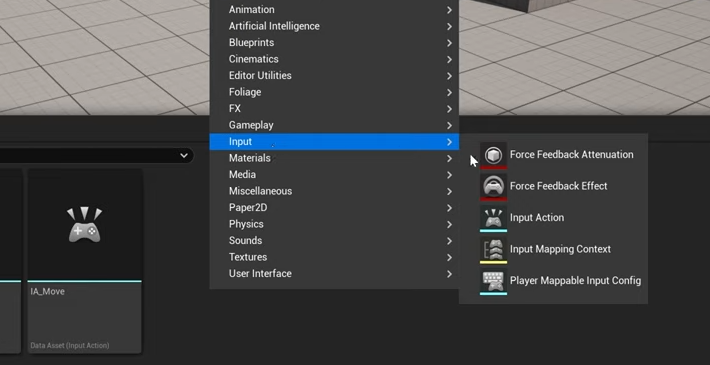
Create two custom events called Start swimming and Stop swimming.
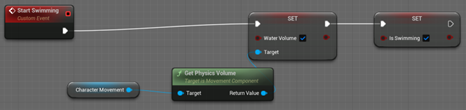
Lets create start swimming first, get character movement from the components menu and drag it just below the event.

from the movement node > Get player volume > set water volume > Tick water volume >

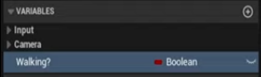
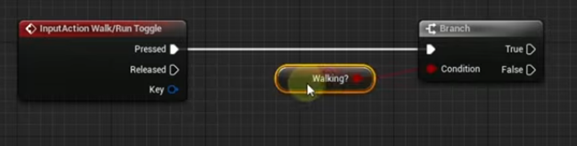
Create a new var isSwimming (boolean) > Connect it to the water volume > Tick isSwimming?
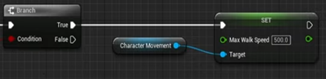
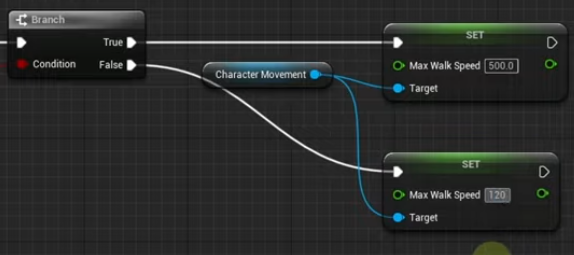
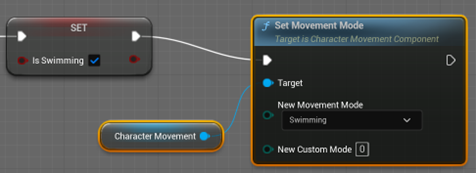
From the set swimming > Change movement mode > add character movement > change movement mode to swimming
Copy and paste everything except the event and connect it to the stop swimming. {Untick the water volume and isSwimming? And change movement mode to walking)

Swimming movement.
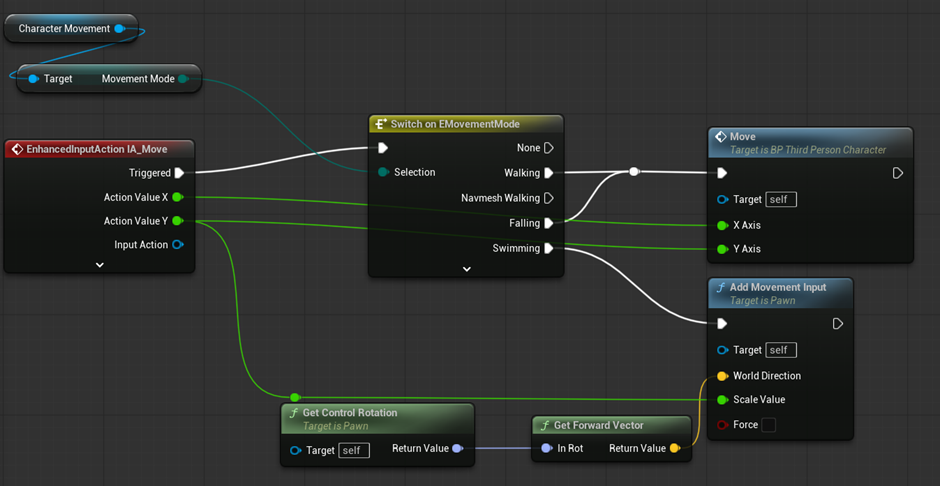
Next we need to modify the movement input (this is already in the blueprint.)
Find the movement input section of the blueprint and drag the IA_Move node to the left to make some space
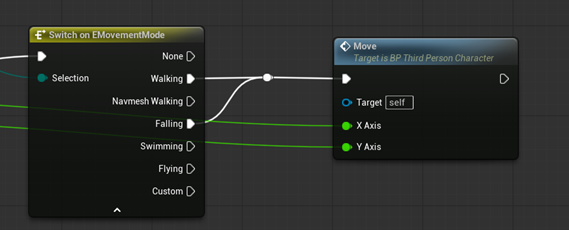
We are going to drag in the character movement from the components section > Get movement mode > switch on EMovementMode

Connect IA_move to the Emovementmode. Click on the reveal arrow and Connect walking pin and falling pin to the existing movement blueprint. (you can make a junction/move joint and connect falling there)

Copy and paste the add movement input below the existing one.
UE5.6+: You will not have an existing movement input node;
Right Click and add movement input below the existing move function.
Get control rotation > Get forward vector > World orientation (new movement input)

Connect the swimming option from our movementmode to the movement input

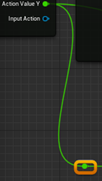
Connect the Y axis from the IA_Move to the movement input.

Compile and save.
UE5.6+: When completed the function should look like this.
Setting up the water body.
If we were to test the function of swimming now nothing would really happen as we have yet to tell the game when to start and when to stop the swimming events. To do this we need to go back to the main screen and in the outliner select WaterBodyOcean.

Under details and next to the add button click on the blueprint button and a create blueprint dialog box will open up.
UE5.6+:
The button is now labelled “Create Blueprint from This”.
It may appear at the top of the Details panel instead of next to Add.

Leave the name if you would like and click on the select button and the blueprint will be created. The blueprint should open. Select event graph and delete event tick.
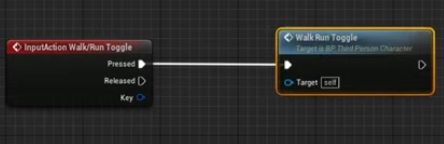
We now need to add a new event called ActorEndOverlap to get this event you may have to click on the ActorBeginOverlap event already on the blueprint.
ActorBeginOverlap > Cast to BP_ThirdPersonCharacter (or what ever is your character blueprint) > As BP thirdperson > Start swimming.
Repeat this process for the ActorEndOverlap however instead of Start swimming do Stop swimming.
(Don’t forget to connect the other actor pin from the overlap event to the object pin on the cast.)

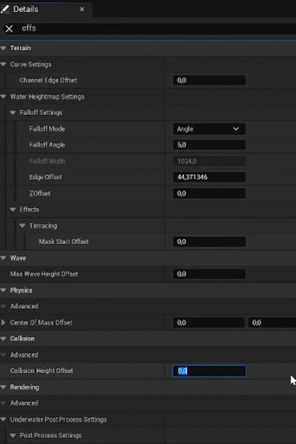
while we are here we also should change the collision value; If we leave out this step when our feet touch the water you will change to swimming animation in mid air which can ruin immersion of the game. Make sure you have the parent waterbody selected in components then In the details pane search for offset. Navigate down to collision and change the collision height offset. Lets start with -70 but you may need to adjust this to your liking.
Compile, save and return to the level tab.
If you find the water has disappeared, select one of the spline nodes and move it slightly.
We are now going test this (ignore the animation for now) you will also notice your character is sliding around a lot.
Lets fix it.
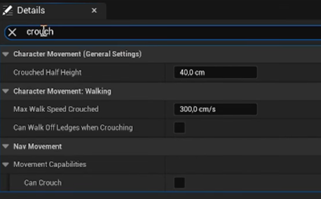
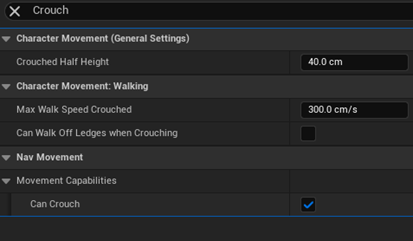
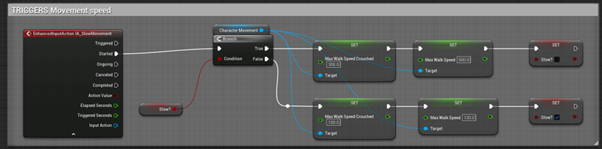
Open the Character BP, select character movement from the components tab and then under the details tab search for swimming.
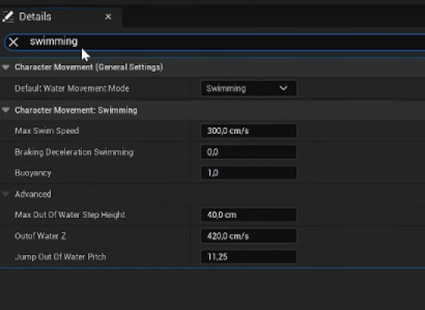
I feel our swim speed is ok; however, let’s change our braking deceleration swimming to make it feel a little more natural; we will change it to 150 however depending on your game this is your call as to what you set it to.
Setting up the Animation Blendspace
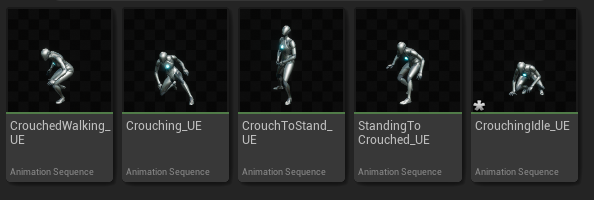
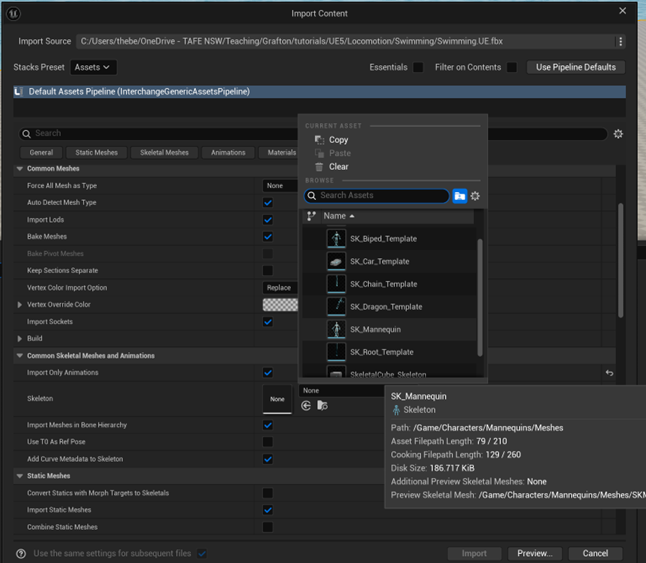
In our Main Animations folder Create a new one call swimming and import our swimming animations Swimming and TreadingWater.
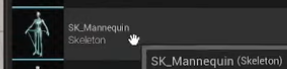
An import content window will appear and all we need to do is scroll down and under the skeleton drop down select the correct skeleton to target, since we are using the 3rd person template we will use SK_Mannequin. The animation files are also retargeted animations from mixamo.
UE5.6+: The below section has refers to the removed the import translation settings in animation files, The nearest fix is when importing animations search for a function called snap to closest frame boundary and skip to creating the Animation Blendspace.
Once we have imported the animations we need to make a change to the TreadingWater animation otherwise when we are treading water at the surface the water level will be at the hip height of the character.
Open TreadingWater and on the left hand side menu find transform you may need to expand it.
We want to change the last value which is the Z value of import translation to -50 then at the top click reimport animation you will notice the mannequin shift position. You can change this value depending on your preferences.


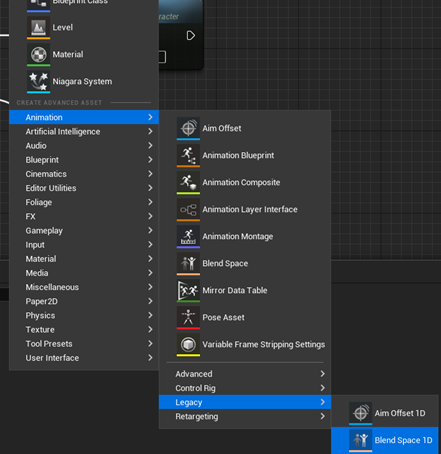
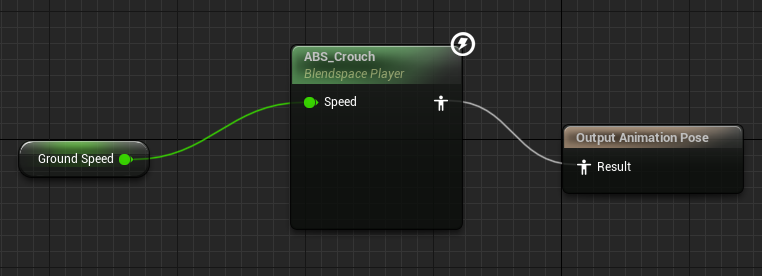
Go back a step and create a new animation blendspace and call it ABS_Swimming


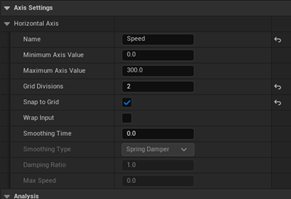
Open up ABS_Swimming and Under the Asset details tab find the horizontal axis and change the name to Speed and set the Maximum Axis Value to the speed you set in the blueprint. Default is 300. Also change your grid divisions to 2 and select snap to grid.
Now on the right under asset browser find your Swim idle and drag it to the left side of the time line and then find your Swimming and drag it to the right side of the timeline.
If you hold Left CTRL and move your mouse over the time line the animation should play.
Save and Exit.
Setting up the Animation.
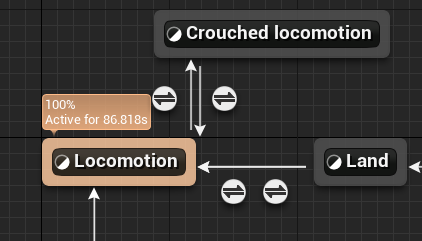
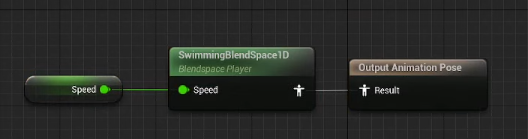
Open animation BP > Main state machine add new state Swimming.

open it > add ABS_Swimming > result > speed > right click and promote to variable (to save a little time rename this variable SwimSpeed)
Use the back button to go back to the main states section of the animGraph and Create a new variable(bool) called Swimming (if its already being used call it swim.)
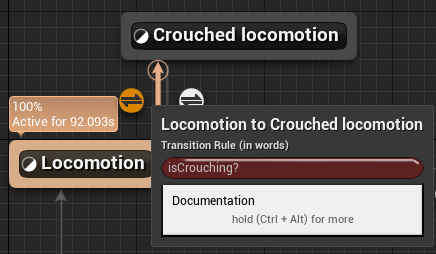
Create transition lines from and to the main locomotion state by dragging from one to the other
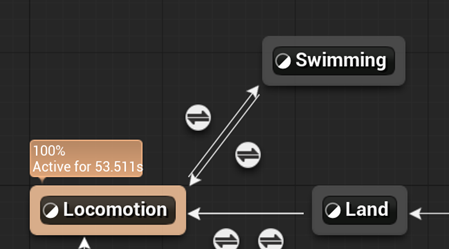
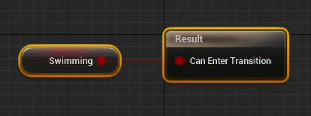
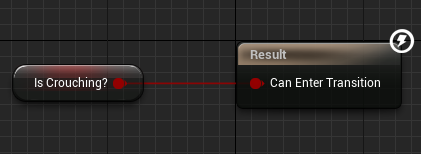
The transition will be controlled by the swimming Var. So click on the transition rule button; for locomotion to swimming the swimming bool is all you need to enter the transition.
for the transition from swimming back to locomotion place the swimming bool from that drag out and get the NOT Bool Var then connect that to enter transition.

Save.
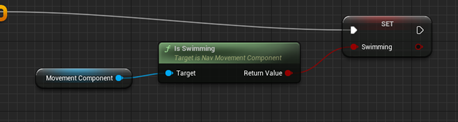
Goto the event graph and on the Sequence add a new pin. Add a new movement component > get is swimming and set swimming.
We now need to setup how our the engine determines the speed of the character.
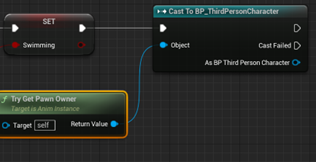
From set swimming > Cast to BP_ThirdPersonCharacter.

From thirdperson object > Try Get Pawn Owner
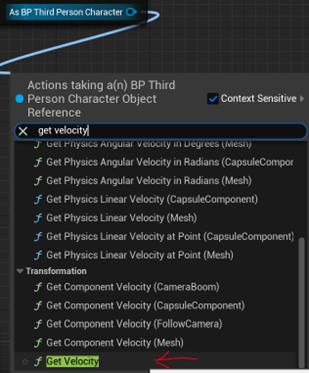
From thirdperson as BP third person character> Get velocity (scroll down find it under transformation) > Vector length > Set speed and connect the cast BP third person to set speed(SwimSpeed).

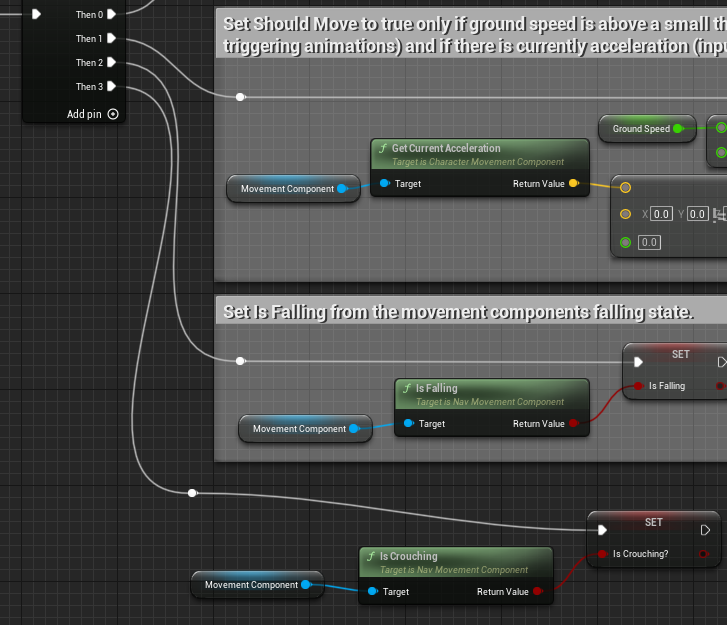
Now we need to go into our AnimGraph and add a swimming > not >AND (may need to create this Drag from the NOT and search AND Boolean) > Should Do IKTrace (control rig)

UE5.6+:
- “Should Do IKTrace” might now appear under a different category because Control Rig nodes were reorganised.
- The graph may default to Structured View, hiding some nodes.
You might need to disable “Show Only Compatible Nodes” to find the Boolean NOT/AND nodes.
Another note is if you are using control rig 2.0 the IK Foot-trace pipeline has been upgrading meaning you may need to use a different node name or you may need to disable it entirely for swimming states.
However;
Now when we enter the water the swimming animation should happen, note you may need to go back and adjust the collision to your liking.
You could also setup a few more animations to smooth out the transitions this is up to you.
Conclusion
With the implementation of a swimming mechanic, you’ve unlocked a new realm of possibilities within your game world. Just as the vast oceans hold unexplored territories and hidden treasures, your game now offers players the chance to dive into untold adventures. While your swimming mechanic may require further refinement to align perfectly with your vision, it serves as a solid foundation for bringing your aquatic landscapes to life. Whether it’s navigating through sunken ruins or discovering secret underwater realms, your players will embark on journeys beyond their wildest imagination. Embrace the endless potential of your newfound aquatic frontier, and watch as your game evolves into an immersive experience like no other.
Additional
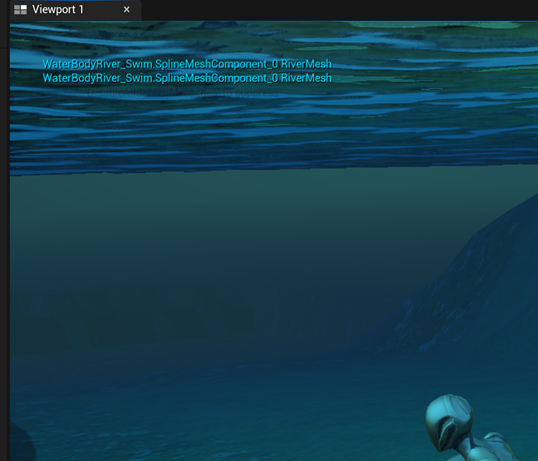
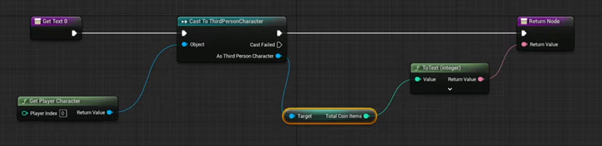
If you are trying to swim between two different bodies of water say a lake and a river the overlap will end you will need to include a function in your waterbody blueprint like this
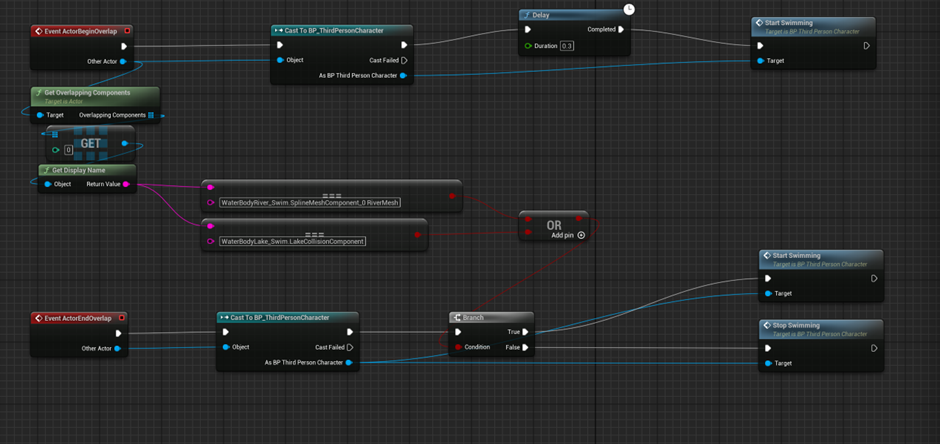
The names for the overlap that is connected from the display name can be found by doing a print string from get display name, when you are testing it will print the names out. Screen shot them and then add them to your absolute equal nodes. You will need to do this for all overlapping waterbodies. For rivers that operate on splines you will need to specify the spline number that overlaps the lake or ocean.